The Secret to Perfect No-Bake Orange Cream Cheesecake (Tested Recipe)

Orange cream cheesecake brings back that nostalgic bite of summer with its perfect blend of bright citrus and smooth vanilla flavors. If you’re a fan of those classic creamsicle treats from childhood, this dessert will absolutely delight your taste buds. I’ve tested and perfected this no-bake orange creamsicle cheesecake recipe to create an impressive yet surprisingly simple dessert that’s ideal for warm weather entertaining.
This swirled creation is not only visually stunning but also delivers the perfect marriage of zesty orange and velvety vanilla-infused cheesecake. In fact, the no-bake orange cream cheesecake requires minimal effort while still creating a decadent yet light and fluffy dessert that’s sure to impress guests. With a chilling time of 6-8 hours (overnight works best in my experience), this refreshing treat is worth the wait. Throughout this guide, I’ll share all my tested secrets for creating the perfect no-bake orange cream cheesecake from crust to garnish.
Choosing the Right Crust for Your No-Bake Cheesecake
The foundation of your no-bake orange cream cheesecake starts with selecting the perfect crust. Unlike baked cheesecakes, no-bake crusts lack those toasty flavors that develop in the oven, therefore choosing the right cookie base becomes even more crucial for a flavorful dessert.
Graham crackers vs. vanilla wafers vs. Golden Oreos
Traditional graham crackers create a reliable crust, requiring about 12 full sheets to yield approximately 1.5 cups (180g) of crumbs. However, many dessert enthusiasts find unbaked graham cracker crusts somewhat bland on their own.
Golden Oreos, on the other hand, offer a game-changing alternative that elevates no-bake crusts with their sweet filling and buttery cookie. For a standard 9-inch cheesecake, you’ll need 35 Golden Oreos (about 3 cups or 403g of crumbs) mixed with 5 tablespoons (70g) of melted butter. This combination creates a decadent base that pairs wonderfully with the orange cream flavors.
Vanilla wafers provide another excellent option, particularly when making fruity desserts like our orange cream cheesecake. You’ll need approximately 60-70 standard-sized Nilla wafers for a typical pie crust. Additionally, digestive biscuits or Biscoff cookies can introduce caramel notes that complement citrus fillings beautifully.
How to get the perfect crust texture
The secret to a sturdy no-bake crust lies in proper proportions. For graham crackers, the ideal ratio is 2 cups (240g) of crumbs to 1 stick of butter with 1/4-1/3 cup sugar. Interestingly, brown sugar works better than granulated sugar as its moisture helps solidify the crust.
Your cookie crumbs should resemble fine sand—large chunks prevent proper binding. After adding melted butter, the mixture should look like wet sand and hold together when pressed. Though initially crumbly, it will stick together once pressure is applied.
Tips for pressing and setting the crust
Start by pressing the crumbs up the sides of your springform pan first, subsequently working toward the middle. Use the bottom of a measuring cup or drinking glass rather than your fingers—this creates a more even, compact surface without sticking.
Apply medium pressure when compacting the crust. Pressing too lightly leaves it crumbly; too firmly makes it dense and difficult to slice. Create slightly rounded edges where the bottom meets the sides instead of sharp angles—this prevents separation when cutting your orange cream cheesecake later.
Once pressed, refrigerate your crust for at least 30 minutes before adding the orange cream cheesecake filling. This crucial chilling time allows the butter to solidify, creating a sturdy foundation that won’t crumble when serving your masterpiece.
Making the Orange Cream Cheesecake Filling
The heart of any no-bake orange cream cheesecake lies in its dual-layered filling—a creamy vanilla base intertwined with vibrant orange swirls. Creating this perfect filling requires attention to detail, especially regarding temperature and mixing techniques.
Cream cheese mixture: ingredients and texture tips
For the perfect cream cheese base, you’ll need room temperature cream cheese—leave it out for at least 30-60 minutes before starting. Cold cream cheese results in a lumpy filling, so this step is non-negotiable. Beat the cream cheese with granulated sugar until fluffy, then incorporate vanilla extract for that classic creamsicle foundation.
Some recipes incorporate sour cream for tanginess, whereas others use sweetened condensed milk for extra creaminess. Pro tip: To quickly soften cream cheese in a pinch, unwrap it completely and microwave in 10-second intervals, testing between each until soft but not melted.
Orange jello layer: dissolving and cooling properly
The orange component typically starts with orange gelatin (jello) whisked with boiling water until completely dissolved. Mix in orange zest for authentic flavor and intensity. Importantly, the jello mixture must cool completely to room temperature (about 20 minutes) or chill for 5 minutes in the refrigerator before continuing. If the mixture is too warm when combining with other ingredients, it will deflate your whipped cream, resulting in a runny filling.
Folding in whipped cream without deflating
Freshly whipped cream is the secret behind the airy, mousse-like texture of no-bake cheesecake. After beating heavy cream with confectioners’ sugar until stiff peaks form, you’ll divide it between your cream cheese mixture and orange jello mixture. Fold gently using a rubber spatula rather than an electric mixer—this preserves the air bubbles that provide structure. Mix just until combined; overmixing deflates the cream, resulting in a dense rather than fluffy texture.
Balancing orange and vanilla flavors
The classic creamsicle appeal comes from balancing tangy-sweet orange with smooth vanilla notes. Furthermore, orange zest intensifies the citrus flavor without adding excess liquid. For stronger orange flavor, consider incorporating fresh orange juice or replacing some vanilla extract with orange extract. The vanilla component shouldn’t overpower the orange—they should complement each other harmoniously, creating that nostalgic creamsicle flavor profile we all remember.
Layering and Swirling for the Perfect Look
Creating visual magic in your no-bake orange cream cheesecake is where artistry meets delicious reality. Alternating vanilla and orange layers creates that stunning visual appeal that makes guests reach for their phones before taking a bite.
How to alternate layers for visual appeal
When working with orange cream cheesecake, begin by dividing your prepared batter into thirds – one vanilla layer and two orange-tinted portions. Pour the first layer into your prepared crust, carefully smoothing it with an offset spatula. Add the second layer gently to prevent mixing, applying it slowly with a spoon to maintain separation.
For truly defined layers, piping works better than pouring. I’ve found that using a piping bag (or zip-top bag with the corner snipped) gives much more control. Start piping from the center and work outward until you fill the space. Between layers, wipe the inside edges of your mold with a damp paper towel to remove excess filling above each layer.
Swirling techniques that work
For a basic but effective swirl, pipe dots of orange filling in a spiral pattern over vanilla batter, then drag a toothpick through to create a beautiful effect. Alternatively, embrace a more casual presentation with swoops and swirls for a rustic yet beautiful finish.
For marbled effects, drizzle your orange mixture over the vanilla base, then use a skewer to swirl in an “S” pattern. Don’t overdo it—just a few gentle motions create the most attractive patterns. The key principle: less is more when swirling.
Common mistakes to avoid during assembly
Avoid these common pitfalls during assembly:
- Overmixing your swirls – this creates muddy colors instead of distinct patterns. Just a few gentle movements with your skewer are sufficient.
- Pouring layers too quickly – this causes lower layers to mix into upper ones. Pour slowly and deliberately.
- Using hot or completely set gelatin – for layered cheesecakes with gelatin, timing is crucial. The mixture should be cool but still pourable, neither hot liquid nor fully set.
By creating distinct layers and artistic swirls, your no-bake orange cream cheesecake becomes as visually captivating as it is delicious. These techniques elevate a simple dessert into a showstopper worthy of any special occasion.
Chilling, Serving, and Garnishing
Patience becomes your secret ingredient once your orange cream cheesecake is assembled. This final phase transforms your creation from a soft mixture into a sliceable dessert masterpiece.
How long to chill for best results
Proper setting requires adequate refrigeration time – generally at least 6-8 hours, although overnight chilling (12 hours) yields the best results. This extended cooling period allows the filling to firm up completely, resulting in clean, beautiful slices. For especially sturdy texture, aim for 12 hours of refrigeration time. Ultimately, this makes the orange cream cheesecake an ideal make-ahead dessert for entertaining.
Serving suggestions and slicing tips
Prior to serving, allow your orange cream cheesecake to sit at room temperature for 10-15 minutes to achieve the smoothest texture. For clean, professional-looking slices, run a sharp knife under hot water, wipe dry, and slice. Repeat this process between each cut to prevent dragging through the filling. To remove the cheesecake from the springform pan, carefully run a knife around the edge first, next release the ring, and finally transfer to a serving platter.
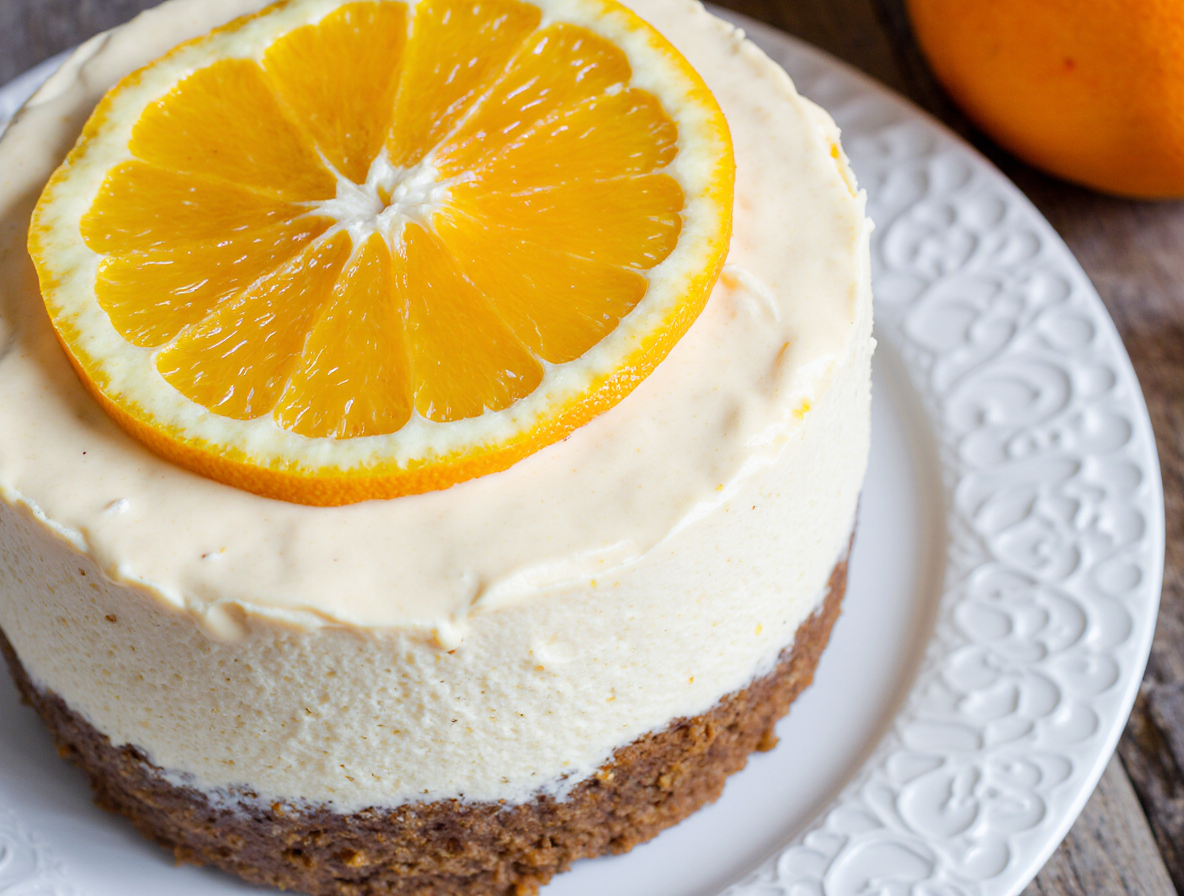
Garnish ideas: whipped cream, zest, orange slices
Enhance your orange cream cheesecake with these complementary garnishes:
- Fresh whipped cream piped along the edges with halved strawberries
- Orange zest sprinkled across the top for vibrant color and aroma
- Decorative orange slices or mandarin segments arranged artfully
- Fresh berries for a burst of color alongside the orange flavor
- Chocolate drizzle for an indulgent touch
Storage and freezing instructions
Keep leftover orange cream cheesecake tightly covered in the refrigerator for up to 5 days, although the crust may begin softening after 4 days. For longer storage, freeze the cheesecake by wrapping it tightly in plastic wrap followed by aluminum foil. This preservation method works for up to 3 months. When ready to enjoy, thaw overnight in the refrigerator for the best texture restoration.
Conclusion
This no-bake orange cream cheesecake truly captures the essence of those beloved creamsicle treats from childhood. After testing this recipe numerous times, I can confidently say that success lies in the details. Certainly, your choice of crust sets the foundation—Golden Oreos provide the most flavorful base, though vanilla wafers work beautifully with the citrus notes as well.
Temperature management remains crucial throughout the process. Room temperature cream cheese prevents those frustrating lumps, while properly cooled orange jello mixture preserves the airy texture we’re after. Additionally, gentle folding techniques keep your filling light and mousse-like rather than dense and heavy.
The visual appeal of this dessert comes from patience during assembly. Therefore, take your time with the layering and swirling—those distinct orange and vanilla patterns make this cheesecake as beautiful as it is delicious. Likewise, adequate chilling time transforms your creation from soft mixture to sliceable perfection, so resist the urge to rush this step.
What makes this dessert particularly special is its versatility. You can prepare it days ahead for entertaining, customize the garnishes based on the season, or even freeze portions for future enjoyment. Though the preparation seems involved, each step is surprisingly simple when broken down.
Finally, remember that this no-bake orange cream cheesecake shines brightest when shared. The combination of vibrant citrus, creamy vanilla, and buttery crust creates a dessert that’s both nostalgic and sophisticated. So gather your ingredients, clear some refrigerator space, and treat yourself to this refreshing showstopper that delivers summer in every bite.
FAQs
Q1. How long does it take to make a no-bake orange cream cheesecake? While the actual preparation time is relatively short, the cheesecake needs to chill for at least 6-8 hours, preferably overnight (12 hours), for the best results. This makes it an ideal make-ahead dessert for entertaining.
Q2. What’s the secret to getting a smooth, lump-free cheesecake filling? The key is to use room temperature cream cheese. Leave it out for 30-60 minutes before starting. If you’re short on time, you can unwrap the cream cheese and microwave it in 10-second intervals until soft but not melted.
Q3. Can I freeze this no-bake orange cream cheesecake? Yes, you can freeze the cheesecake for up to 3 months. Wrap it tightly in plastic wrap followed by aluminum foil. When ready to eat, thaw it overnight in the refrigerator for the best texture.
Q4. What’s the best way to create distinct layers in the cheesecake? For well-defined layers, use a piping bag or a zip-top bag with the corner snipped. Start piping from the center and work outward. Between layers, wipe the inside edges of your mold with a damp paper towel to remove excess filling.
Q5. How can I enhance the orange flavor in the cheesecake? To intensify the orange flavor, you can add orange zest to the filling. For an even stronger taste, consider incorporating fresh orange juice or replacing some of the vanilla extract with orange extract. The key is to balance the orange and vanilla flavors for that classic creamsicle taste.