The Secret to Perfect No-Bake Chocolate Cherry Cheesecake (Tested Recipe)
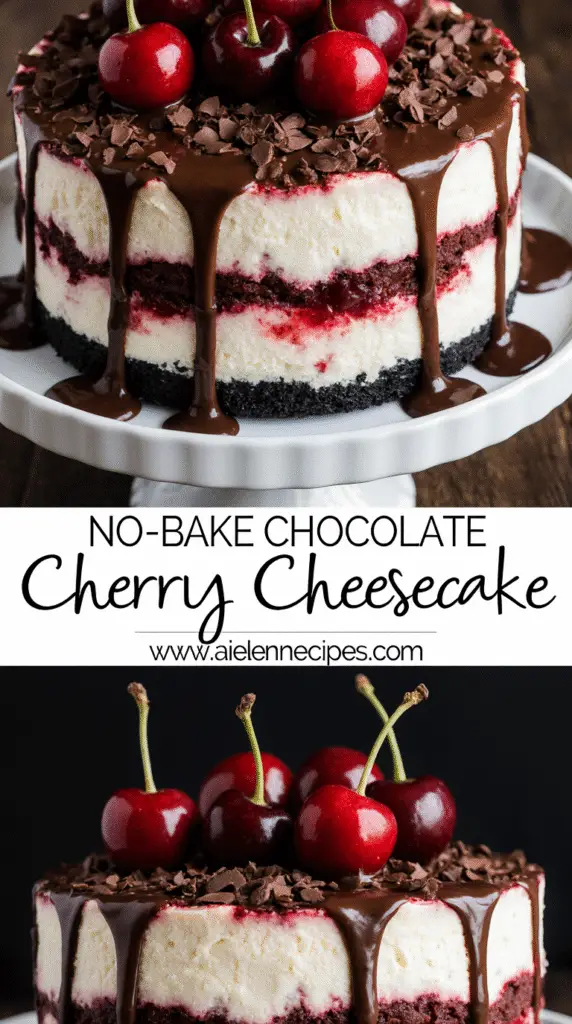
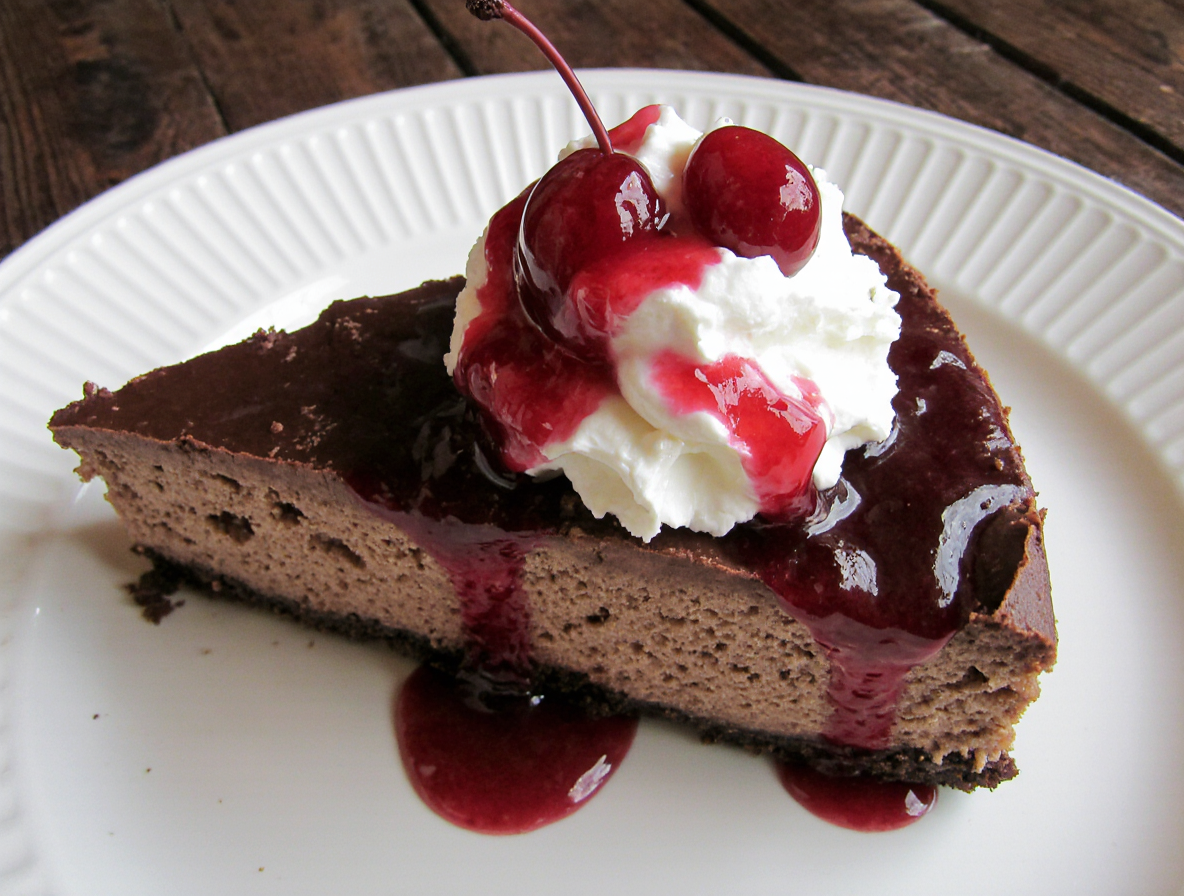
Chocolate cherry cheesecake has become my absolute obsession, particularly the no-bake variety that slices like a dream while delivering that perfect balance of flavors. This decadent dessert features a dense yet silky chocolate filling atop a buttery chocolate wafer crust that delightfully evokes the familiar taste of Oreos.
If you’ve avoided making cheesecake because of “all that baked cheesecake baking drama,” then this no-bake chocolate cherry cheesecake recipe is exactly what you need. The beauty of no-bake cheesecake is that it simply relies on refrigeration to firm up the cream cheese filling—no eggs required. Furthermore, the cherry compote creates a delectable match for all that richness, offering deep red fruit flavor with satisfying jammy texture.
In this guide, I’ll share my tested method for creating these layered beauties with their perfect combination of chocolate and cherry elements. From the crunchy cookie base to the creamy chocolate filling loaded with juicy cherries and topped with chocolate whipped cream, we’ll cover every step to ensure your dessert is both stunning and delicious. Whether you’re a seasoned baker or a novice in the kitchen, this no-bake chocolate cherry cheesecake will quickly become your go-to impressive dessert.
Choosing the Right Ingredients for Flavor and Texture
The magic of a perfect chocolate cherry cheesecake lies in selecting quality ingredients that work together to create that irresistible texture and flavor. Let me share what I’ve discovered through extensive testing.
Best chocolate for a rich filling
When it comes to creating a decadent chocolate filling, not all chocolate is created equal. I strongly recommend using chocolate bars rather than chips for your no-bake chocolate cherry cheesecake. Bars melt more smoothly and provide better structure as they cool. For the best results, choose semi-sweet or dark chocolate with at least 55% cocoa solids. The higher percentage actually helps your cheesecake set properly and delivers a deeper chocolate flavor.
My go-to options include Ghirardelli 60% Cacao, Guittard, or Lindt bars. If you’re in a pinch, HERSHEY’S SPECIAL DARK chips can work, but you won’t get quite the same silky texture. Remember that the chocolate plays two crucial roles: it provides the signature flavor and helps structure your cheesecake as it cools and firms up.
Fresh vs. canned cherries
The cherry debate is real! Sweet cherries come in varieties like deep red Bing, bright red Lambert, and lighter Royal Ann. Sour varieties like Morello and Montmorency are typically found canned rather than fresh.
Fresh cherries have superior texture and flavor compared to canned versions. They maintain a delicious bite rather than becoming mushy, and deliver a more authentic cherry taste without that artificial sweetness canned cherries sometimes have.
Cherry season runs from late May through early August, peaking in June and early July. When selecting fresh cherries, look for plump, dark-colored fruit with firm stems—the darker the cherry, the sweeter it will be. For convenience, frozen cherries work beautifully too, especially in the off-season.
Cream cheese types: block vs. spreadable
This is non-negotiable: use only block-style, full-fat cream cheese for your no-bake cheesecake. Philadelphia cream cheese consistently delivers the best results. Spreadable cream cheese contains additives that prevent proper setting, and low-fat varieties have higher water content that results in a runny texture.
For the perfect chocolate cherry cheesecake, you’ll need 24 ounces (three 8-ounce bricks) of room temperature cream cheese. Allowing it to soften before mixing ensures a smooth, lump-free filling.
Optional add-ins: almond extract, chocolate chips
Almond extract pairs beautifully with cherry flavors, enhancing the overall taste profile. A touch of vanilla extract adds warmth, while lemon juice brings brightness that balances the richness.
For texture contrast, consider folding mini chocolate chips into your filling—they distribute more evenly than regular chips, ensuring chocolate in every bite. Some bakers add sour cream for that signature cheesecake tang, and confectioners’ sugar not only sweetens but also helps thicken the filling.
Step-by-Step: Making the Perfect No-Bake Chocolate Cherry Cheesecake
Now that we’ve gathered our quality ingredients, let’s dive into the hands-on part of creating this velvety chocolate cherry masterpiece. The process is straightforward yet requires attention to detail for that perfect balance of textures.
1. Prepare the chocolate cookie crust
Start by lining an 8-inch springform pan with parchment paper or foil, ensuring it extends over the sides for easy removal later. Place 22 chocolate sandwich cookies (regular Oreos, not Double-Stuf) in a food processor and pulse until finely ground. Add 5 tablespoons of melted butter and process until the mixture resembles wet sand. Pour this mixture into your prepared pan and press firmly using the bottom of a flat glass to create an even layer. Place the crust in the freezer while preparing the filling to help it set properly.
2. Whip the chocolate cream filling
In a large bowl, beat 24 ounces of room temperature cream cheese until completely smooth—this step is crucial for a lump-free cheesecake. Add sugar and a splash of lemon juice, mixing until well combined. The lemon juice isn’t just for flavor; it actually helps the filling set properly. Meanwhile, measure chocolate chips into a shallow heat-resistant bowl. Heat heavy whipping cream until simmering, then pour over the chocolate. Cover for 5 minutes, subsequently stir until smooth, and let cool slightly.
3. Fold in melted chocolate and whipped cream
Once the chocolate ganache has cooled but is still fluid, whip it vigorously with a hand mixer until it becomes light and somewhat stiff. This creates the perfect chocolate base for our filling. In another bowl, whip cold heavy cream until stiff peaks form. Gently fold the whipped chocolate into the cream cheese mixture until no streaks remain, followed by carefully incorporating the whipped cream. This dual-folding technique maintains maximum airiness while ensuring a rich chocolate flavor throughout.
4. Assemble and chill the cheesecake
Spread the chocolate filling evenly over your frozen crust. For the cherry element, either swirl cherry compote through the top layer or spread it evenly across the surface. Cover the cheesecake with plastic wrap and refrigerate for a minimum of 6 hours, though overnight chilling yields the best texture and flavor development. This patient waiting period allows all components to meld beautifully together, creating that signature creamy-yet-firm no-bake texture.
Toppings and Presentation Tips
The visual appeal of your chocolate cherry cheesecake can elevate it from homemade dessert to showstopping centerpiece. Presentation makes all the difference in creating that “wow” moment when you bring your creation to the table.
How to make a cherry compote topping
Initially, prepare a luscious cherry compote by combining pitted cherries with sugar, cornstarch, and lemon juice in a saucepan. Cook over medium heat, stirring frequently until the cherries become juicy. Once the mixture begins to boil, stir constantly and continue boiling for a full minute to activate the cornstarch. This timing is critical for achieving that perfect glossy consistency. After cooling completely, this vibrant topping stores beautifully in the refrigerator for up to two weeks.
Using chocolate whipped cream for decoration
Chocolate whipped cream adds a sophisticated finishing touch that complements both the chocolate and cherry elements. To create this silky decoration, whip cold heavy cream until it begins to thicken, consequently add cocoa powder and sugar. For best results, pipe the whipped cream immediately after making it to maintain its airy texture. The cream holds its shape beautifully when piped but can deflate if left sitting too long. Use a piping bag with a star tip to create elegant swirls around the perimeter of your cheesecake.
Garnishing with chocolate chips or shavings
For an elegant finishing touch, consider these simple yet effective garnishing options:
- Grate or shave chocolate directly onto the cheesecake surface or press pieces into the sides
- Create chocolate decorations by piping warm chocolate into cold water, forming unique shapes
- Place fresh cherries atop swirls of whipped cream for a classic look
Creating a swirl effect with cherry filling
To create that professional marble look, dollop spoonfuls of cherry puree over the cheesecake filling, afterwards use a knife edge to create figure-8 patterns throughout the batter. For an even more dramatic effect, reserve some cherry puree to swirl on top just before serving. This technique not only looks impressive but distributes bursts of cherry flavor throughout each slice.
Storage, Serving, and Make-Ahead Tips
Perfect chocolate cherry cheesecake deserves proper storage to maintain its delicious taste and texture. After all your hard work, these practical tips will help you enjoy this treat at its best.
How long it keeps in the fridge
Your no-bake chocolate cherry cheesecake will stay fresh in the refrigerator for 3-4 days when stored in an airtight container. Some sources suggest it may last up to 7 days, however, the biscuit base typically begins to soften around the 4-day mark. For optimal freshness and flavor, I’ve found it’s best within the first 36 hours, although the taste remains excellent even after several days. Additionally, components like fruit toppings may spoil more quickly than the cheesecake itself.
Freezing instructions
Indeed, no-bake chocolate cherry cheesecake freezes beautifully for up to 3 months. For best results, chill the cheesecake completely first, subsequently wrap it tightly in two layers of plastic wrap followed by a layer of aluminum foil. You can freeze the entire cheesecake or individual slices – the latter being more practical for enjoying portions later. Moreover, freezing individual slices allows for quicker thawing. Always thaw frozen cheesecake overnight in the refrigerator rather than at room temperature to prevent condensation and sogginess.
Best way to slice and serve
For picture-perfect slices, use a hot chef’s knife, rinsing it under hot water between cuts. This prevents the filling from sticking to the blade. Furthermore, wiping the knife clean between each slice ensures neat presentation. Carefully slide a pie server under the crust, making sure it reaches all the way to the tip of each wedge. The first slice might be challenging to remove cleanly, so be patient.
Make-ahead timeline for parties
No-bake chocolate cherry cheesecake is an ideal make-ahead dessert. Prepare it 1-2 days before your event for optimal texture and flavor. Alternatively, you can:
- Assemble the crust up to 2 days ahead and refrigerate until needed
- Make the complete cheesecake up to 36 hours before serving
- Add toppings like fresh fruit or whipped cream just before serving
Conclusion
This no-bake chocolate cherry cheesecake truly stands as a testament to how spectacular desserts don’t always require complicated techniques or hours in the kitchen. The combination of rich chocolate filling, buttery cookie crust, and tangy cherry topping creates a dessert that tastes professionally made yet remains surprisingly approachable.
After testing countless variations, I’ve found that quality ingredients make all the difference. Full-fat block cream cheese provides structure, while real chocolate bars deliver superior flavor and texture compared to chips. Fresh cherries offer the best flavor when available, though frozen cherries work wonderfully during off-seasons.
Perhaps the greatest advantage of this recipe lies in its flexibility. You can prepare it days ahead for special occasions, store leftovers in the refrigerator for several days, or even freeze portions for future cravings. The lack of baking not only simplifies the process but also eliminates common cheesecake pitfalls like cracking or sinking.
My family requests this dessert for nearly every gathering, and guests always ask for the recipe. The striking appearance—with those vibrant cherry swirls against creamy chocolate—belies how straightforward the preparation actually is. Next time you need an impressive dessert without turning on your oven, this chocolate cherry cheesecake awaits as your perfect solution. One bite of this silky, flavorful creation will certainly convince you that some of the best desserts require patience rather than heat.
FAQs
Q1. What’s the secret to a perfect no-bake chocolate cherry cheesecake? The secret lies in using quality ingredients like full-fat block cream cheese, real chocolate bars, and fresh or frozen cherries. Also, allowing sufficient chilling time (at least 6 hours, preferably overnight) is crucial for the perfect texture and flavor development.
Q2. Can I make this cheesecake ahead of time for a party? Absolutely! This no-bake cheesecake is an ideal make-ahead dessert. You can prepare it 1-2 days before your event for optimal texture and flavor. The crust can be assembled up to 2 days ahead, and the complete cheesecake can be made up to 36 hours before serving.
Q3. How long does the no-bake chocolate cherry cheesecake keep in the fridge? The cheesecake will stay fresh in the refrigerator for 3-4 days when stored in an airtight container. For the best taste and texture, it’s recommended to consume it within the first 36 hours, although it remains delicious for several days.
Q4. What’s the best way to slice and serve this cheesecake? For perfect slices, use a hot chef’s knife, rinsing it under hot water between cuts. This prevents the filling from sticking to the blade. Wipe the knife clean between each slice for neat presentation. Use a pie server to carefully remove each slice, ensuring you reach all the way under the crust.
Q5. Can I freeze this no-bake chocolate cherry cheesecake? Yes, you can freeze this cheesecake for up to 3 months. Chill it completely first, then wrap it tightly in two layers of plastic wrap followed by a layer of aluminum foil. You can freeze the entire cheesecake or individual slices. Always thaw frozen cheesecake overnight in the refrigerator to prevent condensation and sogginess.