No-Bake Mini Oreo Cheesecakes: The Foolproof 15-Minute Recipe You’ll Love
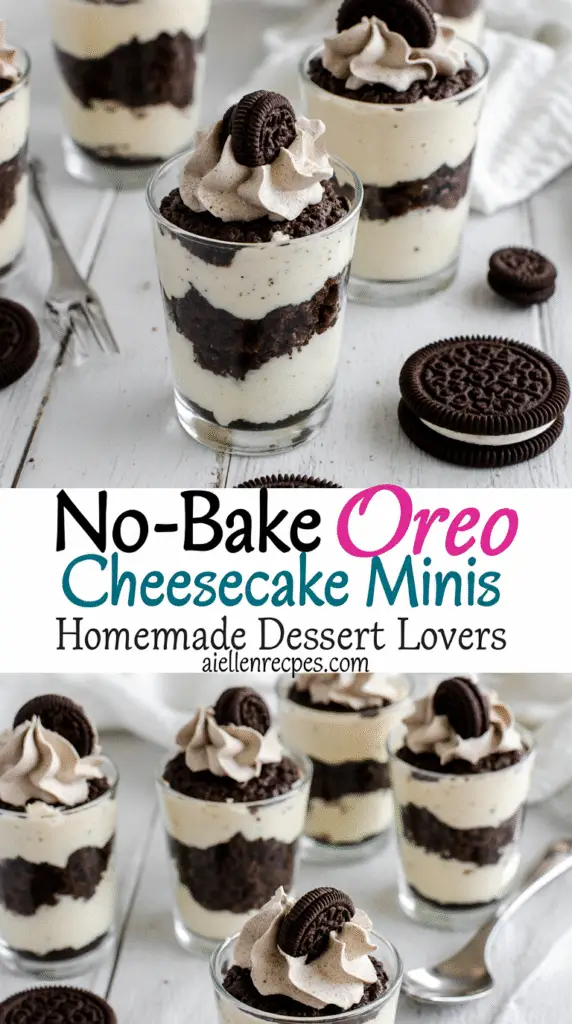
Craving delicious no bake mini Oreo cheesecakes but don’t want to deal with complicated baking? These ridiculously easy 4-ingredient treats are the perfect solution for satisfying your dessert cravings without turning on the oven. They’re undoubtedly an Oreo lover’s dream – loaded with cookies and cream flavor, yet surprisingly simple to prepare.
We’ve perfected this mini Oreo cheesecake recipe no bake method to be completely foolproof. Actually, you only need a few basic ingredients to create these statement desserts. The mini no bake Oreo cheesecake approach means you’ll get perfectly portioned treats that are ideal for sharing at parties or enjoying whenever your sweet tooth strikes. Besides being delicious, these cheesecake bites feature a classic Oreo crust topped with creamy Oreo-studded filling.
In this guide, I’ll walk you through my no bake mini Oreo cheesecake recipe step by step. You’ll learn exactly what ingredients you need, how to prepare them without any baking, and importantly, the best tips for ensuring they set properly after chilling. Whether you’re a beginner or experienced baker looking for a quick dessert win, these mini cheesecakes will become your new go-to treat.
Ingredients You’ll Need for Mini Oreo Cheesecakes
Looking at these no bake mini Oreo cheesecakes, you might think they require a long shopping list. In reality, they need just a handful of quality ingredients that combine to create something magical. Let’s break down everything you’ll need to make these delectable treats.
Oreo cookie crumbs and butter for the crust
The foundation of any good mini Oreo cheesecake is, naturally, the Oreo crust. You’ll need approximately 20-24 regular Oreo cookies to make enough crumbs for 12 mini cheesecakes. I crush mine in a food processor until they’re fine crumbs, though a ziplock bag and rolling pin work perfectly too. Don’t remove the cream filling—it adds sweetness and helps bind the crust.
For the butter component, 4-5 tablespoons of melted unsalted butter will bind your cookie crumbs. The butter should be just melted, not bubbling hot. This combination creates that classic, slightly crunchy yet firm base that perfectly complements the creamy filling.
Cream cheese, sugar, and vanilla for the filling
The star of these no bake mini Oreo cheesecakes is undeniably the filling. Start with 16 ounces (two standard blocks) of full-fat cream cheese. I strongly recommend full-fat because it produces a richer, more stable texture. Additionally, ensure your cream cheese is at room temperature—this prevents those dreaded lumps in your filling.
You’ll need about ½ cup of granulated sugar to sweeten the filling, along with 1 teaspoon of pure vanilla extract. The vanilla enhances the cream cheese flavor without overpowering the Oreo elements. Furthermore, a pinch of salt balances the sweetness and brings out all the flavors.
Heavy cream and powdered sugar for whipped topping
For that cloudlike texture, 1 cup of cold heavy whipping cream whipped with 2-3 tablespoons of powdered sugar creates the perfect topping. The powdered sugar not only sweetens but also stabilizes your whipped cream. Essentially, this component lightens the dense cream cheese mixture, resulting in that airy, mousse-like consistency everyone loves.
Optional: chopped Oreos for extra texture
While not strictly necessary, adding 8-10 coarsely chopped Oreo cookies to your filling transforms these treats from good to extraordinary. The varied texture creates delightful surprises in each bite. Moreover, you can reserve some chopped cookies for garnishing the tops before serving. Apart from this, consider crushing some cookies more finely to fold into the whipped topping for subtle flavor enhancement throughout.
With these simple ingredients, you’re all set to create impressive mini Oreo cheesecakes that taste like they came from a professional bakery—no baking required!
Step-by-Step: How to Make No-Bake Mini Oreo Cheesecakes
The beauty of these no bake mini Oreo cheesecakes lies in their simplicity. Let me walk you through the straightforward process that will have you enjoying these treats in no time.
1. Prepare the Oreo crust
Begin by adding Oreo cookies to a food processor or blender and pulse until you have fine, even-sized crumbs. There’s no need to remove the cream filling—it actually helps bind the crust. For 12 mini cheesecakes, you’ll need about 22 regular Oreos (not Double-Stuf).
Once your cookies are crushed, transfer the crumbs to a bowl and pour in 5 tablespoons of melted butter. Mix thoroughly until the mixture resembles wet sand. The key test: when pressed between your fingers, it should hold its shape.
Line a 12-cavity cupcake pan with paper liners and divide the crust mixture evenly among them (about 1 tablespoon per cup). Press firmly into the bottoms using the back of a spoon or the bottom of a measuring cup. This compacting step is crucial for preventing a crumbly crust.
2. Mix the cheesecake filling
In a medium bowl, beat room temperature cream cheese with sugar until smooth and creamy. This is where patience pays off—beat at low speed first to prevent splashing, then increase to high.
Separately, whip cold heavy cream until stiff peaks form. This step is absolutely vital for achieving that perfect cheesecake texture. The air incorporated during whipping will give your cheesecakes their light, mousse-like consistency.
Gently fold the whipped cream into the cream cheese mixture. The folding technique matters—use a spatula and be careful not to deflate the air you’ve worked to incorporate.
3. Assemble the cheesecakes
For extra Oreo flavor, crush additional cookies and fold them into your cheesecake mixture. You can leave some pieces larger for texture contrast—aim for marble to pea-sized pieces.
Transfer the filling to a piping bag with a large round tip (or simply snip the end off a plastic bag) for easier filling. Pipe or spoon the mixture evenly into each cupcake liner, filling them almost to the top.
Use the back of a spoon to create decorative swoops and swirls on top if desired. These natural texture elements add visual appeal without requiring any special decorating skills.
4. Chill to set the filling
Place the filled cupcake liners in the refrigerator for at least 4-6 hours. For best results and clean slices, overnight chilling is ideal.
The chilling process is non-negotiable—it allows the filling to properly set and develop flavor. During this time, the texture will transform from soft to perfectly sliceable.
After chilling, your no bake mini Oreo cheesecakes are ready to enjoy! They can be stored in the refrigerator for up to 5 days.
Tips to Make This Mini No Bake Oreo Cheesecake Foolproof
Making perfect no bake mini Oreo cheesecakes isn’t complicated, yet certain techniques make all the difference between good and exceptional results. After making these countless times, I’ve discovered several foolproof tips that guarantee success every time.
Use room temperature cream cheese
Starting with room temperature cream cheese is absolutely crucial for achieving a smooth, lump-free filling. Cold cream cheese will not incorporate properly with other ingredients. Allow your cream cheese to sit at room temperature for about 60 minutes before beginning. However, for safety reasons, never leave cream cheese out longer than two hours as it can become a breeding ground for bacteria.
Need to soften cream cheese quickly? Try cutting it into small cubes and spreading them out on a plate for 20-30 minutes, or microwave unwrapped cream cheese in 10-second bursts for about 30-40 seconds total.
Whip the cream until stiff peaks form
Always start with cold heavy whipping cream straight from the refrigerator. Whip it until it reaches stiff peaks – meaning when you lift the beaters, the cream stands straight up without curling over. This step is non-negotiable as it creates the air needed for that fluffy, mousse-like texture in your cheesecakes.
Fold gently to keep the filling light
Once you’ve whipped your cream, fold it into the cream cheese mixture with a light hand. Harsh mixing will deflate the air you’ve incorporated, resulting in a denser, less appealing texture. The gentler you fold, the lighter your cheesecakes will be.
Chill for at least 4 hours or overnight
Patience pays off with these mini treats. They need adequate time to set properly in the refrigerator – a minimum of 4-5 hours. For best results, leave them overnight. Rushing this step will result in soft, messy cheesecakes instead of perfectly firm, sliceable treats.
Use cupcake liners for easy removal
Cupcake liners are more than just decorative – they’re functional. They make removing the mini cheesecakes from the pan significantly easier. Some bakers even recommend lightly greasing the liners for truly effortless removal. Paper liners typically work better than foil ones for these cheesecakes.
Following these five simple yet critical techniques will elevate your no bake mini Oreo cheesecakes from merely good to absolutely flawless every single time.
Storage, Freezing, and Serving Suggestions
These perfectly portioned no bake mini Oreo cheesecakes deserve proper storage to maintain their delectable texture and flavor. First of all, let’s explore how to keep them fresh after preparation.
How to store in the fridge
For optimal freshness, arrange your mini no bake Oreo cheesecakes in a single layer within an airtight container. Seal tightly to prevent them from absorbing other food odors in your refrigerator. Properly stored, these treats will stay fresh for 3-4 days, although some sources suggest they can last up to 5 days. Notably, it’s best to keep them refrigerated until ready to serve since they begin to soften at room temperature after about 30-60 minutes.
Freezing instructions for longer storage
To freeze these mini cheesecakes for future enjoyment, start by placing them on a baking sheet lined with parchment paper and freezing until firm [221]. Subsequently, transfer them to a freezer-safe container or resealable bag. For extra protection, individually wrap each mini cheesecake in plastic wrap, then aluminum foil. Properly frozen, these treats will maintain quality for 1-2 months, with some sources suggesting up to 3 months [212]. To thaw, place them in the refrigerator overnight or for at least 5-8 hours. Importantly, never thaw at room temperature.
When to add toppings for best texture
Given these points about storage, the timing of adding toppings becomes crucial. For best results, wait to add whipped cream, extra Oreo crumbs, or whole Oreos until just before serving. This prevents toppings from becoming soggy. Even if preparing the cheesecakes a day ahead, save the garnishing step for the final moment.
Serving ideas for parties or events
For presentation, consider removing the cupcake liners before serving—this makes them more accessible and visually appealing. Complement these mini treats with:
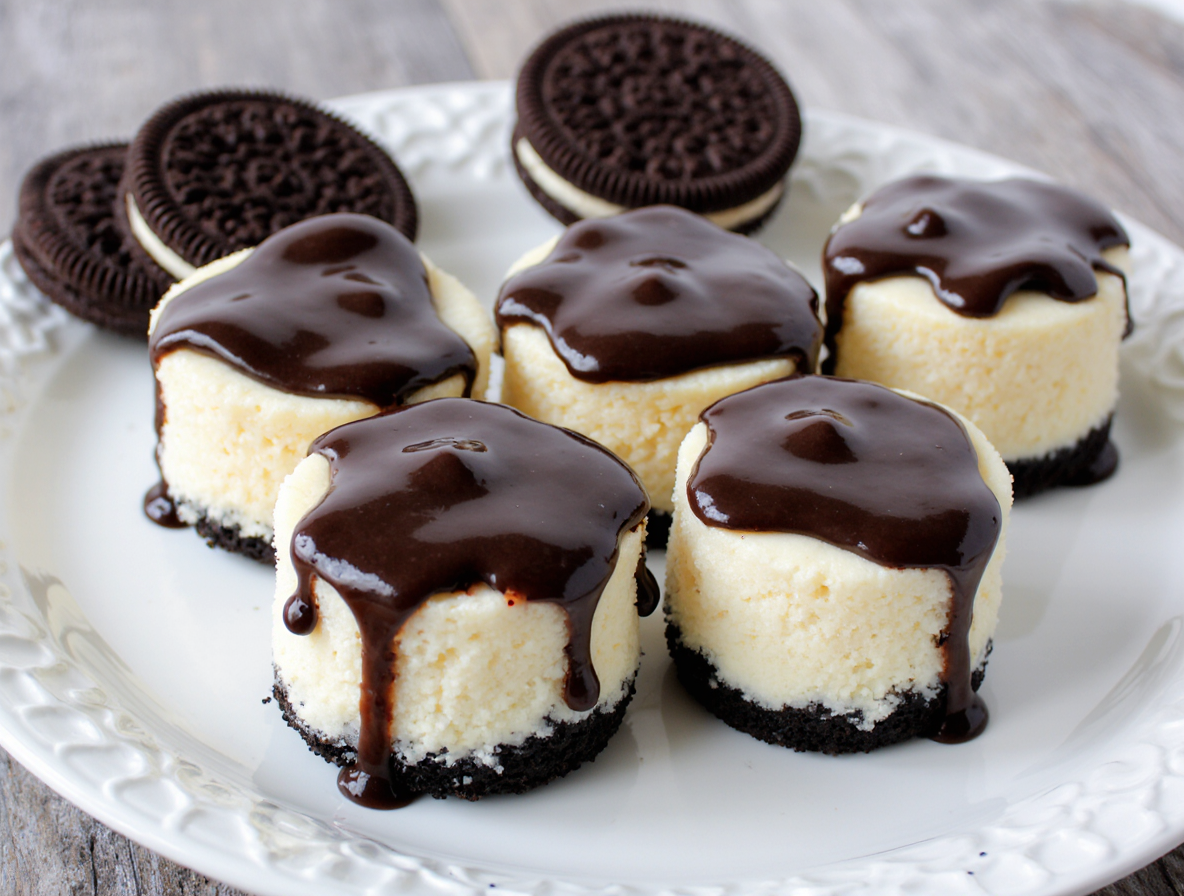
- A glass of cold milk or vanilla ice cream
- Homemade hot fudge sauce
- Fresh berries and mint leaves for color contrast
- Lemon curd or fruit preserves for flavor variation
With proper storage techniques, your no bake mini Oreo cheesecake recipe will remain delicious from preparation through the final bite.
Conclusion
These no-bake mini Oreo cheesecakes truly represent the perfect balance between simplicity and decadence. Throughout this guide, we’ve seen how just a handful of quality ingredients transform into an impressive dessert without any baking required. Most importantly, the techniques—from properly crushing Oreos to gently folding in whipped cream—make all the difference between good and exceptional results.
Patience certainly pays off with this dessert. While the preparation takes only 15 minutes, allowing proper chilling time rewards you with perfectly set cheesecakes that slice beautifully and taste even better. Additionally, their make-ahead nature makes them ideal for busy hosts who want to prepare desserts days before an event.
The versatility of these mini treats cannot be overstated. They work equally well for casual family desserts, elegant dinner parties, or potluck contributions. You can certainly customize them with different toppings or presentations depending on the occasion.
After making this recipe once, it will undoubtedly become part of your regular dessert rotation. The combination of that classic Oreo crust, creamy filling studded with cookie pieces, and the perfect individual portion size creates an irresistible treat that pleases everyone. Best of all, you’ll never stress about oven temperatures, water baths, or cheesecake cracks again!
Give these no-bake mini Oreo cheesecakes a try next time your sweet tooth strikes or guests are coming over. The foolproof method ensures success every time, while the delicious results will have everyone asking for your secret recipe.
FAQs
Q1. How long do these no-bake mini Oreo cheesecakes need to chill? For best results, chill the mini cheesecakes for at least 4-6 hours, or preferably overnight. This allows the filling to set properly and develop its full flavor.
Q2. Can I freeze these mini Oreo cheesecakes? Yes, you can freeze these cheesecakes for longer storage. Wrap them individually and store in an airtight container. They’ll maintain quality for up to 2 months in the freezer.
Q3. What’s the secret to getting a smooth cheesecake filling? The key is using room temperature cream cheese and gently folding in whipped cream. This ensures a lump-free, light, and airy texture in your cheesecake filling.
Q4. How many mini cheesecakes does this recipe yield? This recipe typically makes 12 mini Oreo cheesecakes, perfect for individual servings or sharing at gatherings.
Q5. Can I add extra toppings to these mini cheesecakes? Absolutely! You can add whipped cream, extra Oreo crumbs, or whole Oreos as toppings. For best results, add these just before serving to maintain their texture and freshness.