
How to Make Authentic Mexican Chicken Tostadas in 15 Minutes (Using Rotisserie Chicken)
Need a chicken tostada recipe that won’t keep you in the kitchen all evening? You’re in luck! These delicious Mexican chicken tostadas can be on your table in just 15 minutes.
Actually, the secret to this quick meal is using a rotisserie chicken from the store. I recommend grabbing one from Costco, where they’re tasty, large, and typically priced at around $4.99. Besides being affordable, a store-bought rotisserie chicken can go a long way, making these rotisserie chicken tostadas both economical and flavorful. This Mexican chicken tostadas recipe is surprisingly versatile, making it perfect for picky eaters. Furthermore, if you’re cooking for just a couple of people, this can be prepared as a small batch recipe for two tostada stacks, but can easily be doubled or tripled when needed.
What makes learning how to make chicken tostadas so appealing is their simplicity. You just layer some refried beans, rotisserie chicken, and fresh toppings – and dinner is served! In this article, I’ll walk you through each step to create authentic Mexican rotisserie chicken tostadas that your whole family will love.
Essential Ingredients for Authentic Chicken Tostadas
The foundation of any authentic chicken tostada lies in selecting quality ingredients. Let’s look at what makes these crispy Mexican treats truly special.
Rotisserie chicken and how to shred it
A store-bought rotisserie chicken serves as the perfect protein shortcut for quick tostadas. For best results, start with warm chicken rather than cold, since cold chicken is harder to pull apart and you’ll leave meat on the bones. Depending on size, one rotisserie chicken yields approximately 3 to 5 cups of shredded meat. Notably, a Costco-sized chicken can provide as much as 5 to 6 cups!
For shredding, you have three options:
- Hand mixer method – Fastest technique for fine, even pieces
- Two forks method – Simple with minimal cleanup
- Hand-pulling method – Traditional but more time-consuming
Choosing the right tostada shells
Tostada shells are essentially crispy corn tortillas that serve as the base. You’ll find pre-made shells near the tortillas in most grocery stores. Although store-bought shells work perfectly well, homemade versions offer superior flavor. Consequently, you can make your own by either:
- Frying corn tortillas until golden and crispy
- Baking them at 400°F for about 4-5 minutes per side
Refried beans: canned vs homemade
Refried beans create an essential foundation layer that helps other toppings stick to your tostada. Canned versions offer convenience, yet often have a gluey consistency and high sodium content. In contrast, homemade refried beans allow complete control over texture, salt, and seasonings. Traditional recipes use pinto beans with lard, however, vegetarian versions can substitute vegetable oil.
Fresh toppings to enhance flavor
Fresh components add brightness and texture to balance the rich beans and chicken:
- Shredded lettuce (romaine or iceberg)
- Diced tomatoes
- Finely sliced red onions
- Avocado slices or guacamole
- Cheese (cotija, queso fresco, or shredded cheddar)
Optional condiments and garnishes
Finally, personalize your tostadas with additional toppings:
- Sour cream or Mexican crema
- Cilantro leaves
- Lime wedges
- Jalapeño slices
- Salsa or pico de gallo
- Pickled red onions
The beauty of chicken tostadas lies in their customizability—everyone can build their perfect combination while enjoying a communal meal.
Step-by-Step: How to Make Chicken Tostadas in 15 Minutes
Now that we’ve gathered our ingredients, let’s jump into the quick assembly process for these mexican chicken tostadas!
1. Warm the beans and chicken
First, empty a can of refried beans into a small saucepan and heat over medium heat until hot. Once warm, reduce to low heat and keep simmering while you prep other components. For the rotisserie chicken, heat it in a microwave or on the stovetop, adding a tablespoon of water or chicken broth to prevent it from drying out. Alternatively, you can add some taco seasoning to the chicken while warming for extra flavor.
2. Prep the tostada shells
If using store-bought tostada shells, place them on a baking sheet and warm in a 350°F oven for about 5 minutes to crisp them up. Making homemade shells? Brush corn tortillas on both sides with a thin coat of oil, then bake at 450°F for 8 minutes, rotating halfway through. For traditional fried shells, heat oil in a skillet and fry tortillas for 2-3 minutes per side until golden brown.
3. Layer beans, cheese, and chicken
Begin by spreading a thin layer of warm refried beans on each tostada shell, leaving a small border around the edge. Next, sprinkle a layer of shredded cheese over the beans. Top with your warmed, seasoned rotisserie chicken, distributing it evenly across all shells.
4. Broil for melted cheese
Place the layered tostadas on a baking sheet and position under the broiler for about 30-90 seconds—just enough time to melt the cheese. Keep a close eye on them during this step, as they can burn quickly under the broiler’s intense heat.
5. Add fresh toppings and serve
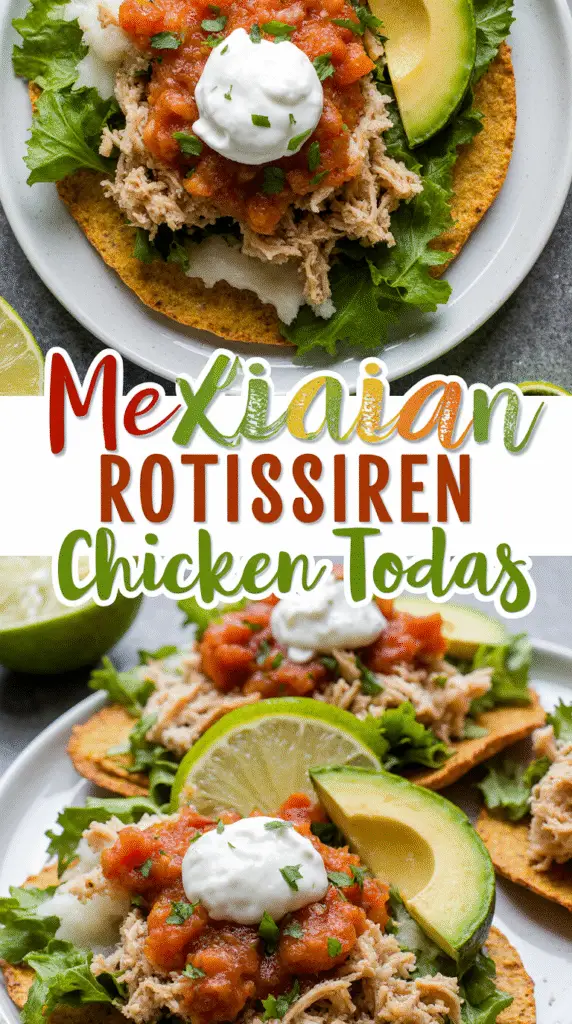
Immediately after removing from the broiler, top your chicken tostadas with shredded lettuce, diced tomatoes, sliced avocado or guacamole, and a dollop of sour cream. Garnish with fresh cilantro and serve with lime wedges for squeezing over the top. For a complete meal, these mexican chicken tostadas pair wonderfully with a side of Mexican rice or a simple green salad.
Tips for Customizing Your Tostadas
One major advantage of chicken tostadas is their incredible versatility. With a few simple swaps and additions, these crispy delights can satisfy everyone at your dinner table.
Make it spicy or mild
The heat level of your chicken tostada is entirely adjustable! For spice lovers, add sliced jalapeños, a few dashes of hot sauce like Valentina or Cholula, or incorporate chipotle peppers in adobo sauce into your chicken mixture. To increase heat gradually, blend chipotle peppers before adding them to spread the spice evenly throughout. Alternatively, for milder flavors, simply cut the peppers into larger chunks that can be removed before serving. Plus, setting out various hot sauces lets everyone customize their own heat level.
Vegan and vegetarian swaps
Transforming rotisserie chicken tostadas into plant-based delights is straightforward:
- Replace chicken with tofu sofritas, grilled vegetables, or walnuts mixed with black beans for a meaty texture
- Use vegetarian refried beans (most canned varieties are already vegetarian)
- Substitute dairy cheese with plant-based alternatives like Violife
- Add colorful toppings like pickled red onions, diced tomatoes, and fresh cilantro
Gluten-free shell options
Most corn tortillas and pre-made tostada shells are naturally gluten-free, just check for the GF label on packaging. For homemade gluten-free shells, use masa flour specifically labeled for tortillas. Old El Paso offers gluten-free tostada shells made with just three ingredients, and brands like Los Pericos and Guerrero also produce gluten-free options.
Kid-friendly topping ideas
Children often appreciate building their own meals. Indeed, setting up a “toppings bar” encourages picky eaters to create tostadas they’ll actually eat. Consider these family-friendly options:
- Shredded cheese (dairy or plant-based)
- Mild salsa or pico de gallo
- Guacamole or diced avocado
- Shredded lettuce or cabbage
- Diced tomatoes
The beauty of this approach? Everyone gets exactly what they want without extra cooking effort.
Common Questions and Quick Fixes
When making chicken tostadas, a few common questions pop up. Let’s tackle these practical concerns to ensure your Mexican feast goes smoothly.
Can I use canned chicken?
Yes! Canned chicken works well for quick tostadas. Drain thoroughly first, as excess moisture makes shells soggy. Additionally, season generously with salt, pepper, garlic powder, onion powder, and dried oregano to enhance flavor. This budget-friendly option makes chicken tostadas even more economical while maintaining taste.
How to keep tostadas from getting soggy
Create a moisture barrier by spreading room temperature (never hot) refried beans or avocado puree on the shell first. Moreover, avoid overloading with wet ingredients and serve immediately after assembly. Another effective technique is to assemble tostadas as you eat them rather than preparing all at once. For gatherings, put out small batches and replenish as needed.
How to store leftovers
Store components separately in airtight containers. Keep tostada shells at room temperature in sealed bags. Afterward, refrigerate cooled chicken mixture for up to 5 days. For longer storage, freeze the meat with some cooking liquid in freezer containers. When reheating, warm the meat in a saucepan, adding water if necessary.
What to serve with chicken tostadas
Complete your meal with Spanish rice and refried beans. Alternatively, add chips with salsa, guacamole, or vegan queso. For special occasions, consider serving alongside margaritas. These sides create a satisfying spread that keeps even hungry teens full for hours.
Conclusion
Authentic Mexican chicken tostadas truly represent one of the most convenient yet delicious meals you can prepare at home. Thanks to the rotisserie chicken shortcut, this traditional dish transforms from an elaborate cooking project into a 15-minute weeknight wonder. Most importantly, these tostadas deliver authentic Mexican flavors without keeping you trapped in the kitchen for hours.
Additionally, the beauty of these tostadas lies in their incredible adaptability. Whether you need to accommodate spice preferences, dietary restrictions, or picky eaters, this recipe provides a perfect solution for family dinners or casual entertaining. Everyone can customize their own creation while still enjoying a communal meal experience.
Therefore, next time you pass by the rotisserie chicken section at your local grocery store, remember the delicious potential waiting to be unlocked. Grab that chicken, pick up some tostada shells and fresh toppings, and you’re practically halfway to a satisfying meal that punches well above its weight class in terms of flavor and presentation.
After all, great cooking doesn’t always require hours of preparation or complex techniques. Sometimes, the best meals come from simple ingredients assembled thoughtfully. These rotisserie chicken tostadas prove that authentic Mexican flavors can be part of your regular dinner rotation, regardless of how busy your schedule might be.
So go ahead – crisp those shells, warm those beans, shred that chicken, and let your creativity shine with toppings. Your 15-minute culinary adventure awaits!
FAQs
Q1. How long does it take to prepare authentic Mexican chicken tostadas? Using rotisserie chicken, you can make delicious chicken tostadas in just 15 minutes. This quick meal is perfect for busy weeknights or when you want a tasty dinner without spending hours in the kitchen.
Q2. What are some essential toppings for chicken tostadas? Essential toppings for chicken tostadas include shredded lettuce, diced tomatoes, sliced avocado or guacamole, cheese (such as cotija or queso fresco), and a dollop of sour cream. You can also add cilantro, lime wedges, and salsa for extra flavor.
Q3. Can I make chicken tostadas gluten-free? Yes, you can easily make gluten-free chicken tostadas. Most corn tortillas and pre-made tostada shells are naturally gluten-free. Just be sure to check the packaging for a gluten-free label. You can also make your own gluten-free shells using masa flour specifically labeled for tortillas.
Q4. How can I prevent my tostadas from getting soggy? To keep your tostadas crispy, spread a thin layer of room temperature refried beans or avocado puree on the shell first to create a moisture barrier. Avoid overloading with wet ingredients and serve immediately after assembly. You can also assemble tostadas as you eat them rather than preparing all at once.
Q5. What’s the best way to shred rotisserie chicken for tostadas? There are three main methods to shred rotisserie chicken: using a hand mixer for fine, even pieces; using two forks for a simple approach with minimal cleanup; or hand-pulling for a more traditional method. For best results, start with warm chicken as it’s easier to pull apart than cold chicken.