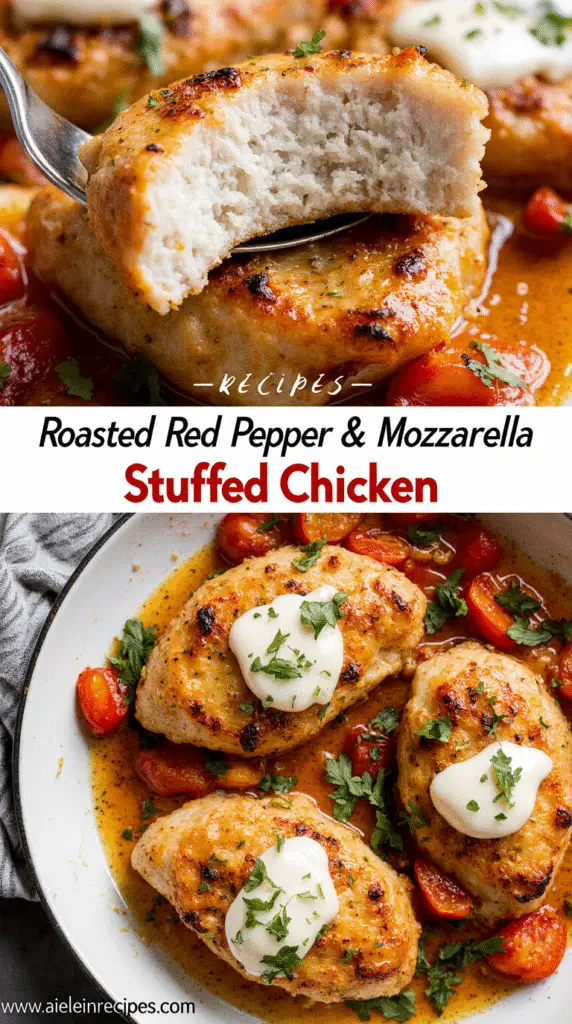
How to Make Perfect Stuffed Chicken with Roasted Red Peppers (Never Dry Again!)
Did you know you can make delicious chicken with roasted red peppers and mozzarella in under an hour with just eight basic pantry ingredients?
Tired of dry, flavorless chicken breasts? This roasted red pepper stuffed chicken recipe is your solution. With a prep time of only 10 minutes and a total cooking time of about 40-50 minutes, this dish is both weeknight-friendly and impressive enough for special occasions. Not only is this chicken stuffed with peppers and cheese incredibly tasty, but it’s also surprisingly diet-friendly at just 258 calories and 7g net carbs per serving.
In this guide, we’ll walk you through every step of creating the perfect chicken breast with roasted red peppers – from proper preparation techniques to the exact temperature (165°F) needed for perfectly cooked, never-dry results. Best of all, whether you’re baking at 375°F or 400°F, we’ve got you covered with tips to ensure your baked chicken with roasted red peppers and mozzarella turns out moist and flavorful every single time.
Prepping the Chicken for Stuffing
The first step toward perfect stuffed chicken is proper preparation. For chicken with roasted red peppers and mozzarella, starting with properly butterflied breasts ensures even cooking and creates the ideal pocket for your filling.
To butterfly a chicken breast, place it on a cutting board and hold it flat with your palm. Using a sharp knife (preferably a boning knife), carefully cut horizontally through the thickest part, stopping about half an inch from the edge. Open it like a book, creating a hinged pocket that will hold your delicious pepper filling.
After butterflying, pound the chicken to an even thickness of approximately ¼ inch using a meat mallet. This breaks down tough fibers, making the meat more tender while ensuring uniform cooking throughout.
Before seasoning, thoroughly pat the chicken dry with paper towels. This crucial step removes excess moisture that would otherwise prevent proper browning and create steam instead of a golden crust.
Trim any visible fat from the breasts, then season both inside and outside with your preferred spices. Many chefs recommend a combination of salt, pepper, garlic powder, and onion powder for complementing the roasted red pepper flavor.
Remember that properly prepped chicken needs at least 5 minutes of rest time after cooking for juices to redistribute throughout the meat, resulting in the juiciest stuffed chicken possible.
Making the Roasted Red Pepper Filling
The heart of this dish lies in creating a flavorful stuffing that keeps your chicken moist throughout cooking. For my roasted red pepper filling, I begin with jarred roasted peppers—though homemade work wonderfully if you have them frozen.
Heat a tablespoon of olive oil in a skillet over medium-high heat. Add sliced roasted red peppers first, followed by fresh spinach, cooking until the spinach wilts completely (approximately 3-5 minutes). Toss in minced garlic during the final minute, cooking just until fragrant.
Another excellent approach involves combining:
- Thawed frozen spinach (squeezed completely dry)
- Chopped roasted red peppers (drained and patted dry)
- Fresh breadcrumbs and grated Parmesan
- Smoked paprika for depth
For a creamier filling, incorporate cream cheese, mozzarella, and Parmesan after your vegetables have cooled slightly. This creates a decadent texture that melts beautifully inside the chicken. Furthermore, consider enhancing your mixture with sun-dried tomatoes or bacon for additional flavor dimensions.
Season everything generously with salt and pepper. Subsequently, you might add herbs like basil or oregano, perhaps even a pinch of crushed red pepper flakes for subtle heat. The filling should be thick enough to stay inside the chicken pocket yet moist enough to prevent dryness during baking.
Stuffing and Cooking the Chicken
Now comes the exciting part—stuffing and cooking your chicken with roasted red peppers and mozzarella. After preparing your filling, gently open each butterflied chicken breast and spoon 3-4 tablespoons of the mixture inside. Pack it firmly but avoid overstuffing, as this could cause the filling to leak during cooking.
Fold the chicken over the filling, ensuring the edges overlap by at least an inch. Secure with 2-3 wooden toothpicks through both overlapped edges to keep everything intact. For additional stability, some chefs recommend placing the chicken seam-side down in your cooking vessel.
Preheat your oven to 375°F. For best results, sear the stuffed breasts in a hot, oiled skillet for 2-3 minutes per side until golden brown. Afterward, transfer the skillet directly to the oven (if oven-safe) or move the chicken to a baking dish.
Bake for 17-20 minutes or until the thickest part reaches 165°F. Without a thermometer, check doneness by making a small incision—the meat should be white/opaque with clear (not pink) juices.
Finally, allow your chicken breast with roasted red peppers to rest 5-10 minutes before serving. This crucial step redistributes juices throughout the meat, ensuring your roasted red pepper stuffed chicken remains moist rather than dry.
Conclusion
Mastering this roasted red pepper stuffed chicken recipe will undoubtedly transform your dinner routine. The process might seem intimidating at first, but after following these steps, you’ll create restaurant-quality chicken that remains juicy and flavorful every time. Proper butterflying technique paired with even pounding ensures the chicken cooks uniformly, while the strategic placement of filling keeps everything moist throughout the baking process.
Additionally, this recipe offers endless customization possibilities. You could certainly swap spinach for kale, try different cheese combinations, or add herbs based on your preferences. The basic technique remains the same regardless of your filling choices.
Most importantly, this dish strikes the perfect balance between impressive presentation and practical preparation. Your guests will never guess how simple this elegant meal was to create! The combination of roasted red peppers and melted mozzarella creates a stunning color contrast when sliced, making this dish as beautiful as it is delicious.
Remember, patience during the resting period makes all the difference between good chicken and great chicken. Those few minutes allow juices to redistribute throughout the meat, ensuring each bite remains tender. We believe this stuffed chicken recipe will become a staple in your cooking repertoire – perfect for both weeknight dinners and special occasions alike!
FAQs
Q1. Can I cook the chicken and peppers together? While it’s possible to cook chicken and peppers together, for this stuffed chicken recipe, it’s best to prepare the roasted red pepper filling separately before stuffing the chicken. This ensures the peppers are properly cooked and seasoned before being combined with the chicken.
Q2. How do I prevent the stuffed chicken from becoming dry? To keep the chicken moist, butterfly and pound it to an even thickness, stuff it with a flavorful filling, and avoid overcooking. Use a meat thermometer to check for doneness (165°F at the thickest part) and let the chicken rest for 5-10 minutes after cooking to allow juices to redistribute.
Q3. What’s the ideal cooking time and temperature for stuffed chicken? Preheat your oven to 375°F and bake the stuffed chicken for about 17-20 minutes. The exact time may vary depending on the thickness of the chicken. Always ensure the internal temperature reaches 165°F for food safety.
Q4. Can I customize the filling for the stuffed chicken? Absolutely! While this recipe uses roasted red peppers, spinach, and mozzarella, you can experiment with different vegetables, cheeses, and seasonings. Just make sure the filling is not too wet to prevent leakage during cooking.
Q5. How do I properly stuff the chicken breast? After butterflying the chicken breast, gently open it and spoon 3-4 tablespoons of the filling inside. Fold the chicken over the filling, ensuring the edges overlap by at least an inch. Secure with 2-3 wooden toothpicks through both overlapped edges to keep everything intact during cooking.