How to Make Red Velvet Cinnamon Rolls: A Foolproof Recipe Guide
Did you know that a single red velvet cinnamon roll packs 429 calories of pure indulgence?
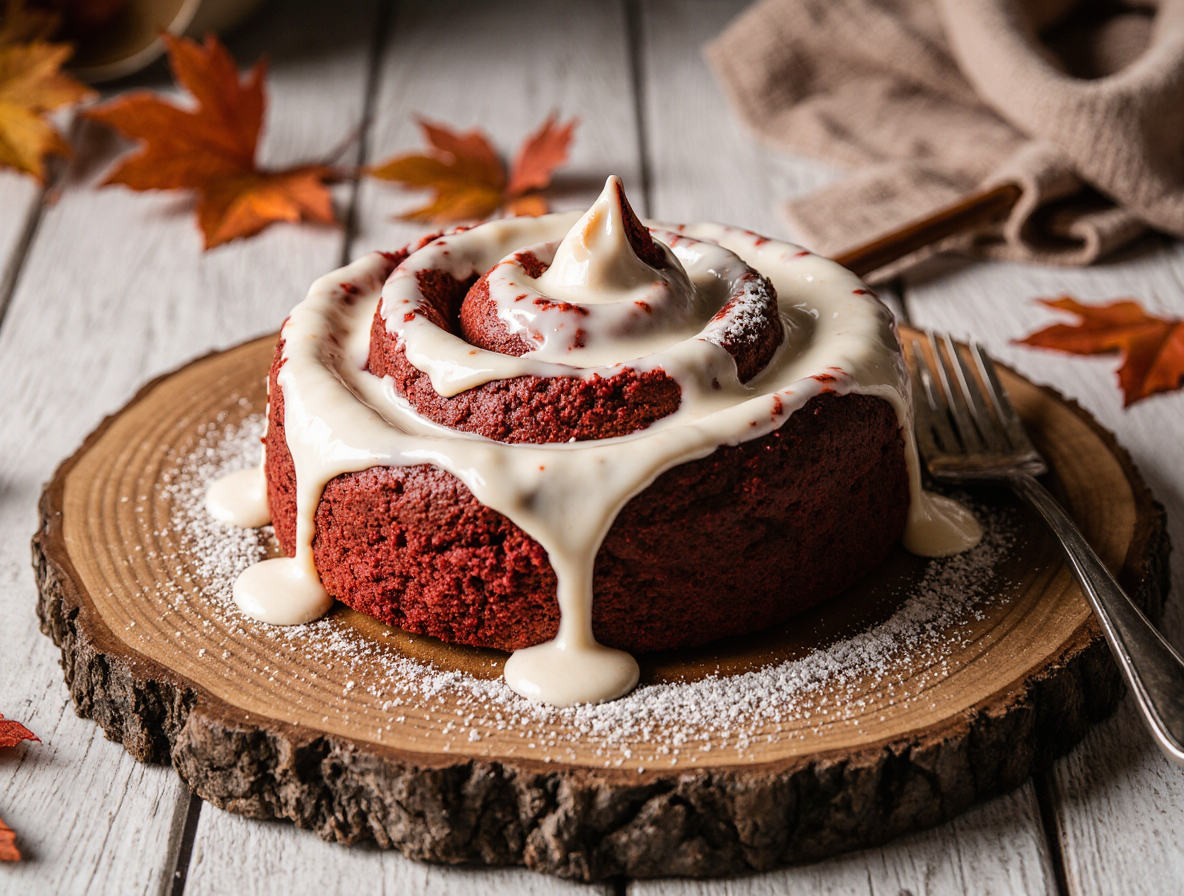
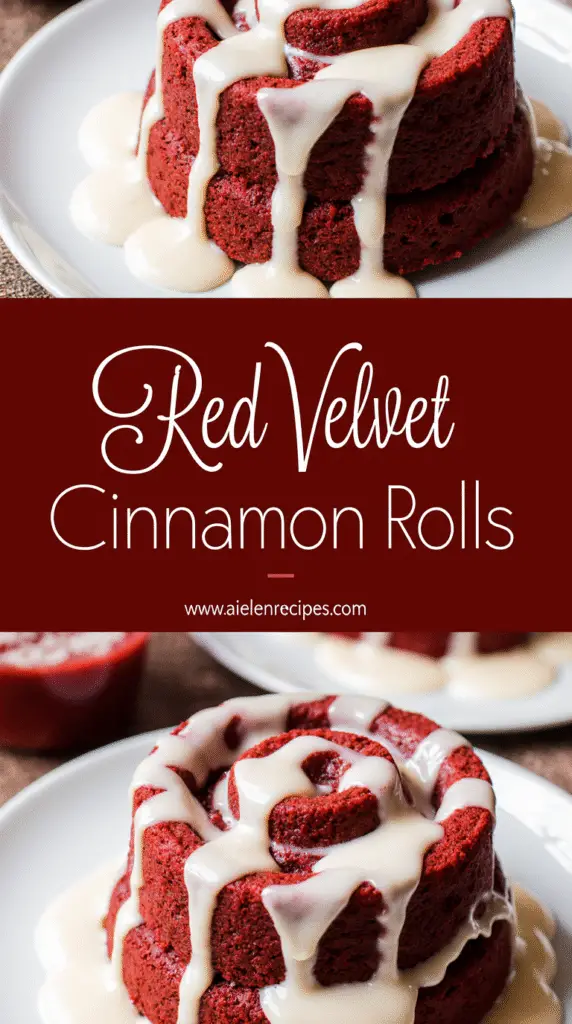
These ruby-hued treats transform everything you love about red velvet cake into a glazed, swirled delight that never goes out of style. Whether you’re sharing them with loved ones or treating yourself, these rolls are guaranteed to be a crowd-pleaser. They’re soft, fluffy, sweet rolls filled with a buttery cinnamon-sugar mixture and typically topped with cream cheese icing.
We pull this recipe out for special occasions like Valentine’s Day and Christmas morning, especially since red velvet is always a hit during holidays. The best part? That gooey, perfectly spiced center that we all save for last! Furthermore, you’ll love that these cinnamon rolls can be made completely from scratch without a boxed cake mix in sight, though we’ll explore both options in this guide.
In this article, I’ll walk you through a foolproof method to create these soft and tender red velvet cinnamon rolls that have so much flavor and make a super fun treat for any occasion. Let’s get started!
Gather Your Ingredients and Tools
Before diving into baking, gathering all necessary components for your red velvet cinnamon rolls recipe ensures a smooth process. Let’s take a look at what you’ll need.
Essential ingredients for dough, filling, and icing
For the perfect red velvet cinnamon rolls, you’ll need specific ingredients for each component:
Dough Ingredients: Begin with the foundation—active dry yeast (about 2¼ teaspoons or one package) and warm water or milk (110°F) to activate it properly. Additionally, you’ll need all-purpose flour (between 2½-4½ cups depending on the recipe), sugar, and salt for structure and flavor. To achieve that distinctive red velvet taste and color, add cocoa powder (2-3 tablespoons) and red food coloring (gel food coloring works best for vibrant color). Eggs, butter, and sometimes milk powder will create richness and tenderness in your dough.
Filling Ingredients: The classic filling combines softened butter (not melted), brown sugar (about 1 cup), and ground cinnamon (2-3 tablespoons). For an authentic red velvet twist, certain recipes also include a small amount of cocoa powder in the filling.
Icing Ingredients: Traditional cream cheese icing requires cream cheese (4-8 ounces), softened butter (¼-½ cup), powdered sugar (1½-2 cups), and vanilla extract. Some recipes also incorporate a touch of heavy cream or milk for consistency.
Recommended tools for easy preparation
Successful red velvet cinnamon rolls require several key tools:
- Stand mixer with dough hook attachment (or large mixing bowl with wooden spoon)
- Measuring cups and spoons
- Rolling pin
- Large baking dish or pan
- Parchment paper
- Pastry brush (for spreading butter)
- Dental floss or sharp knife (for cutting rolls)
- Mixing bowls of various sizes
Choosing between cake mix and from-scratch options
You have two primary approaches when making red velvet cinnamon rolls. The cake mix method uses a box of red velvet cake mix combined with flour, yeast, and water—cutting down on ingredients and kneading time. Consequently, this approach gets rolls on your table with less hassle.
Alternatively, making rolls completely from scratch gives you full control over ingredients and flavor intensity. The scratch method typically produces a more bread-like texture rather than cake-like, which many bakers prefer. However, it requires more ingredients and slightly more effort.
Either method can yield delicious results—your choice ultimately depends on your available time and baking confidence.
Step-by-Step: How to Make Red Velvet Cinnamon Rolls
The magic of red velvet cinnamon rolls happens in these five key stages. Let me walk you through each step of this delectable process.
Make the dough and let it rise
Initially, activate your yeast by combining it with warm milk (100-110°F) and a tablespoon of sugar in your stand mixer bowl. Let this mixture sit for 5-10 minutes until foamy. Next, add your remaining sugar, butter, eggs, vanilla extract, red food coloring, and 3 cups of flour along with cocoa powder. Mix these ingredients together until combined.
Attach your dough hook and knead on medium speed for 6-8 minutes until the dough becomes smooth and elastic but still slightly tacky. Shape it into a ball and place in a lightly greased bowl. Cover tightly with plastic wrap and a clean towel, then let rise in a warm environment until doubled in size, approximately 1-1½ hours.
Prepare the cinnamon-sugar filling
While the dough rises, make your filling by mixing brown sugar, cinnamon, and a pinch of salt in a bowl until thoroughly combined. In some recipes, a touch of cocoa powder is added to enhance the red velvet flavor profile.
Roll, fill, and slice the dough
Once your dough has doubled, punch it down to release air bubbles. On a lightly floured surface, roll the dough into a rectangle approximately 12×16 inches. Spread softened butter evenly across the surface, leaving a small margin around the edges. Sprinkle your cinnamon-sugar mixture over the butter, patting it gently to adhere.
Starting with the long edge, roll the dough tightly into a log shape, finishing with the seam side down. Score the log into 12 equal sections, then use a sharp knife or unflavored dental floss to cut clean slices.
Second rise and baking instructions
Place rolls in a greased 9×13-inch baking dish, allowing some space between each. Cover again and let rise in a warm spot until nearly doubled, about 45-60 minutes. Preheat your oven to 350°F and bake for 20-25 minutes until golden brown on top.
Make and apply the icing
Meanwhile, prepare cream cheese icing by beating together cream cheese, butter, powdered sugar, vanilla, and enough milk to reach your desired consistency. Apply the icing while rolls are still warm—not hot—allowing it to melt slightly into the crevices for maximum flavor infiltration.
Tips for Perfect Rolls Every Time
Creating perfect red velvet cinnamon rolls requires mastering a few critical techniques that professional bakers swear by.
How to avoid dense or dry rolls
Measure ingredients precisely—ideally with a scale. Avoid adding excess flour, as this creates tough, dry rolls. For proper rising, place dough in a warm environment (75-95°F) to activate yeast growth. Consider using your oven’s proofing setting, oven light, or placing a hot cast iron skillet on the lower rack to create optimal warmth. Additionally, underbake slightly as rolls continue cooking while cooling.
What to do if your dough is too sticky
If dough sticks to everything, add flour in small 2-tablespoon increments until it becomes manageable. Remember that proper kneading naturally reduces stickiness over time. For especially tacky dough, clean your hands midway through kneading to better assess true stickiness. Continue kneading until you can perform the “windowpane test”—stretching dough thin enough to see light through without tearing.
How to get the perfect swirl
Roll dough tightly yet gently to maximize cinnamon layers. For cleaner cuts, use unflavored dental floss instead of a knife. Alternatively, cut the filled dough into strips first, rolling each strip individually for perfect uniformity.
When to frost for best results
Apply frosting after rolls have cooled 5-10 minutes—not immediately from the oven nor completely cooled. For maximum moistness, spread half the frosting on warm rolls, allowing it to melt into crevices, then apply remaining frosting once partially cooled.
Storage, Reheating, and Make-Ahead Options
Made a batch of these delicious red velvet cinnamon rolls and wondering how to keep them fresh? Proper storage ensures every bite remains as heavenly as the first.
How to store rolls at room temperature or fridge
Store freshly baked rolls in an airtight container at room temperature for 2-4 days. For longer freshness, refrigerate them for up to 5-7 days. Remember that cream cheese frosting requires refrigeration, even though unfrosted rolls can stay at room temperature.
Freezing instructions for baked rolls
To freeze baked rolls, first let them cool completely. Afterward, wrap individual rolls tightly in plastic wrap, then place in a freezer-safe container. These treats remain delicious for up to 3 months in the freezer. Alternatively, freeze the entire pan wrapped in plastic and foil.
Reheating tips to keep them soft
For the softest texture, let frozen rolls thaw completely before reheating. Microwave individual rolls for 30-60 seconds or warm them in a 325°F oven for 5-10 minutes covered with foil to prevent drying. Ideally, save some frosting to add fresh after reheating.
Overnight prep instructions
For freshly baked morning rolls, prepare the dough through the slicing stage, then cover and refrigerate overnight. The next day, remove them 30-60 minutes before baking to reach room temperature. This cold proofing creates perfectly risen rolls with minimal morning effort.
Conclusion
Red velvet cinnamon rolls truly stand as a delightful treat that brings together the best of both worlds – the beloved flavor of red velvet cake and the comforting warmth of cinnamon rolls. Throughout this guide, I’ve shared everything you need to create these gorgeous ruby-hued delights from scratch. Whether you choose the convenience of a cake mix or prefer making them entirely homemade, these rolls will surely impress anyone lucky enough to taste them.
Remember that patience plays a key role during the rising process. Actually, this waiting time allows the yeast to work its magic, resulting in those perfectly fluffy rolls we all crave. Additionally, proper storage ensures you can enjoy these treats for days after baking or even months if you freeze them correctly.
Most importantly, don’t stress if your first batch isn’t perfect! Each time you make these rolls, you’ll develop a better feel for the dough consistency and rolling technique. Soon enough, you’ll master the art of creating that signature swirl and achieving the ideal texture.
Therefore, next time a special occasion calls for something extraordinary – or you simply want to treat yourself – give these red velvet cinnamon rolls a try. The combination of that distinctive cocoa-infused dough, warm cinnamon filling, and creamy frosting creates an unforgettable experience that’s worth every minute spent in the kitchen. Happy baking!
FAQs
Q1. What makes red velvet cinnamon rolls unique? Red velvet cinnamon rolls combine the flavors of red velvet cake with traditional cinnamon rolls. They feature a cocoa-infused dough with a vibrant red color, filled with a cinnamon-sugar mixture, and topped with cream cheese frosting.
Q2. Can I use a cake mix to make red velvet cinnamon rolls? Yes, you can use a red velvet cake mix to make cinnamon rolls. This method is quicker and requires fewer ingredients. However, making them from scratch allows for more control over the flavor and texture, typically resulting in a more bread-like consistency.
Q3. How do I ensure my cinnamon rolls are soft and fluffy? To achieve soft and fluffy cinnamon rolls, avoid adding too much flour, ensure proper rising in a warm environment, and slightly underbake them. Also, adding heavy cream or milk to the recipe can contribute to a gooey texture.
Q4. What’s the best way to store red velvet cinnamon rolls? Store unfrosted rolls at room temperature for 2-4 days in an airtight container. If frosted with cream cheese icing, refrigerate for up to 5-7 days. For longer storage, freeze individual rolls wrapped in plastic wrap for up to 3 months.
Q5. How can I prepare red velvet cinnamon rolls ahead of time? You can prepare the rolls through the slicing stage, then cover and refrigerate overnight. The next morning, let them sit at room temperature for 30-60 minutes before baking. This method allows for fresh, warm rolls with minimal morning effort.