
No-Bake Strawberry Dessert Lasagna: The Perfect Summer Treat
Looking for a show-stopping strawberry dessert lasagna that doesn’t require turning on the oven? This irresistible no-bake treat combines layers of creamy goodness with the bright flavors of summer.
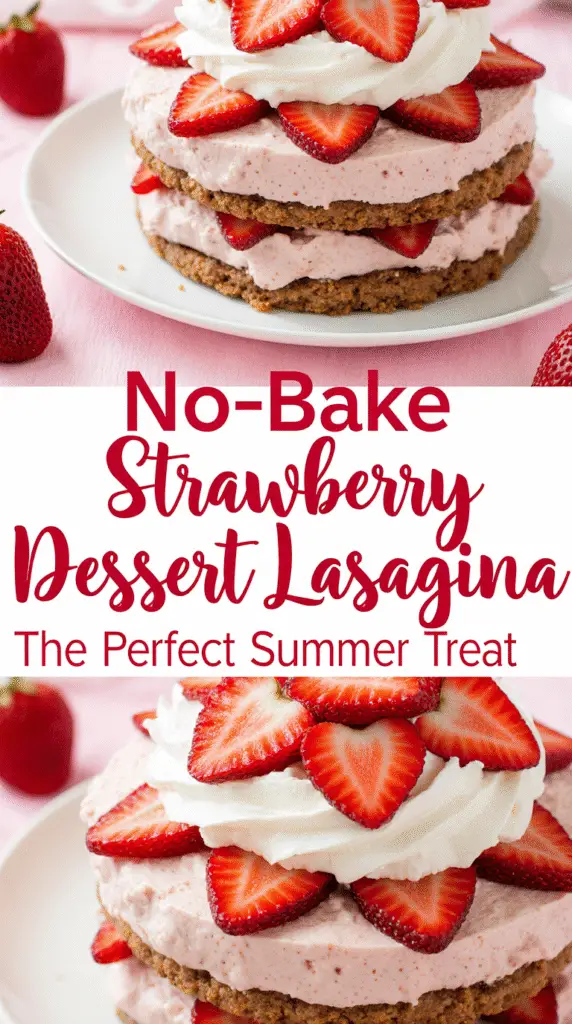
When the temperature rises, I find myself craving something cool and refreshing. That’s why this no-bake strawberry lasagna recipe has become my go-to dessert for warm-weather entertaining. With four delicious layers—a golden Oreo crust, creamy cheesecake with fresh strawberries, a vibrant fruit layer, and whipped topping—this strawberry lasagna dessert is both visually stunning and delightfully satisfying.
What makes this no-bake strawberry lasagna truly special is its versatility. It’s perfect for Easter celebrations, summer potlucks, or even Valentine’s Day. Additionally, you can prepare it up to 5 hours ahead of time, which means you won’t be stuck in the kitchen when guests arrive.
In this guide, I’ll walk you through everything you need to know to create this refreshing dessert, from breaking down the ingredients for each layer to sharing essential tips for achieving the perfect texture and presentation.
Ingredients Breakdown by Layer
The perfect strawberry dessert lasagna comes to life through carefully layered ingredients that create a symphony of flavors and textures. Let’s break down each component that makes this no-bake treat so irresistible.
Crust: Golden Oreos and butter
The foundation of our strawberry lasagna dessert starts with a simple yet flavorful crust. Most recipes call for Golden Oreos—about one package (14.3 ounces)—crushed into fine crumbs. Unlike traditional pie crusts, you don’t need to remove the vanilla cream filling from the cookies; it actually helps bind the crust together while adding sweetness. Simply combine the crushed cookies with melted butter (typically 1/2 cup unsalted) and press firmly into your baking dish. Some recipes offer alternatives like vanilla wafers (11 ounces) or Lorna Doone shortbread cookies (36 cookies) for slightly different flavor profiles.
Cheesecake layer: Cream cheese, sugar, and whipped topping
The second layer brings creamy richness to our no-bake strawberry lasagna. Start with 8 ounces of softened cream cheese—room temperature is crucial for achieving a smooth texture. Mix this with sugar (amounts range from 1/4 cup to 1 cup depending on desired sweetness) and fold in whipped topping (typically 8 ounces or 1 container of Cool Whip). Some recipes enhance this layer with 1/4 cup sour cream for extra tanginess or incorporate a small amount of strawberry pie filling for color and flavor. This luscious mixture creates a cloud-like layer that perfectly complements the crust below.
Lemon or strawberry layer: Jello or pudding mix with yogurt or milk
The third layer brings vibrant color and fruity flavor to your strawberry lasagna recipe. You have two delicious approaches here:
- For a Jello version: Use one 3-ounce package of strawberry gelatin mixed with 3/4 cup boiling water and ice cubes to cool it quickly. Some recipes enhance this with 1 cup strawberry Greek yogurt for creaminess.
- For a pudding version: Combine one 3.4-ounce package of instant vanilla pudding with 2 cups cold milk until thickened.
Both options create a flavorful middle layer, especially when studded with 1 to 1½ cups of fresh, diced strawberries.
Topping: Whipped cream and fresh strawberries
The crown of this no-bake strawberry lasagna is a cloud of whipped topping—either an 8-ounce container of Cool Whip or homemade whipped cream made from heavy cream, powdered sugar, and vanilla. For homemade versions, the typical ratio is 1 cup heavy cream to 1/4 cup powdered sugar. Fresh strawberries make the perfect garnish, either whole, sliced, or diced. For an extra special touch, some recipes suggest adding mint leaves or white chocolate curls as a finishing flourish.
Step-by-Step Instructions for Making Strawberry Lasagna
Creating this delectable no-bake strawberry lasagna is simpler than you might think. The secret lies in patience—allowing each layer to set properly before adding the next. Let me guide you through the process step by step.
1. Prepare the crust and chill
Begin by processing your Golden Oreos (with cream filling intact) in a food processor until you have fine crumbs. Alternatively, place cookies in a ziplock bag and crush them with a rolling pin. In a medium bowl, combine the cookie crumbs with melted butter and stir until the mixture resembles wet sand. Press this mixture firmly into the bottom of a 9×13 inch baking dish, using your fingers or the bottom of a glass to create an even, compact layer. For the best results, refrigerate the crust for 30 minutes or place it in the freezer for 10-15 minutes to firm up.
2. Mix and spread the cheesecake layer
Next, in a large bowl, beat softened cream cheese until fluffy. Add powdered sugar and mix until completely smooth. Fold in one container of whipped topping (such as Cool Whip) or homemade whipped cream using a rubber spatula to maintain airiness. For extra flavor, some recipes incorporate diced strawberries directly into this mixture. Carefully spread this creamy layer over the chilled crust, ensuring you don’t disturb the base. Return the dish to the refrigerator for at least an hour to set.
3. Add the fruit-flavored layer with strawberries
For the signature strawberry layer, dissolve strawberry gelatin in boiling water, stirring for about 2 minutes. Add ice cubes to cold water and mix into the gelatin until it begins to thicken. Remove any unmelted ice if necessary. Fold in whipped topping and diced fresh strawberries. Another approach involves mixing strawberry pudding with yogurt or milk for a creamier consistency. Pour this mixture over the cheesecake layer, gently spooning it on to avoid disturbing the layers beneath. Refrigerate for another hour until this layer sets completely.
4. Top with whipped cream and garnish
Finally, spread the remaining whipped topping over the strawberry layer in an even, smooth layer. For a professional finish, use a spatula to create gentle swirls on top. Garnish with fresh strawberries—either whole, sliced, or diced—arranged in an appealing pattern. For added elegance, consider sprinkling some reserved cookie crumbs around the edges or adding white chocolate curls as a decorative touch. Refrigerate the completed strawberry dessert lasagna for at least 2-4 hours before serving.
Tips for the Perfect No-Bake Strawberry Lasagna
The difference between an ordinary strawberry dessert lasagna and an extraordinary one often comes down to small but crucial details. Mastering these techniques will elevate your dessert from simply tasty to absolutely unforgettable.
Use softened cream cheese for smooth texture
I cannot overemphasize the importance of properly softened cream cheese for your strawberry lasagna recipe. Cold cream cheese invariably results in a lumpy cheesecake layer rather than the silky smooth texture we’re aiming for. Ideally, let your cream cheese sit at room temperature for about 60 minutes before mixing. In a hurry? Cut it into small cubes and spread them out for 20-30 minutes, or place the foil-wrapped cream cheese in warm water for about 10 minutes. For truly desperate situations, microwave unwrapped cream cheese in 10-second bursts, flipping between each, for 30-40 seconds total.
Chill each layer before adding the next
Patience pays off tremendously when making no-bake strawberry lasagna. Subsequently chilling each layer before adding the next is crucial for structural integrity. Allow at least an hour between layers, furthermore, give the completed dessert a minimum of 6 hours in the refrigerator before serving. This waiting period not only helps the layers set properly but also allows the crust to absorb some moisture from the filling, making it less crumbly when served.
Add food coloring for a vibrant look
For that eye-catching pink hue in your strawberry lasagna dessert, consider adding a touch of food coloring. Natural options include freeze-dried strawberries pulverized into powder or reduced strawberry juice concentrate. Alternatively, gel food coloring requires less volume than liquid versions to achieve vibrant colors. Essentially, this step is optional but makes your creation more visually appealing.
Use fresh strawberries for best results
Primarily select ripe yet firm strawberries for your no-bake strawberry lasagna. Once sliced, pat them dry with paper towels to remove excess moisture, preventing soggy layers. Fresh berries provide superior flavor, texture, and appearance compared to frozen alternatives. When using frozen berries, thaw completely and drain thoroughly before incorporating.
Press crust firmly to avoid crumbling
The foundation of perfect strawberry dessert lasagna is a well-packed crust. Press the crumb mixture firmly using the flat bottom of a drinking glass or measuring cup rather than just your fingers. Build up a thicker layer around the sides to prevent crumbling when serving. Notably, aim for medium-firm pressure—compact enough to hold together but not so tight that it bakes into a hard, dense base.
Make-Ahead, Storage, and Serving Suggestions
One of the greatest advantages of strawberry dessert lasagna is its make-ahead convenience, making it perfect for busy hosts and special occasions.
How far in advance you can make it
Strawberry dessert lasagna is truly a planner’s dream. You can prepare this no-bake treat up to 24 hours in advance of your event. This makes it ideal for holiday gatherings or summer potlucks when you want to minimize day-of preparations. For optimal results, many experts recommend making it the night before serving. This extended chilling time allows the layers to set properly and flavors to meld together. In fact, some variations of this dessert actually improve on the second day. First and foremost, remember that this dessert requires a minimum setting time of 4-6 hours in the refrigerator before serving.
How to store in fridge or freezer
For refrigeration, always store your strawberry lasagna dessert in an airtight container or cover it tightly with plastic wrap. In the freezer, strawberry lasagna can be stored for impressive durations—generally 2-3 months when properly wrapped. For best freezer results:
- Cover the entire dessert with two layers of plastic wrap
- Add a layer of heavy-duty aluminum foil for extra protection
- Thaw overnight in the refrigerator or for 2-3 hours for partial thawing
Serving tips for clean slices
To achieve those picture-perfect slices of no-bake strawberry lasagna, try warming your knife under hot water between each cut. Furthermore, for the cleanest presentation, wipe the blade clean after every slice. Consider removing the dessert from the refrigerator approximately 10-15 minutes before serving to allow it to soften slightly. Nevertheless, don’t leave it out too long as the layers will become too soft.
How long it lasts after serving
After serving, strawberry dessert lasagna maintains its quality in the refrigerator for 3-5 days[233]. However, the first 2-3 days provide the best texture and flavor experience. Beyond that timeframe, you may notice the crust beginning to soften and the whipped cream layers starting to break down. Additionally, fresh strawberries will gradually release moisture, potentially making the dessert slightly runnier after several days.
Conclusion
This no-bake strawberry dessert lasagna stands as a true crowd-pleaser for any warm-weather gathering. Consequently, you’ll find yourself returning to this recipe throughout summer and beyond. The four distinct layers work together beautifully—from the buttery Golden Oreo crust to the creamy cheesecake filling, vibrant strawberry center, and cloud-like whipped topping.
Perhaps the most appealing aspect of this dessert lies in its versatility. Not only does it shine at summer barbecues, but it also fits perfectly on holiday tables from Easter to Valentine’s Day. Additionally, the make-ahead nature of this treat allows you to prepare it up to 24 hours before your event, giving you precious time to focus on other aspects of hosting.
Patience certainly pays off when creating this strawberry sensation. Each chilled layer contributes to a stable, picture-perfect dessert that slices cleanly and maintains its structural integrity. Fresh strawberries provide both visual appeal and bright flavor, especially when you take care to select ripe yet firm berries.
The next time temperatures climb and you need a refreshing dessert without heating up your kitchen, this strawberry lasagna deserves your consideration. Your guests will undoubtedly request the recipe, amazed that something so impressive requires no baking whatsoever. This dessert proves that sometimes the most memorable treats come from the refrigerator rather than the oven.
FAQs
Q1. How long does it take to prepare No-Bake Strawberry Dessert Lasagna? While the actual preparation time is relatively short, the dessert requires at least 4-6 hours of chilling time for the layers to set properly. For best results, it’s recommended to make it the night before serving.
Q2. Can I use frozen strawberries instead of fresh ones? Fresh strawberries are preferred for the best flavor, texture, and appearance. However, if using frozen strawberries, make sure to thaw them completely and drain thoroughly before incorporating them into the dessert to prevent excess moisture.
Q3. How long can I store No-Bake Strawberry Dessert Lasagna? When stored in an airtight container in the refrigerator, the dessert maintains its quality for 3-5 days. For longer storage, you can freeze it for up to 2-3 months when properly wrapped.
Q4. Can I make this dessert ahead of time for an event? Absolutely! This dessert is perfect for making ahead. You can prepare it up to 24 hours in advance of your event, which makes it ideal for holiday gatherings or summer potlucks.
Q5. What’s the secret to getting clean slices when serving? For picture-perfect slices, try warming your knife under hot water between each cut and wiping the blade clean after every slice. Also, remove the dessert from the refrigerator about 10-15 minutes before serving to allow it to soften slightly for easier cutting.