
Strawberry Shortbread Cookies Recipe
Introduction
Exploring the delightful world of strawberry shortbread cookies can lead you to a perfect blend of buttery richness and fruity freshness. The combination of soft, crumbly cookie texture with the bright notes of strawberry creates not just a treat but an experience. These cookies offer a unique twist on the traditional shortbread, incorporating both freeze-dried strawberries and fresh puree, which lends them a beautifully aromatic flavor profile and speckled appearance. Perfect for afternoon tea, casual gatherings, or simply as a sweet snack, these cookies encapsulate the essence of summer in each bite.
The delightful crunch from the shortbread pairs splendidly with the softness of the glaze, making these cookies not just a treat for the taste buds, but a feast for the eyes. A delicate strawberry glaze drizzled over the top not only enhances the visual appeal but adds an extra layer of flavor that ties the whole cookie together. This recipe ensures a generous yield, making it an ideal way to impress friends or family with your baking prowess or to simply indulge in a moment of sweetness just for you.
Recipe Overview
– Total Time: 40 minutes
– Prep Time: 20 minutes
– Servings: 24 cookies
– Difficulty: Not specified in the recipe
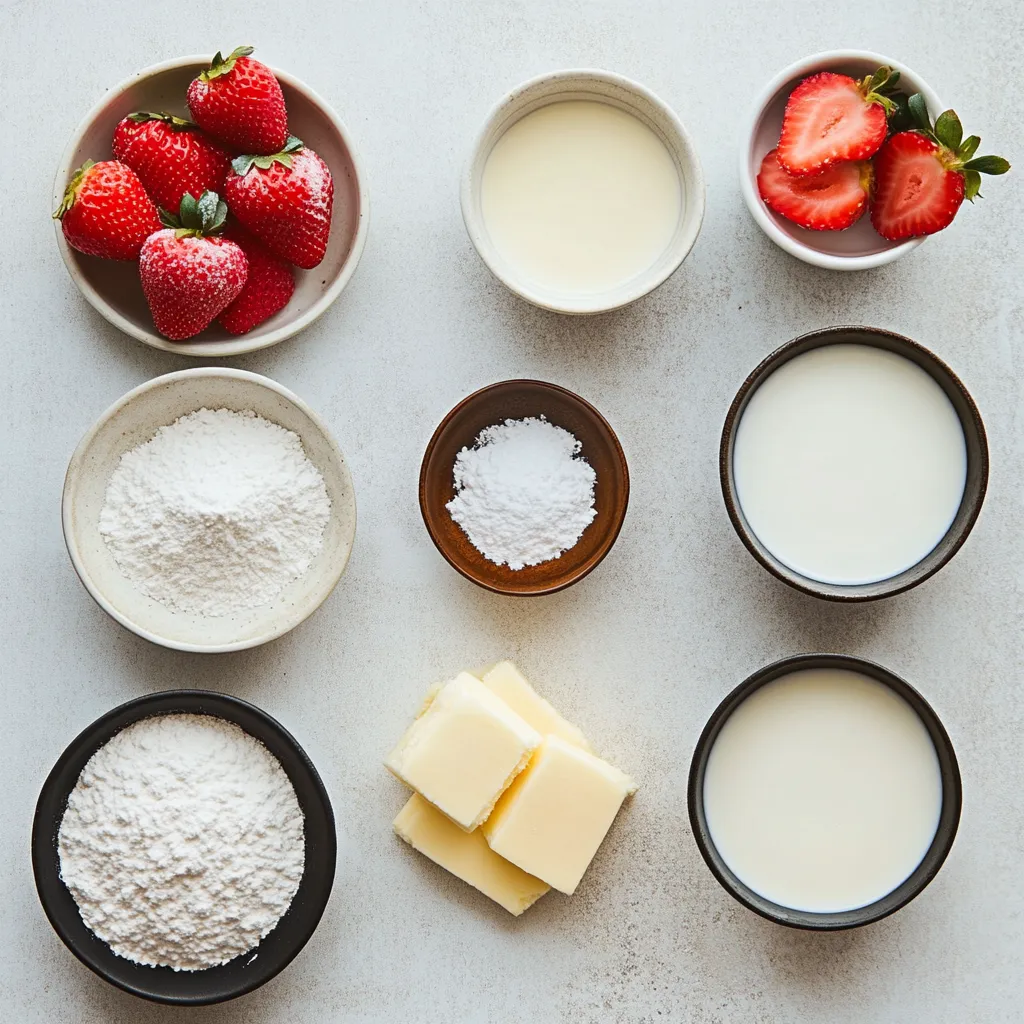
Ingredients
– 1 cup unsalted butter, softened to room temperature
– ½ cup powdered sugar, plus more for glazing
– 1 teaspoon pure vanilla extract
– 2 cups all-purpose flour
– ¼ teaspoon salt
– ½ cup freeze-dried strawberries, finely crushed
– 2 tablespoons fresh strawberry puree (about 3-4 ripe strawberries)
– 1 teaspoon milk (optional, for adjusting glaze consistency)
Instructions
1. Preheat the Oven: Begin by preheating your oven to 350°F (175°C). Line a baking sheet with parchment paper to prevent sticking and ensure easy cleanup.
2. Prepare the Cookie Dough: In a large mixing bowl, beat the softened butter and ½ cup of powdered sugar together until the mixture is light in color and fluffy in texture. Add the vanilla extract and mix until fully incorporated.
3. Mix Dry Ingredients: In a separate bowl, combine the all-purpose flour, salt, and crushed freeze-dried strawberries. Whisk them together to ensure an even distribution of ingredients.
4. Combine Mixtures: Gradually add the dry mixture to the butter-sugar blend. Stir gently until just combined, being careful not to overmix, as this can lead to tough cookies.
5. Shape the Cookies: Using a tablespoon, scoop out portions of the dough and roll them into small balls. Place these balls on your prepared baking sheet, then gently flatten each one with the palm of your hand or the bottom of a glass for an even shape.
6. Bake the Cookies: Bake in your preheated oven for 12-15 minutes, or until the edges turn a light golden brown. After baking, let them cool on the baking sheet for a few minutes before transferring them to a wire rack to cool completely.
7. Make the Glaze: In a small bowl, mix 1 cup of powdered sugar with the fresh strawberry puree until you achieve a smooth consistency. If the glaze is too thick, add a teaspoon of milk to thin it out to your desired texture.
8. Glaze the Cookies: Once the cookies are completely cool, use a spoon or a piping bag to drizzle the strawberry glaze over the tops of the cookies, creating a beautiful finish.
9. Serve and Savor: Allow the glaze to set for about 10 minutes before serving. These delightful strawberry shortbread cookies are perfect to enjoy with a warm cup of tea or coffee!
Preparing for Baking
Preheating the Oven
It’s important to start your baking process correctly by preheating your oven to 350°F (175°C). This temperature allows for even baking and ensures that your cookies rise perfectly and develop a light golden color. Preheating for at least 10-15 minutes prior to putting the cookies in is ideal, as it helps create the right environment for the baking soda and sugar to react, resulting in a wonderfully textured cookie. Using an oven thermometer can help you confirm that your oven is at the right temperature, which is especially useful if your oven tends to run hot or cold.
Lining the Baking Sheet
To avoid the common struggle of cookies sticking to the baking sheet, lining it with parchment paper is highly recommended. Parchment not only provides a non-stick surface but also aids in even baking and makes cleanup a breeze. Cut the parchment to fit the size of your baking sheet, ensuring no edges are exposed to the heat of the oven. If you don’t have parchment paper, you can also use a silicone baking mat as an alternative; it provides a similar non-stick effect.
Mixing the Dough
Creaming the Butter and Sugar
The creaming process is crucial for the texture of your cookies. Start with softened butter to make mixing easier; it should give slightly when pressed. In a large mixing bowl, combine the softened butter with the powdered sugar. Beat them together until the mixture appears light and fluffy; this may take about 2-3 minutes of mixing. The sugar grains will aerate the butter and help create a delicate texture. You’ll know it’s ready when the color is pale and the mixture is smooth, indicating that air has been whipped in.
Adding Vanilla Extract
Incorporating the vanilla extract isn’t just an extra step; it enhances the overall flavor profile of your cookies. Vanilla adds depth and sweetness that beautifully complements the strawberries. Mix in the vanilla extract thoroughly after creaming the butter and sugar, ensuring it’s fully distributed throughout the dough. This process will create that aromatic base which is so signature to any good cookie recipe.
Combining Dry Ingredients
Mixing Flour, Salt, and Strawberries
In a separate bowl, you’ll want to prepare the dry ingredients. Start by sifting or whisking the all-purpose flour and salt together to eliminate any lumps. Then, add the finely crushed freeze-dried strawberries. This ingredient brings an intense burst of strawberry flavor into the dough while also giving it a lovely pink hue. Whisk everything together thoroughly to ensure that the strawberries, flour, and salt are evenly distributed, which will improve the taste and texture of the cookies.
Importance of Not Overmixing
Once you add this dry mix to the creamed butter and sugar, it’s essential to mix gently. Overmixing can lead to the development of gluten, which will result in tough cookies rather than the tender shortbread texture we aim for. Stir the mixture until it’s just combined; it’s okay if a few streaks of flour remain. The goal here is to maintain a delicate crumb structure, which is the hallmark of a great shortbread cookie. Your dough should look slightly shaggy but hold together when formed into a ball.

Instructions for Using Tablespoons to Portion Out the Dough Effectively
When portioning the cookie dough, use a standard tablespoon to scoop out equal amounts. This ensures uniformity in size and baking time for each cookie. Start with a heaping tablespoon of dough, which you can easily adjust based on your preference for cookie size. If you prefer smaller cookies, adjust the heaping amount to a rounded tablespoon instead.
To achieve consistency, you can also use a cookie scoop, which often comes in various sizes to match your desired cookie dimensions. This tool not only makes it easier to portion out the dough but also helps in maintaining even sizes across all cookies.
Flattening the Cookie Balls
Achieving an even shape for each cookie is vital for uniform baking. After scooping out the dough, roll it into a ball in the palms of your hands. Place the ball on the lined baking sheet and flatten it gently.
Using the palm of your hand directly works well, but for a more precise flattening technique, consider using the bottom of a glass. Place the bottom of the glass in a small bowl of sugar or flour to prevent sticking. This method helps create a nice, even disc shape, enhancing the appearance and bake of your cookies.
The Baking Process
Baking Time and Temperature
Baking the strawberry shortbread cookies at the optimal temperature of 350°F (175°C) is crucial for achieving the perfect texture. Keep a close eye on them while baking; the cookies typically take between 12 to 15 minutes to reach that alluring golden brown edge.
A visual cue is essential: look for the edges of the cookies to become lightly browned while the centers appear set but might retain a slight softness. If you notice any darkening on the edges before the minimum time, test to see if they are done earlier.
Cooling the Cookies
Once baked, immediately transfer the cookies to a cooling rack after letting them sit on the baking sheet for a few minutes. This transition helps maintain the dough’s integrity as the cookies finish setting. Cooling racks promote airflow around the cookies, preventing them from becoming soggy.
Leaving cookies on the baking sheet for too long can cause them to become too soft; conversely, moving them too quickly can result in breakage. Aim for about 5 minutes on the sheet before moving them to achieve the perfect texture.
Crafting the Glaze
Mixing Ingredients for Glaze
Creating the glaze is a straightforward process that adds the final touch to your cookies. In a small bowl, combine 1 cup of powdered sugar with the prepared strawberry puree. Using a whisk, mix the two ingredients thoroughly until a smooth consistency is achieved. This ensures that the sweetness of the glaze complements the tartness of the strawberries.
Adjusting Consistency
The glaze might thicken slightly after combining the ingredients; hence, adjusting its consistency is advisable. If you find the glaze too thick for drizzling, gradually add a teaspoon of milk. Mix this thoroughly until the desired pouring consistency is reached, which should be smooth but not too runny. This allows for proper drizzling without the glaze running off the cookies completely.
Glazing the Cookies
Application Techniques
There are various techniques for glazing your cookies. A spoon can double as both a tool for application and for drizzling, allowing for creative patterns over each cookie. If you desire a more precise approach and a cleaner finish, using a piping bag is highly recommended. Simply fill the piping bag with the glaze and cut a small tip off one corner to control the flow.
This piping method not only adds elegance but also allows for artistic designs on the cookies as you drizzle the glaze over them.
Additional Presentation Tips
For an elegant finishing touch, consider sprinkling additional crushed freeze-dried strawberries over the glazed cookies while the icing is still wet. This not only enhances their aesthetic appeal but also adds a playful crunch. Additionally, presenting your cookies on a decorative plate lined with fresh strawberry slices showcases the cookie beauty while echoing the bright flavor of your strawberry shortbread.
Serving Suggestions
Ideal Pairings
When it comes to pairing beverages, these strawberry shortbread cookies shine alongside a warm cup of tea or coffee. The richness of the cookies harmonizes with the lightness of a green tea or the robustness of coffee, making for a delightful snack or dessert. For a refreshing twist, serve them with a chilled glass of lemonade or iced tea, complementing their fruity nature beautifully.
Creative Serving Ideas
Consider arranging the cookies in a stack on a decorative platter that showcases their colorful glaze. Nestling fresh strawberries and a few mint leaves around the cookies not only enhances the presentation but also adds a burst of color and freshness to the display. For a picnic or casual gathering, you might serve them individually wrapped in clear bags tied with a ribbon, allowing guests to enjoy them on the go.
Storage Tips
Keeping Cookies Fresh
To keep your strawberry shortbread cookies fresh for several days, store them in an airtight container at room temperature. This will help maintain their soft texture and the glaze’s visual appeal. If the cookies come into contact with humidity, they can lose their crunch and become soggy, so ensuring they are well-sealed is key.
Freezing for Later Enjoyment
If you wish to enjoy these cookies at a later date, freezing is an excellent option. Allow the cookies to cool completely before wrapping each one individually in plastic wrap, then place them in a freezer-safe container. For best results, consume the cookies within three months to enjoy the optimal flavor and texture. When you’re ready to enjoy them, allow the frozen cookies to thaw at room temperature before serving, and consider re-glazing them for a fresh look.
Conclusion
The strawberry shortbread cookies are characterized by their delicate buttery richness and a hint of fruity flavor from the strawberries. With minimal effort, these cookies can be prepared and baked in about 40 minutes, making them an easy yet sophisticated treat. Serving them is simple, whether it’s alongside a warm beverage or as part of a colorful dessert platter, ensuring they are a delightful addition to any occasion.

Strawberry Shortbread Cookies Recipe
Ingredients
- 1 cup unsalted butter softened
- ½ cup powdered sugar plus more for glazing
- 1 teaspoon pure vanilla extract
- 2 cups all-purpose flour
- ¼ teaspoon salt
- ½ cup freeze-dried strawberries finely crushed
- 2 tablespoons fresh strawberry puree
- 1 teaspoon milk optional, for glaze
Instructions
- Preheat your oven to 350°F (175°C) and line a baking sheet with parchment paper.
- In a large mixing bowl, beat the softened butter and ½ cup powdered sugar until light and fluffy.
- Add the vanilla extract and mix until incorporated.
- In a separate bowl, combine flour, salt, and crushed strawberries, whisking to mix.
- Gradually add the dry mixture to the butter-sugar blend, stirring gently until just combined.
- Scoop portions of dough, roll into balls, and flatten them on the baking sheet.
- Bake for 12-15 minutes until edges are light golden brown, then cool on a wire rack.
- Mix 1 cup powdered sugar with strawberry puree to make the glaze, adding milk if needed.
- Drizzle the glaze over cooled cookies and let set for about 10 minutes before serving.