The Easiest No-Bake Oreo Lasagna Recipe You’ll Ever Make
Have you ever created a dessert that disappears before you can even take leftovers home? This oreo lasagna recipe is exactly that kind of treat! Unlike traditional lasagna, this rich, indulgent dessert is what chocolate lovers dream of with its perfect layers of cookies and cream goodness.
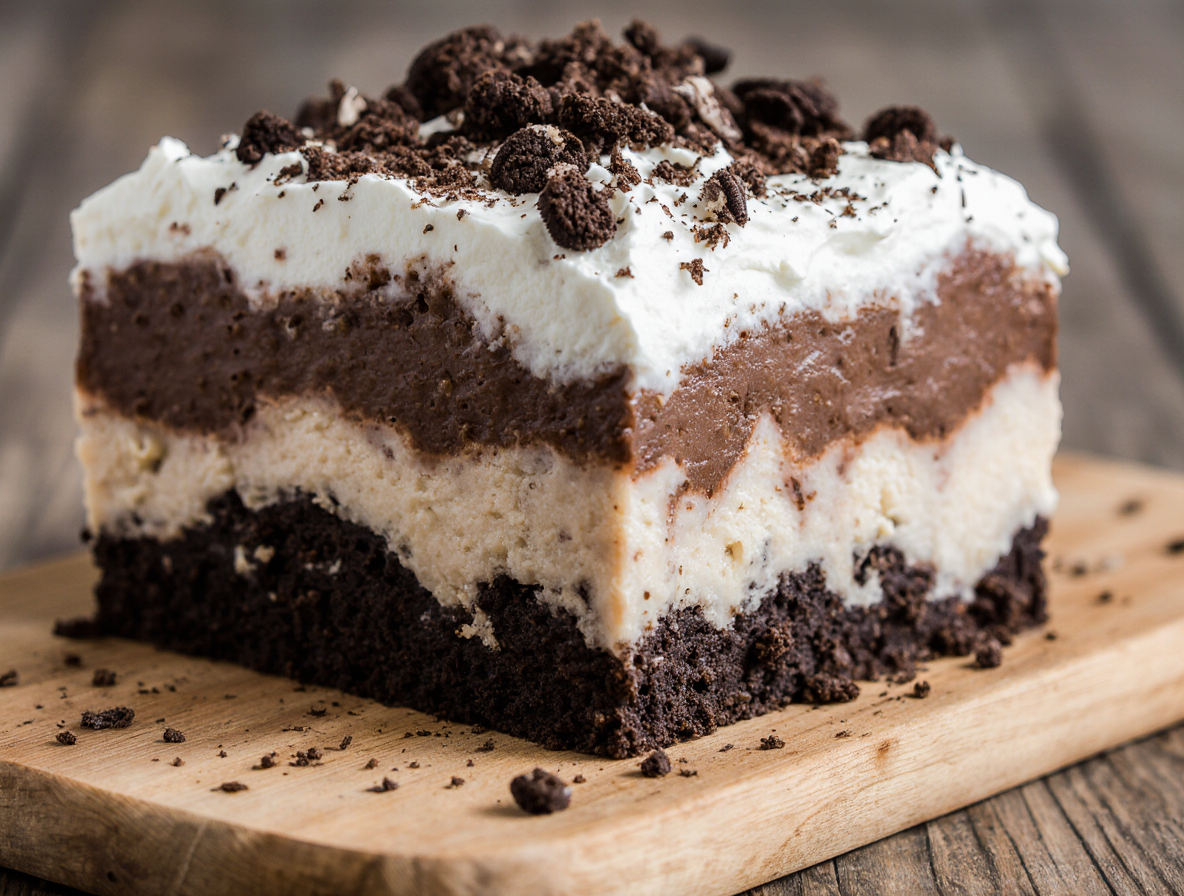
Looking for an impressive no-bake oreo lasagna that’s sure to be a hit at your next gathering? This easy oreo lasagna recipe requires just four ingredients and can be prepared ahead of time. The oreo lasagna dessert features delicious layers starting with an Oreo crust, followed by a creamy cheesecake layer, chocolate pudding, and topped with whipped cream and chocolate chips. Actually, the possibilities are endless with this Oreo dessert!
In this guide, I’ll walk you through everything you need to know to create this show-stopping oreo lasagna dessert recipe. Perfect for parties, picnics, and potlucks, this no-bake treat is specifically designed to impress without hours in the kitchen. Let’s dive into how you can make this crowd-pleaser that never fails to disappear quickly!
What You Need to Make Oreo Lasagna
Making the perfect oreo lasagna dessert starts with gathering the right ingredients. Let’s explore each component that makes this no-bake dessert so irresistible.
Oreos: Regular vs. Double Stuf
When creating your oreo lasagna recipe, the type of Oreos you choose matters significantly. Regular Oreos are strongly preferred over Double Stuf for the crust. Despite what you might expect, Double Stuf Oreos don’t actually contain twice the filling—studies found they have about 1.86 to 1.91 times the cream of regular Oreos. Furthermore, multiple recipes specifically warn against using Double Stuf Oreos because the extra cream affects the consistency of the crust, making it too wet and greasy. The extra filling creates a crust that’s too soft and might leak butter when used in desserts.
Butter: Salted or Unsalted?
Both salted and unsalted butter work in this easy oreo lasagna recipe, though many chefs recommend salted butter. Salted butter helps balance the sweetness of the dessert, creating a more complex flavor profile. Generally, you’ll need about 4-6 tablespoons of melted butter to combine with the crushed Oreos for a proper crust that holds together.
Cream Cheese and Cool Whip
For the creamy layer, you’ll need an 8-ounce package of cream cheese. Make sure it’s softened to room temperature before mixing—this prevents lumps and ensures a smooth filling. Cool Whip plays a dual role in this oreo lasagna dessert recipe: it’s used both in the cream cheese layer and as the final topping. Many recipes call for a 12 or 16-ounce container divided between these layers. While homemade whipped cream can substitute for Cool Whip, the latter holds its shape better over time.
Instant Pudding: Chocolate or Vanilla
The pudding layer requires instant pudding mix—not the cook and serve kind. Although chocolate instant pudding is traditional for this oreo cookie lasagna recipe, you can experiment with vanilla or even cheesecake flavor for variety. One or two packages (3.9 or 5.9 ounces) will be needed depending on your recipe.
Milk: Best type to use
Whole milk or half-and-half creates the thickest, richest pudding layer. However, 2% or nonfat milk will also work. One important caution: non-dairy milk isn’t recommended as the pudding won’t set properly. You’ll typically need 2¾ to 3¼ cups of cold milk for the pudding layer.
With these ingredients ready, you’re all set to create a dessert that beautifully balances chocolate cookie crunch with creamy, luscious layers.
Step-by-Step: How to Make No-Bake Oreo Lasagna
Now that we’ve gathered all our ingredients, let’s dive into creating this delicious layered dessert step by step. This no-bake oreo lasagna comes together quickly once you understand the layering process.
1. Make the Oreo crust
Begin by crushing the entire package of Oreos (filling included) into fine crumbs using a food processor or placing them in a ziplock bag and crushing with a rolling pin. Reserve about 1 cup of crumbs for the topping. In a bowl, combine the remaining Oreo crumbs with melted butter until thoroughly mixed. Press this mixture firmly into the bottom of a 9×13 inch baking dish, creating an even layer. Place the crust in the refrigerator or freezer for about 5-10 minutes to set while preparing the next layer.
2. Prepare the cream cheese layer
In a large mixing bowl, beat the softened cream cheese until light and fluffy (about 3 minutes). Gradually add powdered sugar and continue mixing until well incorporated. Add 2 tablespoons of cold milk to the mixture. Fold in half of the Cool Whip until completely combined. Spread this creamy mixture evenly over the chilled Oreo crust. Return the dish to the refrigerator during the next step.
3. Mix and spread the pudding layer
In a separate bowl, whisk together the instant chocolate pudding mix and cold milk (approximately 3¼ cups) for about 2 minutes until it begins to thicken. For best results, let the pudding set for about 5 minutes before spreading. Gently spread the pudding mixture evenly over the cream cheese layer. Refrigerate for another 10 minutes to firm up.
4. Add the final Cool Whip topping
Spread the remaining Cool Whip over the pudding layer in an even layer. Sprinkle the reserved Oreo crumbs on top. For extra indulgence, add mini chocolate chips as a finishing touch.
5. Chill before serving
Cover the dessert tightly and refrigerate for at least 4 hours, but overnight chilling yields the best results. This essential chilling time allows all layers to set properly and flavors to meld together. For clean, even slices, place the pan in the freezer for 30 minutes before serving.
Tips to Get the Perfect Oreo Lasagna Dessert
Success with your oreo lasagna recipe depends on mastering a few critical techniques. Consider these expert tips that make the difference between a good dessert and an extraordinary one.
Use instant pudding only
Always choose instant pudding mix instead of cook-and-serve varieties for this no-bake dessert. Instant pudding forms the rich chocolate layer and sets quickly without heat. Cook-and-serve pudding requires additional steps and won’t achieve the right consistency. Additionally, mix your pudding with cold milk to ensure a smooth texture and quick setting.
Chill between layers
Patience truly pays off with this oreo lasagna dessert. After adding each layer, refrigerate for 5-10 minutes before proceeding to the next. This brief chilling time helps stabilize each layer, preventing them from blending together. Consequently, you’ll achieve those picture-perfect distinct layers everyone loves.
Soften cream cheese properly
For a lump-free easy oreo lasagna recipe, properly softened cream cheese is essential. The microwave method works in a pinch—unwrap the cream cheese, place on a microwave-safe plate, and heat at 50-75% power in 5-second intervals, turning after each interval. Alternatively, cut cream cheese into small cubes and let sit at room temperature for 20-30 minutes. Furthermore, a sealed package can be placed in warm water for 10-15 minutes.
Crush Oreos finely
The foundation of any oreo cookie lasagna recipe is a perfectly crushed cookie base. Use a food processor for the finest texture, or place cookies in a ziplock bag and crush with a rolling pin. Finely crushed cookies create a more stable crust that holds together when sliced.
Let it set for at least 4 hours
Perhaps the most crucial step—refrigerate your completed dessert for a minimum of 4 hours. Overnight chilling yields even better results. For those picture-perfect slices, place the dessert in the freezer for about 30 minutes before serving, then cut with a sharp knife. Clean the knife between each slice for pristine presentation.
Fun Variations to Try
Once you’ve mastered the classic oreo lasagna recipe, it’s time to explore creative variations that will keep this dessert fresh and exciting for any occasion.
Peanut butter Oreo lasagna
For peanut butter lovers, this variation adds a rich, nutty dimension to the traditional recipe. Create a layer of peanut butter between the cream cheese and pudding layers for enhanced flavor. As a finishing touch, garnish with mini Reese’s peanut butter cups, peanut butter chips, or a drizzle of melted peanut butter. Many bakers recommend using slightly less milk in the pudding layer to ensure the dessert holds its shape better with the addition of peanut butter.
Mint chocolate version
Create a refreshing twist by substituting regular Oreos with Mint Oreos. Alternatively, add a dash of mint extract to the cream cheese layer if you prefer using classic cookies. This variation offers a cooling contrast to the rich chocolate elements, making it particularly delightful for summer gatherings or after-dinner treats. The mint-chocolate combination creates a refreshingly indulgent flavor profile that’s reminiscent of your favorite ice cream.
Golden Oreo and strawberry twist
Swap traditional chocolate Oreos for Golden Oreos and replace chocolate pudding with vanilla or cheesecake flavored pudding mix. Moreover, incorporate sliced strawberries between layers or as a topping for a fruity contrast to the sweet creaminess. This lighter, fruity version makes an excellent spring or summer dessert option when berries are at their peak.
Holiday-themed toppings
Customize your oreo lasagna dessert for specific holidays throughout the year. For Christmas, add crushed candy canes or red and green sprinkles. During Halloween, incorporate orange and black sprinkles or candy pieces. Easter celebrations call for pastel-colored candies or chocolate eggs on top. These seasonal adaptations make the same delicious dessert appropriate for any festive occasion.
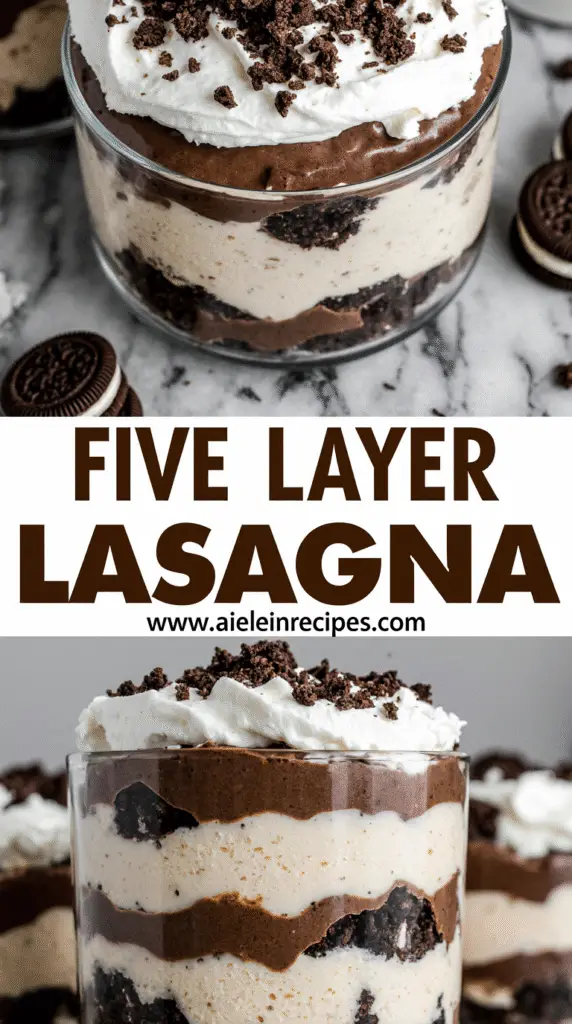
Make it in a trifle dish
Present your oreo cookie lasagna recipe in a clear trifle dish for dramatic visual appeal. This presentation style showcases the distinct layers and allows guests to appreciate the dessert’s composition. Furthermore, a trifle format works with any Oreo flavor variation, including peanut butter, birthday cake, or double chocolate Oreos. This serving method turns a casual dessert into an elegant centerpiece.
Conclusion
This Oreo lasagna truly stands as one of the most crowd-pleasing desserts you’ll ever make. After following these simple steps, you’ll have a showstopping treat that combines the perfect balance of chocolate cookie crunch with velvety layers of cream cheese and pudding. Best of all, you never need to turn on your oven!
Remember that patience pays off when making this dessert. Chilling between layers and allowing at least 4 hours of refrigeration before serving creates those picture-perfect slices everyone will admire before they quickly disappear.
What makes this recipe particularly wonderful is its versatility. Whether you stick with the classic version or experiment with mint, peanut butter, or fruity variations, this dessert adapts to any occasion. Additionally, the presentation options—from a simple baking dish to an elegant trifle—make it suitable for casual family gatherings and special celebrations alike.
My family requests this Oreo lasagna for almost every holiday now, and guests always ask for the recipe. Therefore, I recommend keeping these ingredients on hand for those times when you need an impressive dessert without spending hours in the kitchen. Once you try this easy no-bake creation, it will undoubtedly become your go-to dessert for years to come!
FAQs
Q1. How long does it take to make Oreo lasagna? While the actual preparation time is relatively quick (about 30 minutes), the dessert requires at least 4 hours of chilling time for the best results. For optimal flavor and texture, it’s recommended to chill overnight.
Q2. Can I use Double Stuf Oreos for the crust? It’s best to use regular Oreos for the crust. Double Stuf Oreos contain extra cream, which can make the crust too wet and greasy, affecting its consistency and stability.
Q3. What type of milk should I use for the pudding layer? Whole milk or half-and-half works best for creating a thick, rich pudding layer. However, 2% or nonfat milk can also be used. Avoid non-dairy milk as it may prevent the pudding from setting properly.
Q4. Can I make Oreo lasagna ahead of time? Yes, Oreo lasagna is an excellent make-ahead dessert. In fact, preparing it a day in advance allows the flavors to meld and the layers to set properly, resulting in a more delicious and visually appealing dessert.
Q5. Are there any variations to the classic Oreo lasagna recipe? Absolutely! You can try variations like peanut butter Oreo lasagna, mint chocolate version, or a Golden Oreo and strawberry twist. You can also customize toppings for holidays or serve it in a trifle dish for a more elegant presentation