The Perfect Frozen S’mores Recipe: A No-Bake Summer Treat
Frozen s’mores recipe takes the classic campfire treat we all love and transforms it into a refreshing summer dessert without needing any fire. These delicious treats combine the traditional s’mores flavors – graham crackers, chocolate, and marshmallow – but with a cool, creamy twist that’s perfect for hot days.
Creating these cold dessert recipes is surprisingly simple. The frozen s’mores squares feature layers of whipped fudgy chocolate and creamy marshmallow fluff sandwiched between golden graham crackers. Actually, the hardest part isn’t making them – it’s waiting for them to set in the freezer! Despite requiring only about 20 minutes of preparation time, you’ll need to exercise patience for 4-6 hours while they freeze completely. Furthermore, these frozen treats can be stored for up to 3 months when properly wrapped, making them an excellent make-ahead dessert option.
In this guide, I’ll show you exactly how to create this no-bake summer treat that’s both kid-friendly and crowd-pleasing. Whether you’re looking to cool down on a sweltering day or simply want to enjoy s’mores flavor year-round, this frozen s’mores recipe certainly delivers all the taste with none of the heat.
What Makes Frozen S’mores the Perfect Summer Treat
Summer calls for refreshing treats that don’t require you to turn on the oven. Frozen s’mores answer this call perfectly, offering all the nostalgic flavors of traditional s’mores with none of the heat or hassle. Let’s explore what makes this frozen s’mores recipe an ideal addition to your summer dessert lineup.
No baking required
First of all, the most appealing aspect of frozen s’mores during hot weather is that they require absolutely no baking. When temperatures soar, the last thing anyone wants is to heat up the kitchen with a hot oven. Unlike traditional baked desserts, these cold treats come together without any cooking whatsoever. You simply mix, layer, and freeze—making them perfect for sweltering days when even the thought of turning on the oven seems unbearable.
Additionally, the no-bake nature of frozen s’mores makes them accessible for cooks of all skill levels. Even kitchen novices can successfully create this impressive dessert without worrying about baking times, temperatures, or the dreaded possibility of burning. The preparation involves simple mixing and layering techniques that anyone can master, regardless of their culinary experience.
Cool and refreshing texture
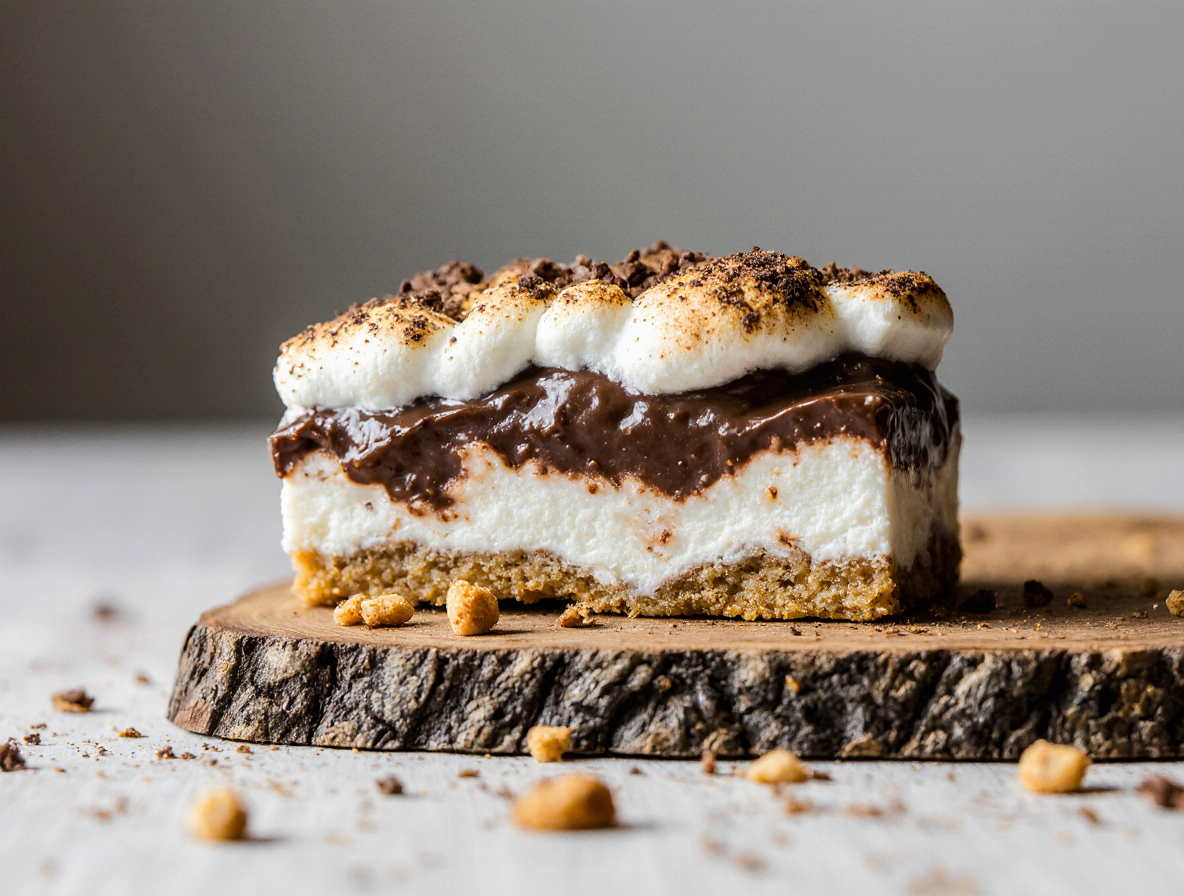
The texture of frozen s’mores is what truly sets them apart from their campfire cousins. Instead of the messy, melty experience of traditional s’mores, the frozen version offers distinct layers that create a delightful mouthfeel. The contrast between the creamy chocolate pudding layer and the fluffy marshmallow cream provides a sophisticated taste experience.
Moreover, the graham crackers transform during freezing—they soften slightly while maintaining just enough structure, creating a cake-like texture that’s easy to slice and serve. This combination of cold, creamy filling and tender graham cracker layers creates a refreshing dessert that cools you down instantly on hot summer days.
Kid-friendly and crowd-pleasing
Not only are frozen s’mores a hit with children, they’re equally beloved by adults, making them the perfect dessert for summer gatherings. The familiar flavors appeal to nostalgic adults while the fun, ice cream-like quality attracts younger palates.
In fact, frozen s’mores can be a wonderful activity to involve children in the kitchen, as the preparation requires no hot surfaces or dangerous tools. Kids can help mix the pudding, layer the ingredients, and then experience the satisfaction of enjoying a dessert they helped create.
As a bonus, these frozen treats can be prepared well in advance of any gathering, allowing hosts to focus on other aspects of entertaining rather than last-minute dessert preparation. The make-ahead nature of this cold dessert recipe means you’ll have more time to enjoy your own summer party rather than being stuck in the kitchen.
Ingredients You’ll Need for the Frozen S’mores Recipe
Before diving into making frozen s’mores, let’s gather all the essential ingredients you’ll need for this delightful cold dessert recipe. The beauty of this treat lies in its simple components that come together to create something truly special.
Graham crackers
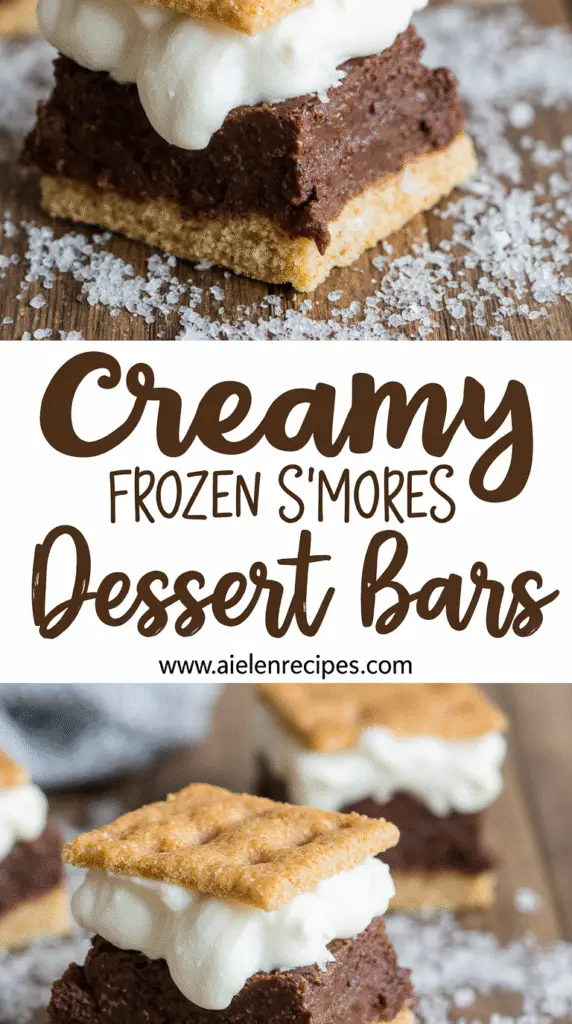
The foundation of any s’mores recipe starts with graham crackers. For this frozen version, you’ll need approximately 14-16 graham cracker sheets. These honey-sweetened crackers provide the perfect base and top layer for your frozen treats. Their subtle sweetness and distinctive flavor pair wonderfully with the filling ingredients. Look for whole graham cracker sheets rather than crumbs, as you’ll need intact pieces to create neat layers.
Instant chocolate pudding
Next, you’ll need a box of instant chocolate pudding mix (typically 3.9 oz). This forms the rich, fudgy chocolate layer that mimics the melted chocolate bar in traditional s’mores. Instant pudding works best here because it sets quickly and maintains a creamy texture even when frozen. Dark chocolate or chocolate fudge pudding varieties offer a deeper chocolate flavor compared to regular chocolate pudding.
Milk and whipped topping
To prepare the pudding layer, you’ll need approximately 1¾ cups of cold milk—slightly less than what’s typically called for on the pudding box. This ensures a thicker consistency that holds up well when frozen. Additionally, you’ll need about 8 ounces of whipped topping (like Cool Whip), which gets folded into both the chocolate and marshmallow layers to create a lighter, more mousse-like texture that remains scoopable even after freezing.
Cream cheese and marshmallow fluff
For the marshmallow layer, you’ll need 8 ounces of cream cheese (softened to room temperature) and one 7-ounce jar of marshmallow fluff. The cream cheese provides structure and a subtle tanginess that balances the sweetness, whereas the marshmallow fluff delivers that authentic s’mores flavor without needing to toast actual marshmallows.
Optional add-ins like mini chocolate chips
Though not essential, optional add-ins can elevate your frozen s’mores. Consider incorporating mini chocolate chips between layers for added texture and chocolate intensity. Other possibilities include chopped nuts, chocolate shavings, or even a drizzle of caramel sauce before the final freeze. These extras add visual appeal and flavor complexity to your cold dessert masterpiece.
Step-by-Step Guide to Making Frozen S’mores
Now that we have all our ingredients ready, let’s walk through the process of making these delicious frozen treats step by step. Creating frozen s’mores requires minimal effort yet delivers maximum flavor.
Prepare the chocolate pudding layer
First, grab a medium-sized mixing bowl and combine the instant chocolate pudding mix with cold milk. Whisk thoroughly for about 2 minutes until the mixture begins to thicken. Let it sit for approximately 5 minutes to set properly. Subsequently, fold in half of your whipped topping until well incorporated. This creates a lighter, fluffier chocolate layer that remains scoopable even when frozen. The pudding mixture should have a mousse-like consistency – thick enough to hold its shape yet smooth enough to spread easily.
Make the marshmallow cream layer
In a separate bowl, beat the softened cream cheese until completely smooth and free of lumps. This typically takes about 2-3 minutes with an electric mixer. Afterward, add the entire jar of marshmallow fluff and mix until fully combined. Gently fold in the remaining whipped topping until the mixture is light and airy. The finished marshmallow layer should be white, fluffy, and hold soft peaks when you lift your spoon.
Layer and assemble the s’mores
Line a 9×13-inch baking dish with parchment paper, allowing some overhang on the sides for easy removal later. Arrange a single layer of graham crackers on the bottom, breaking some pieces if needed to fit perfectly. Next, spread the chocolate pudding mixture evenly over the graham crackers. Following that, add another layer of graham crackers. Spread the marshmallow cream mixture on top, then finish with a final layer of graham crackers.
Freeze and slice into squares
Cover the dish with plastic wrap or aluminum foil and place in the freezer for at least 4 hours, although overnight is ideal for the best results. Once completely frozen, use the parchment paper overhang to lift the entire dessert out of the pan. Utilizing a sharp knife, cut into squares of your desired size.
Tips, Variations, and Storage Ideas
After perfecting your frozen s’mores creation, mastering a few additional techniques will help you achieve professional-looking results and exciting flavor variations. These simple yet effective tips will elevate your cold dessert experience.
Tips for clean slicing and serving
For picture-perfect frozen s’mores squares, timing and technique are essential. First, allow the frozen treats to sit at room temperature for 10-15 minutes before serving to soften slightly. This prevents the chocolate layer from being too firm and makes biting into them more enjoyable.
To achieve clean-edged slices, run your knife under hot water before each cut, wiping the blade between slices. This warm-knife technique creates those satisfyingly neat edges you see in bakery desserts. Additionally, using the graham cracker lines as cutting guides helps maintain uniform squares.
Flavor variations to try
The classic frozen s’mores recipe serves as an excellent base for creative variations:
- Chocolate graham crackers – Substitute regular grahams with chocolate ones for an extra chocolatey experience
- Cookies and cream – Fold crushed Oreo cookies into the chocolate pudding layer
- Peanut butter twist – Add chopped peanut butter cups and finish with a peanut butter drizzle
- Different pudding flavors – Try white chocolate or butterscotch pudding for unique flavor profiles
How to store frozen s’mores for later
Properly stored frozen s’mores maintain their quality for extended periods. Wrap each square individually in plastic wrap or parchment paper, then place in a freezer bag. This method prevents ice crystals and freezer burn while allowing you to grab individual portions whenever cravings strike.
These frozen treats will keep for 2-3 months when stored correctly, making them perfect for preparing well ahead of special occasions or keeping on hand for unexpected guests.
Make-ahead and freezer-friendly tips
The texture of frozen s’mores actually improves with time in the freezer, particularly overnight. For the best results when making ahead, ensure your layers are completely set before slicing. Line your pan with parchment paper leaving overhanging edges for easy removal.
When layering ingredients, place dollops before spreading to avoid disrupting the layers beneath. This technique creates distinct, visually appealing layers that maintain their separation even after freezing. Since these treats freeze beautifully, consider making a double batch to have on hand throughout summer.
Conclusion
Frozen s’mores truly represent the perfect marriage of nostalgic flavors and refreshing summer indulgence. Throughout this guide, we’ve seen how these delectable treats transform the classic campfire experience into something uniquely suited for hot weather enjoyment. Undoubtedly, the minimal preparation time coupled with their impressive presentation makes them an ideal choice for busy summer days.
Additionally, the versatility of this recipe opens up countless possibilities for personalization. Whether you prefer the classic combination or want to experiment with peanut butter, cookies and cream, or different pudding flavors, these frozen treats can be adapted to suit any taste preference. After all, the best recipes are those you can make your own!
Most importantly, frozen s’mores solve the common summer dilemma of wanting homemade desserts without heating up the kitchen. The no-bake nature of this treat means you can satisfy your sweet tooth while keeping cool. Furthermore, their make-ahead quality allows you to prepare them days or even weeks before you need them.
The next time the temperature rises and you’re craving something sweet yet refreshing, remember this frozen s’mores recipe. With its simple ingredients, straightforward preparation, and delightful layers of flavor, it might just become your new summer tradition. Unlike their campfire counterparts, these treats require no fire, no mess, and no fuss—just pure, cool enjoyment that brings together the best of childhood nostalgia and grown-up convenience.
FAQs
Q1. How long do frozen s’mores need to set in the freezer? Frozen s’mores require at least 4-6 hours in the freezer to set properly, but for best results, it’s recommended to freeze them overnight.
Q2. Can I make frozen s’mores ahead of time? Yes, frozen s’mores are perfect for making ahead. They can be stored in the freezer for up to 2-3 months when properly wrapped, making them an excellent make-ahead dessert option.
Q3. What are some flavor variations I can try with frozen s’mores? You can experiment with different flavors by using chocolate graham crackers, adding crushed Oreos for a cookies and cream version, incorporating peanut butter cups, or trying different pudding flavors like white chocolate or butterscotch.
Q4. How do I achieve clean-cut slices when serving frozen s’mores? For clean slices, let the frozen s’mores sit at room temperature for 10-15 minutes before cutting. Run your knife under hot water before each cut and wipe the blade between slices. Using the graham cracker lines as cutting guides can also help maintain uniform squares.
Q5. Are frozen s’mores kid-friendly to make? Absolutely! Frozen s’mores are very kid-friendly to make as they require no baking or use of hot surfaces. Children can help mix the pudding, layer the ingredients, and enjoy a dessert they helped create, making it a fun and safe kitchen activity for kids.