The Secret to Making the Perfect Key Lime Pound Cake (Chef-Tested Recipe)
Key lime pound cake perfectly balances buttery richness with the bright, tropical zing of fresh citrus. Actually, this dessert is more than just a treat—it’s a Southern classic with a refreshing twist, originating from a variation featured in Southern Living magazine back in 2011.
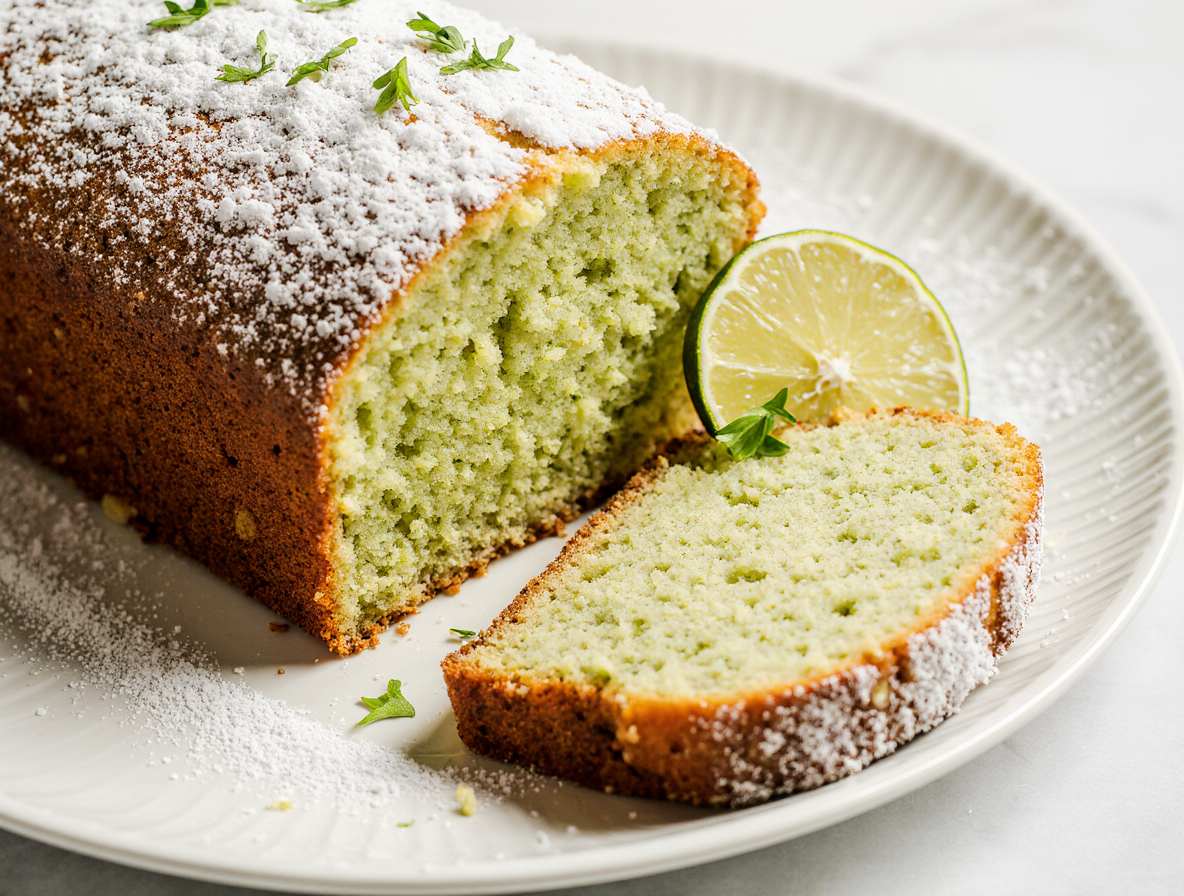
When I make this key lime pound cake recipe, I’m always impressed by how one cake can generously serve 12 to 16 people, making it perfect for gatherings. The recipe requires about 8-10 key limes, which are smaller than standard limes and offer a more aromatic, tart flavor without being too acidic. Furthermore, each slice delivers a decadent 683-695 calories of pure satisfaction, with the perfect balance of fats, carbohydrates, and protein.
In this guide, I’ll walk you through my chef-tested method for creating the best key lime pound cake recipe from scratch, complete with a delicious glaze that takes this dessert to another level. Whether you’re a seasoned baker or trying this for the first time, you’ll discover why this cake has become a new favorite for so many people.
Choosing the Right Ingredients for Key Lime Pound Cake
The foundation of an exceptional key lime pound cake begins with selecting quality ingredients. First of all, understanding each component’s role will help you achieve that perfect balance of tartness and sweetness.
Key lime juice vs regular lime juice
Authentic key limes differ significantly from standard Persian limes found in grocery stores. Key limes are smaller, yellower when ripe, and have noticeably thinner skin. While Persian limes are more acidic with a tangy flavor, key limes offer a sweeter, more aromatic taste with a distinctive floral quality. If you can’t find fresh key limes, regular lime juice makes an acceptable substitute. However, avoid bottled juice whenever possible – nothing compares to freshly squeezed for the brightest flavor.
Why lime zest matters
Lime zest plays a crucial role in creating depth of flavor. The zest contains fragrant oils that intensify the lime presence throughout your cake. Indeed, even a small amount dramatically enhances both flavor and aroma. For maximum impact, try rubbing the zest directly into sugar before mixing – this technique releases more oils from the zest, delivering an even stronger lime flavor.
Butter, shortening, or both?
The fat component significantly influences your pound cake’s texture. Many bakers prefer using a combination of butter and shortening rather than butter alone. Unsalted butter provides rich, classic flavor, while shortening creates a more tender, consistently moist crumb. In contrast, some recipes use all butter with sour cream for equally impressive results. Importantly, choose brand-name butter since it typically contains less water than generic versions.
The role of sour cream or milk
The liquid component determines your cake’s moisture level. Sour cream creates exceptional richness and the perfect crumb texture. Alternatively, whole milk produces a moist, tender result. Some recipes use buttermilk or heavy cream for variations in richness. Interestingly, you can create a buttermilk-like effect by adding lime juice to whole milk, which curdles it slightly for added tanginess.
Cake flour vs all-purpose flour
The flour choice directly impacts your cake’s structure. Cake flour, with its lower protein content, produces a lighter, airier texture. Meanwhile, all-purpose flour provides more structure. If cake flour isn’t available, create a substitute by replacing two tablespoons of all-purpose flour with cornstarch for each cup needed. Regardless of which flour you choose, measuring accurately prevents a dry cake – spoon it lightly into measuring cups rather than scooping directly from the bag.
Step-by-Step Guide to Making the Cake
Creating the perfect key lime pound cake depends on precise technique at each step. Let’s walk through the process that transforms simple ingredients into an extraordinary dessert.
1. Preparing your pan and oven
Preheat your oven to 325°F – this moderate temperature allows the cake to bake evenly throughout. Prepare your tube pan or bundt pan meticulously – grease thoroughly first, then dust lightly with flour, tapping out any excess. Alternatively, use parchment paper to line the pan for easier removal. For bundt pans specifically, ensure every crevice is coated to prevent sticking.
2. Creaming butter and sugar properly
This step is absolutely essential for a properly textured cake. Start with butter at cool room temperature (about 67°F) – it should give slightly when pressed without appearing greasy. Beat butter and shortening at medium speed until creamy. Next, gradually add sugar and beat for 3-5 minutes until the mixture becomes noticeably lighter in color and fluffy in texture. The visual transformation is key – properly creamed butter will be pale yellow with peaks and valleys. Remember to scrape down the bowl at least once during this process.
3. Mixing dry and wet ingredients
Combine your dry ingredients (flour, baking powder, salt) in a separate bowl. Add them to the butter mixture alternately with your wet ingredients, always beginning and ending with the flour mixture. This typically means adding flour in thirds and liquid in halves. Mix on low speed just until blended after each addition. This technique prevents overmixing while ensuring even distribution of ingredients.
4. Adding lime juice and zest at the right time
After your main ingredients are incorporated, stir in the vanilla, lime juice, and lime zest. Adding these flavoring elements at the end preserves their bright flavor and prevents the acidic lime juice from affecting the creaming process.
5. Baking time and doneness check
Bake for approximately 1 hour and 15-20 minutes. To test doneness, insert a long wooden pick or skewer into the center – it should come out clean or with just a few moist crumbs. If the cake begins browning too much before it’s done, loosely tent with foil. Cool in the pan on a wire rack for 10-15 minutes before gently removing. This cooling period allows the cake to set while still warm enough to release easily.
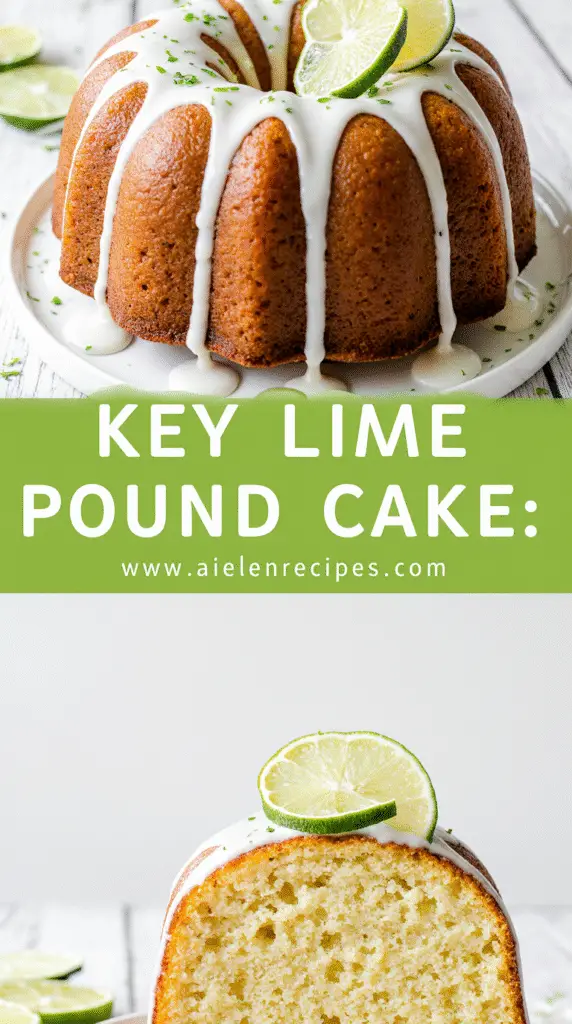
Making the Perfect Key Lime Glaze
The finishing touch that elevates a key lime pound cake from good to extraordinary is the glaze. This final element not only adds moisture but also intensifies the cake’s signature tangy-sweet profile.
Basic glaze ingredients
The classic key lime glaze requires remarkably few ingredients. Most recipes call for powdered sugar as the base, combined with fresh key lime juice and vanilla extract. For the perfect balance, I typically use about 1-2 cups of powdered sugar with 2-3 tablespoons of key lime juice. Additionally, some recipes incorporate lime zest for visual appeal and extra flavor intensity. Essentially, the ratio determines consistency – start with the powdered sugar and add lime juice gradually until you achieve the desired thickness.
Cream cheese glaze vs classic glaze
While the traditional glaze offers bright, clean flavors, cream cheese versions provide luxurious richness. For a cream cheese glaze, you’ll need 2-8 ounces of softened cream cheese, powdered sugar, key lime juice, and vanilla extract. The cream cheese creates a more opaque, frosting-like appearance compared to the translucent classic glaze. Furthermore, cream cheese glazes work particularly well for those who enjoy a “sweet-tart heaven” combination that balances the cake’s sweetness. To adjust consistency, gradually add milk until you reach your preferred thickness.
Tips for applying glaze evenly
For a perfectly glazed cake, consistency matters tremendously. The ideal glaze should pour slowly and coat the back of a spoon – neither too runny nor too thick. Consequently, when applying, place waxed paper beneath the cooling rack to catch drips. For even coverage, use a pastry brush to completely glaze the still-warm cake, including the center hole if using a bundt pan. Moreover, sifting the powdered sugar beforehand prevents clumps in your glaze.
When to glaze the cake
Timing is crucial for glazing. For classic glazes, apply immediately after preparing while the cake is still warm, which allows the glaze to seep in, creating sweet, flavorful rivulets throughout. Ultimately, for cream cheese glazes, wait until the cake has completely cooled to prevent melting. Once glazed, garnish with additional lime zest for an extra visual pop and flavor boost.
Tips, Variations, and Storage
Even a perfectly formulated key lime pound cake recipe needs careful execution to achieve amazing results. Making a few adjustments can transform your cake from good to exceptional.
Common mistakes to avoid
Measuring inconsistently is the biggest culprit behind failed pound cakes. Spoon and level (or weigh) your flour rather than scooping directly from the bag. Always use room temperature ingredients—especially eggs and butter—for proper emulsification and texture. Avoid overmixing once the flour is added; this creates a tough, rubbery cake with an uneven bake. Finally, resist opening the oven door before minimum baking time elapses as this can cause your cake to fall.
Flavor variations: coconut, berries, or white chocolate
Creating delicious variations on the classic key lime pound cake is surprisingly simple. For a tropical twist, add shredded coconut to the batter, substitute some milk with coconut milk, or top with toasted coconut. Alternatively, fold raspberries or blueberries into the batter before baking for a fruity surprise. White chocolate enthusiasts can either fold chips into the batter or drizzle melted white chocolate over the finished cake. Sprinkle graham cracker crumbs over the top for added crunch and a key lime pie feel.
How to store and freeze the cake
This cake maintains perfect texture at room temperature for 3-5 days when stored in an airtight container. Though refrigeration is possible, it often negatively affects texture. For long-term storage, wrap individual slices or the whole cake tightly in plastic wrap and aluminum foil, then freeze in a freezer-safe bag for up to six months. Bring frozen cake to room temperature before serving.
Serving suggestions and toppings
Serve this cake alongside freshly whipped cream and a lime slice for elegant simplicity. A scoop of vanilla ice cream creates a decadent dessert experience. Leftover slices make excellent trifles—simply layer crumbled cake with whipped cream and sprinkle with additional lime zest. This versatile dessert complements meals featuring citrus flavors and makes an impressive addition to potlucks and summer gatherings.
Conclusion
Key lime pound cake truly stands as a testament to how simple ingredients can create something extraordinary. Throughout this guide, we’ve explored every aspect of crafting this Southern classic, from selecting the finest ingredients to applying the perfect glaze. Undoubtedly, the secret lies in balancing precise technique with quality components—especially those aromatic key limes that give this dessert its signature character.
After testing countless variations, I’ve found that attention to detail makes all the difference. Therefore, don’t rush the creaming process, measure ingredients carefully, and allow yourself to enjoy the process. Additionally, remember that fresh key lime juice will always deliver superior results compared to bottled alternatives.
The versatility of this cake also deserves special mention. Whether served at summer gatherings or holiday celebrations, this dessert consistently impresses guests while requiring relatively little effort. You can even prepare it days in advance or freeze portions for later enjoyment.
Finally, don’t hesitate to make this recipe your own. As I’ve discovered, adding coconut, berries, or white chocolate transforms this classic into something uniquely yours while still honoring its traditional roots. This key lime pound cake has become one of my most requested desserts—not just because it tastes amazing, but because each slice brings a moment of citrus-infused joy that’s hard to replicate with any other treat.
FAQs
Q1. What’s the key to achieving a moist key lime pound cake? The secret lies in using the right ingredients and techniques. Use a combination of butter and shortening, incorporate sour cream or whole milk for moisture, and avoid overmixing the batter. Proper creaming of butter and sugar is also crucial for a moist, tender texture.
Q2. Can I use regular lime juice instead of key lime juice in the recipe? While key limes offer a more aromatic and sweeter taste, you can substitute regular lime juice if key limes are unavailable. However, for the best flavor, always use freshly squeezed juice rather than bottled alternatives.
Q3. How do I properly apply the glaze to my key lime pound cake? For even coverage, apply the glaze while the cake is still warm. Use a pastry brush to coat the entire cake, including the center hole if using a bundt pan. The glaze should be thin enough to pour slowly but thick enough to coat the back of a spoon.
Q4. How long can I store my key lime pound cake? When stored in an airtight container at room temperature, the cake maintains its perfect texture for 3-5 days. For longer storage, you can freeze individual slices or the whole cake for up to six months.
Q5. What are some flavor variations I can try with this key lime pound cake recipe? You can create delicious variations by adding shredded coconut, folding in berries like raspberries or blueberries, or incorporating white chocolate chips. For a key lime pie feel, try sprinkling graham cracker crumbs over the top of the glazed cake.