The Secret to Perfect Homemade Easy Cheesy Pizza Pockets (Better Than Store-Bought)

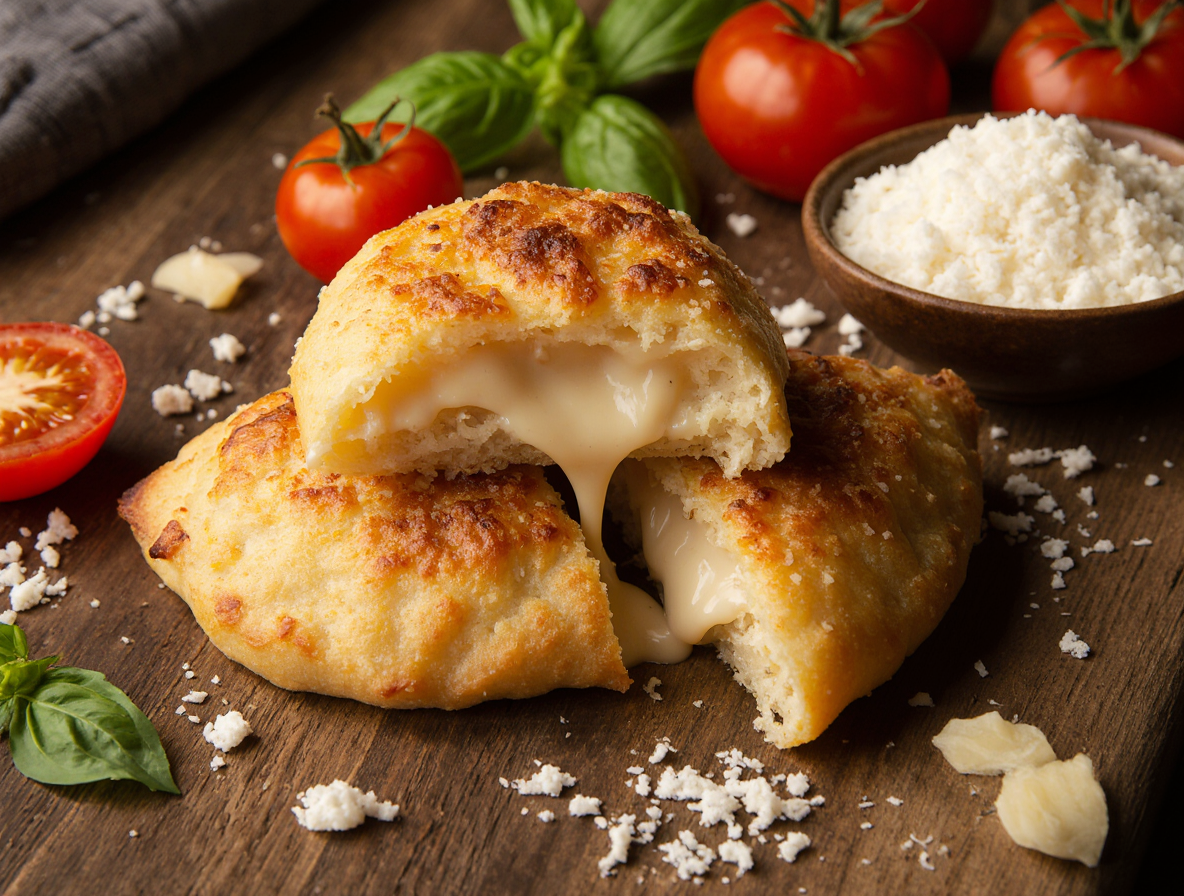
Homemade easy cheesy pizza pockets take less than 20 minutes to prepare yet taste absolutely amazing! Unlike their store-bought counterparts, these delicious hand-held treats feature a perfectly crispy outside with an irresistibly gooey cheese center that will make you feel like you’re eating restaurant-quality food.
What’s particularly great about making pizza pockets at home is that you don’t need advanced cooking skills to create them. Furthermore, they’ve become a favorite option for both quick weeknight dinners and party snacks. With just four ingredients and approximately 10 minutes of prep work, these kid-approved treats can be customized to suit everyone’s taste preferences. Although they’ll keep in the refrigerator for up to three days, I definitely recommend baking them right before serving for the best flavor experience.
Essential Ingredients for Easy Pizza Pockets
The foundation of perfect homemade easy cheesy pizza pockets begins with selecting the right ingredients. Let’s explore what you’ll need to create these delicious handheld treats.
Dough options: homemade vs store-bought
When it comes to pizza pocket dough, you have two excellent paths to choose from. For homemade enthusiasts, a soft dough made with eggs creates a fluffy texture that’s ideal for encasing your fillings. Adding eggs to your dough makes it significantly softer than traditional pizza crust. Another quick homemade option combines self-rising flour with Greek yogurt for a protein-packed base that doesn’t require yeast.
If you’re short on time, store-bought alternatives work wonderfully. Refrigerated pizza crust like Pillsbury is readily available and easy to work with. Moreover, puff pastry transforms into a golden, flaky crust that’s buttery and delicious. Crescent roll dough is another excellent choice, offering the most irresistible buttery, flaky bite according to kitchen tests.
Best cheeses for melting
The star of any pizza pocket is undoubtedly the cheese. Low-moisture mozzarella is the gold standard for that perfect stretch and melt. For enhanced flavor, many recipes recommend freshly shredded cheese rather than pre-packaged options – the anti-clumping agents in bagged cheese can prevent proper melting.
Creating a blend of cheeses elevates your pizza pockets from good to extraordinary. Try combining mozzarella with parmesan for added depth, or introduce cheddar for bold flavor. For those who enjoy heat, pepper jack makes an excellent substitute for traditional mozzarella.
Choosing the right sauce
The sauce provides crucial moisture and flavor to your pizza pockets. Traditional pizza sauce or marinara work beautifully, with thicker varieties preventing leakage during baking. Surprisingly, pasta sauce can double as pizza sauce in a pinch.
Homemade sauce gives you complete control over spices and sweetness, while store-bought options offer convenience without sacrificing taste. In fact, some specialty pizza sauces, while flavorful, can be too watery for pocket assembly.
Popular fillings to try
The beauty of homemade pizza pockets lies in their infinite customization options:
- Meat lovers: Pepperoni, cooked crumbled sausage, ham, or bacon
- Vegetarian delights: Mushrooms, spinach, peppers, broccoli, or olives
- Specialty combinations: Hawaiian (ham/pineapple), buffalo chicken (chicken/hot sauce/mozzarella), or Mediterranean (sundried tomato pesto/spinach/olives)
One crucial tip: pre-cook vegetables in butter to remove excess moisture and prevent soggy dough. Additionally, keep filling amounts moderate – overstuffing leads to exploding pockets during baking.
Step-by-Step: How to Make Homemade Pizza Pockets
Creating homemade easy cheesy pizza pockets is a straightforward process that yields delicious results. Let me walk you through the steps to ensure your pockets turn out perfect every time.
1. Roll and cut the dough
Start by preheating your oven to 425°F. Place your pizza dough on a lightly floured surface and use a rolling pin to roll it out to a 1/4-inch thickness. Depending on your preference, you can shape the dough into a rectangle or square. For rectangles, cut the dough into 6-8 evenly sized pieces using a sharp knife or pizza cutter. Alternatively, use a 3-inch biscuit cutter for circular pockets, then roll these circles slightly larger to accommodate your fillings.
2. Add sauce, cheese, and fillings
Spoon approximately 1 tablespoon of pizza sauce onto one half of each dough piece, leaving a 1/2-inch border around the edges. Follow with 2 tablespoons of shredded mozzarella cheese on top of the sauce. Next, add your desired toppings, being careful not to overfill – a common mistake that leads to leakage. Remember that a little goes a long way; for pepperoni pockets, 2-3 slices is typically sufficient.
3. Seal the edges properly
Fold the empty half of the dough over your fillings to create a pocket. Press the edges together firmly with your fingers first. Then, use a fork dipped lightly in flour to crimp all around the edges, ensuring a tight seal. This double-sealing method is crucial for preventing any filling from escaping during baking.
4. Brush with oil or egg wash
For a golden, flavorful crust, brush the tops of your pizza pockets with either:
- Egg wash (whisk an egg yolk with 1 tablespoon water)
- Olive oil or melted butter
- Butter mixed with herbs like oregano and garlic powder
5. Bake until golden and bubbly
Using a fork, poke a few small holes in the top of each pocket to allow steam to escape. Place your pockets on a parchment-lined baking sheet and bake for 12-17 minutes until the crust turns golden brown. Let them rest for a few minutes before serving, as the filling will be extremely hot.
Creative Filling Ideas to Customize Your Pockets
The beauty of homemade easy cheesy pizza pockets lies in their endless customization potential. Let’s explore some exciting filling combinations that will elevate your pocket game.
Meat lovers: sausage, pepperoni, bacon
For those craving a protein-packed treat, meat lovers’ pizza pockets deliver savory satisfaction. Combine ground sausage with mozzarella and marinara for a classic flavor profile. Alternatively, layer pepperoni slices with cheese for that nostalgic pizza taste. For ultimate indulgence, add crumbled bacon or ham to create a multi-meat masterpiece. These hearty combinations work especially well with Italian seasoning sprinkled on the buttered crust.
Vegetarian options: mushrooms, spinach, peppers
Plant-based fillings offer incredible variety and freshness. Try sautéed mushrooms with spinach and mozzarella for an earthy flavor. Red onions and bell peppers add sweet crunch, consequently making excellent additions. Broccoli, celery, and carrots provide nutritious options that kids might not otherwise eat. For Mediterranean flair, combine sun-dried tomatoes with fresh basil and vegan cheese alternatives.
Spicy combos: jalapeños, hot sauce, pepper jack
Heat-seekers can create fiery pockets with strategic ingredient choices. Jalapeños paired with pepper jack cheese create moderate spice, whereas hot sauce mixed into the base sauce intensifies the heat level. Subsequently, adding chili powder or garam masala to vegetable fillings creates unique flavor profiles. These spicy variations pair excellently with cooling dips like ranch.
Kid-friendly picks: cheese only, ham and pineapple
Simple combinations typically win over younger eaters. A basic three-cheese pocket (mozzarella, cheddar, and parmesan) remains a foolproof option. Notably, ham and pineapple creates the popular “Hawaiian” flavor kids adore. Likewise, pepperoni-only pockets mirror the familiarity of classic pizza slices children already enjoy.
Cheese blends that work well
Perfecting your cheese combination elevates homemade pizza pockets from good to extraordinary:
- Mozzarella + provolone: Ultimate stretchability with enhanced flavor
- Cheddar + mozzarella: Sharp tanginess balanced with creamy melt
- Fontina + parmesan: Buttery melt with nutty depth
- Gouda (especially smoked) + monterey jack: Rich flavor with excellent melting
Remember that harder, aged cheeses melt less readily, so pair them with younger, meltable varieties for best results.
Storage, Freezing, and Reheating Tips
Once you’ve prepared your pizza pockets, proper storage becomes the key to maintaining their delicious taste for future enjoyment. Let me share my tested methods for keeping these treats fresh.
How to store in the fridge
After baking your homemade easy cheesy pizza pockets, allow them to cool completely before storage. I place mine in airtight containers to maintain optimal freshness. Indeed, proper cooling prevents condensation that could make your pockets soggy. Store them in the refrigerator for easy access, yet remember that the sooner you consume them, the better they’ll taste.
Freezing unbaked vs baked pockets
Both freezing methods work well, but each serves a different purpose:
Unbaked freezing: Place assembled pockets on a baking sheet, freeze until solid, then transfer to freezer bags. This method gives you fresh-baked taste later, as you’ll bake them directly from frozen at 375°F for 25-30 minutes.
Baked freezing: Cool completely (about 1 hour in refrigerator), wrap individually in plastic wrap, then place in freezer bags. This option provides quick reheating convenience.
Best ways to reheat for crispiness
To restore that perfect texture:
- Oven: Reheat at 350°F for 10-15 minutes—ideal for maintaining crispy crusts
- Microwave: For speed, use medium-low power for 1½ minutes, then high for 1½-2 minutes
- Air fryer: Reheat at 350°F for 4-6 minutes for exceptional crispiness
- Stovetop: Place in skillet over medium heat, cover for 5 minutes until bottom crisps and cheese melts
For microwave reheating, I recommend covering with a damp paper towel to prevent drying out.
How long they last in freezer or fridge
Properly stored homemade pizza pockets remain fresh in the refrigerator for 3-5 days. For longer storage, frozen pockets maintain quality for up to 3 months. First, flash-freeze them individually before transferring to storage bags to prevent sticking together. Unlike store-bought versions, homemade pockets lack preservatives, hence the shorter freezer life compared to commercial products that last 14 months.
Regardless of storage method, always check for signs of spoilage before consuming. Trust your senses—if something seems off with appearance or smell, it’s safer to discard.
Conclusion
Homemade easy cheesy pizza pockets undoubtedly offer a superior alternative to their store-bought counterparts. Throughout this guide, we’ve explored how these delicious treats combine simplicity with endless customization possibilities. First and foremost, their quick 20-minute preparation time makes them perfect for busy weeknights when cooking elaborate meals seems impossible.
The versatility of pizza pockets truly stands out as their greatest strength. Whether you prefer traditional pepperoni, vegetable-packed options, or adventurous flavor combinations, these handheld treats adapt to any preference. Families particularly appreciate this flexibility since everyone can enjoy their favorite fillings without compromise.
Proper storage techniques certainly extend the enjoyment of your homemade creations. Flash-freezing unbaked pockets provides that fresh-baked experience weeks later, while knowing the best reheating methods ensures your pockets maintain their crispy exterior and gooey interior regardless of when you eat them.
After all, the real magic happens when you take that first bite – the perfect contrast between crispy crust and melted cheese creates an experience store-bought versions simply cannot match. Though the process might seem intimidating at first, the straightforward steps we’ve outlined make success virtually guaranteed, even for kitchen novices.
My family now requests these pizza pockets regularly, and I’ve found them equally perfect for quick lunches, dinner solutions, or party appetizers. The ability to control ingredients means healthier options compared to processed alternatives, without sacrificing any flavor.
Give these homemade easy cheesy pizza pockets a try this week – your taste buds will thank you, and you’ll likely never return to the freezer aisle version again!
FAQs
Q1. How long does it take to make homemade pizza pockets? Homemade pizza pockets take about 20 minutes to prepare, including 10 minutes of prep work and 10-15 minutes of baking time.
Q2. What are some good cheese options for pizza pockets? Low-moisture mozzarella is ideal for melting. You can also try blends like mozzarella with parmesan, cheddar, or pepper jack for added flavor.
Q3. Can I freeze homemade pizza pockets? Yes, you can freeze both unbaked and baked pizza pockets. Unbaked pockets can be frozen on a baking sheet, then transferred to freezer bags. Baked pockets should be cooled completely, wrapped individually, and placed in freezer bags.
Q4. What are some vegetarian filling ideas for pizza pockets? Popular vegetarian fillings include sautéed mushrooms, spinach, bell peppers, broccoli, and olives. You can also try combinations like sun-dried tomatoes with fresh basil or a three-cheese blend.
Q5. How do I reheat pizza pockets to keep them crispy? For the best crispy texture, reheat pizza pockets in an oven at 350°F for 10-15 minutes. Alternatively, you can use an air fryer at 350°F for 4-6 minutes or reheat them in a covered skillet on the stovetop for about 5 minutes.