Ultimate Green Chile Chicken Enchiladas Recipe
Introduction
Exploring the rich flavors of Mexican cuisine can be an exciting journey for any home cook. Among the many delightful dishes, enchiladas hold a special place in many hearts and stomachs. These rolled tortillas, usually filled with a variety of ingredients, are typically smothered in a spicy sauce that brings a beautiful harmony of flavors and textures. In this guide, we’ll delve into the ultimate green chile chicken enchiladas recipe, highlighting their zesty flavors and comforting texture.
Succulent, shredded chicken mingles with creamy sour cream and savory green chiles, all encased within warm corn tortillas and topped with gooey, melted cheese. This dish is not only delightful to taste but also visually appealing with its vibrant colors. Whether you’re hosting a family dinner or craving a comforting meal after a long day, these enchiladas fit the bill perfectly. Serve them alongside a fresh salad or some Mexican rice for a wholesome meal.
Recipe Overview
– Total Time: 45 minutes
– Prep Time: 15 minutes
– Servings: 4-6
– Difficulty: Not specified in the recipe
The ultimate green chile chicken enchiladas feature a delightful combination of flavors that are sure to please anyone. The green chile enchilada sauce provides a gentle heat, while the sour cream and shredded cheese add richness and creaminess. Ideal for both weeknight meals and festive gatherings, these enchiladas offer convenience, especially when using pre-cooked chicken. The whole family will enjoy this dish, making it a great addition to your recipe repertoire.
Ingredients
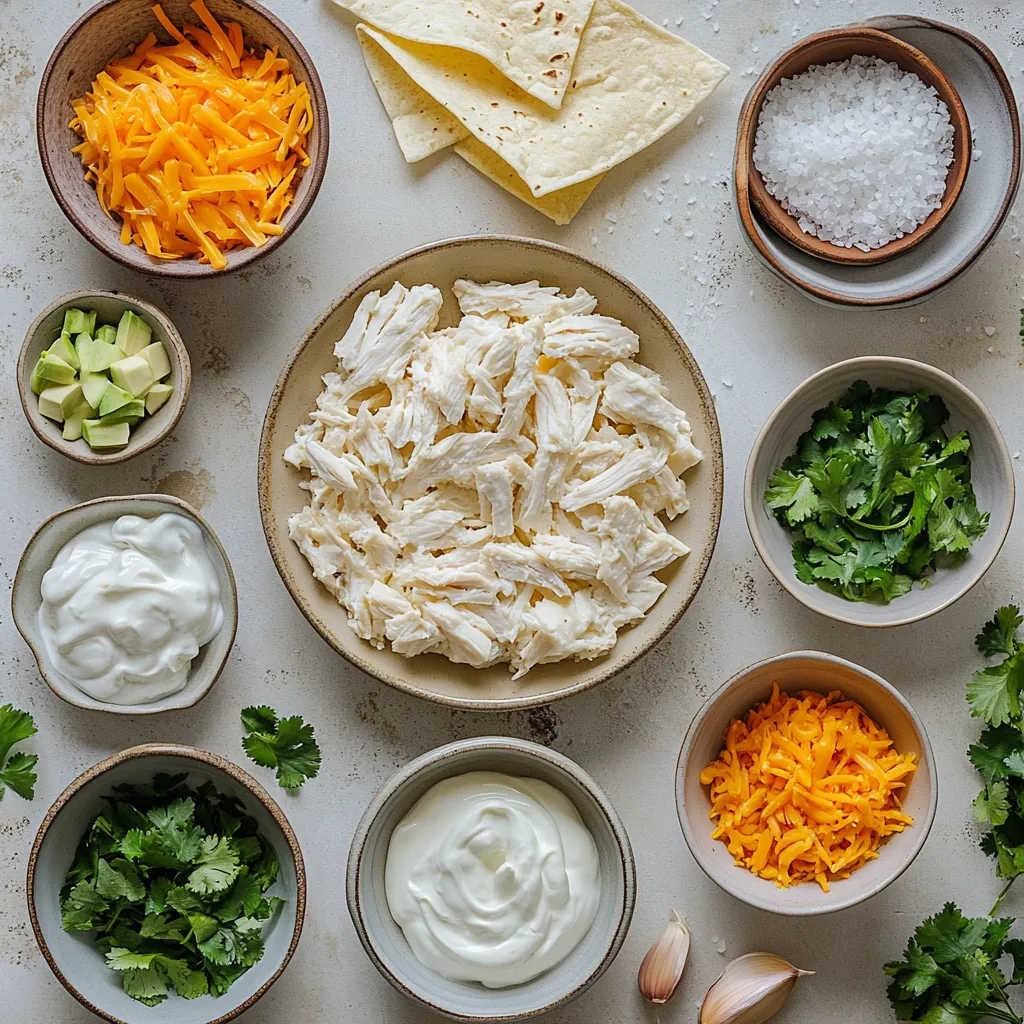
– 2 cups cooked shredded chicken (rotisserie chicken works wonderfully)
– 1 can (10 oz) green chile enchilada sauce
– 1 can (4 oz) diced green chiles
– 1 cup sour cream
– 2 cups shredded cheese (choose between cheddar or Monterey Jack)
– 8-10 corn tortillas
– 1/2 cup chopped fresh cilantro (optional, for garnish)
– 1 teaspoon garlic powder
– 1 teaspoon onion powder
– Salt and pepper, to taste
Main Ingredients
The foundation of the dish includes essential components like cooked shredded chicken and green chile enchilada sauce, creating the primary flavors of the enchiladas. The diced green chiles elevate the taste further, while sour cream adds a creamy texture. The choice of melted cheese for garnish contributes both flavor and visual appeal.
Optional Ingredients
For those looking to enhance the dish, fresh cilantro acts as a beautiful garnish that adds freshness. Salt and pepper serve as basic seasonings to bring out the flavors. Both garlic powder and onion powder are crucial in building a rich flavor profile in the chicken filling.
Kitchen Tools Required
To prepare this dish, you’ll need a few essential kitchen tools: a 9×13 inch baking dish for assembling the enchiladas, a mixing bowl to combine the filling ingredients, a skillet or microwave for warming tortillas, and aluminum foil to cover the baking dish while cooking.
Instructions
1. Preheat the Oven: Begin by preheating your oven to 350°F (175°C) to ensure it’s ready for baking.
2. Prepare the Filling: In a large mixing bowl, combine the shredded chicken, half of the green chile enchilada sauce, diced green chiles, sour cream, half of the shredded cheese, garlic powder, onion powder, and a pinch of salt and pepper. Stir the mixture thoroughly until all ingredients are well incorporated.
3. Warm the Tortillas: To make the corn tortillas more pliable and easier to roll, warm them in a skillet over medium heat for a minute on each side or microwave them for about 30 seconds.
4. Assemble the Enchiladas: Spread a thin layer of the remaining enchilada sauce on the bottom of a 9×13-inch baking dish to prevent sticking. Take one tortilla, add approximately 1/4 cup of the chicken filling, roll it up tightly, and place it seam-side down in the baking dish. Repeat the process with the remaining tortillas and filling until they are all assembled.
5. Add Sauce and Cheese: Once all enchiladas are arranged in the dish, pour the remaining enchilada sauce evenly over the top. Then, sprinkle the remaining shredded cheese generously over the sauce.
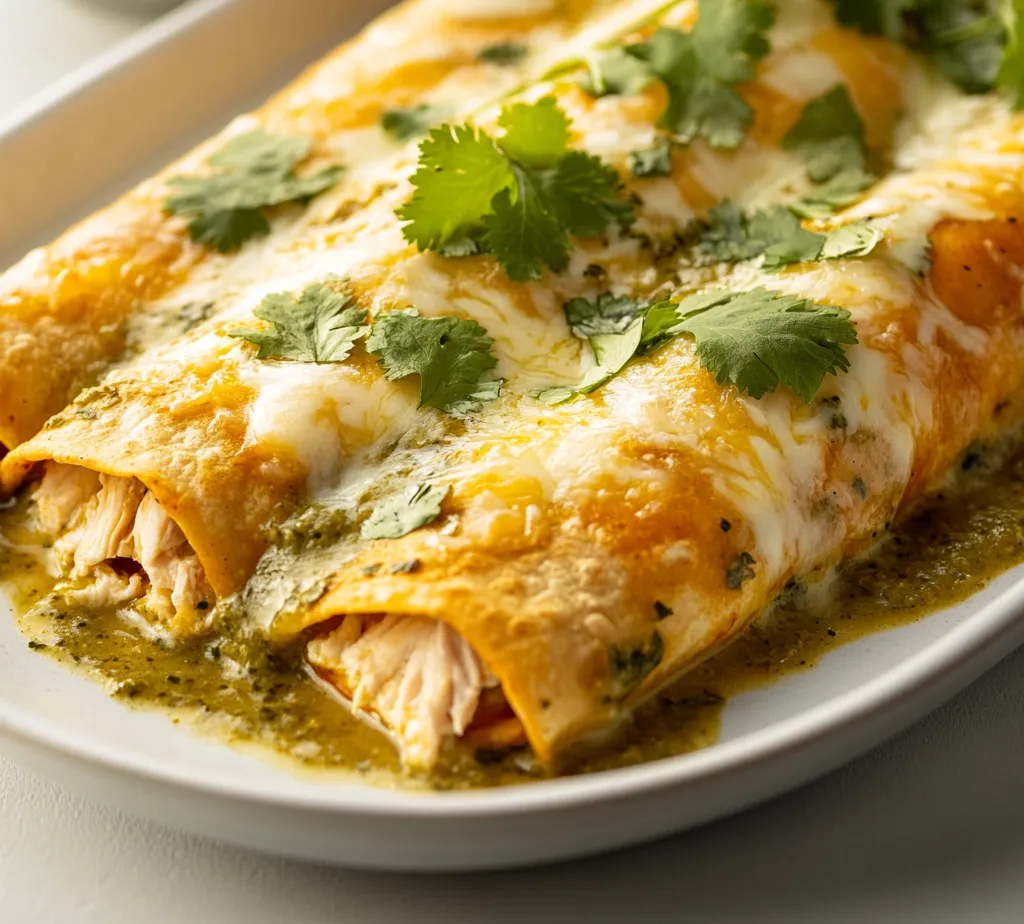
6. Bake to Perfection: Cover the baking dish with aluminum foil and place it in the preheated oven. Bake for 20 minutes, then remove the foil and continue baking for an additional 10-15 minutes, or until the cheese is melted, bubbly, and slightly golden.
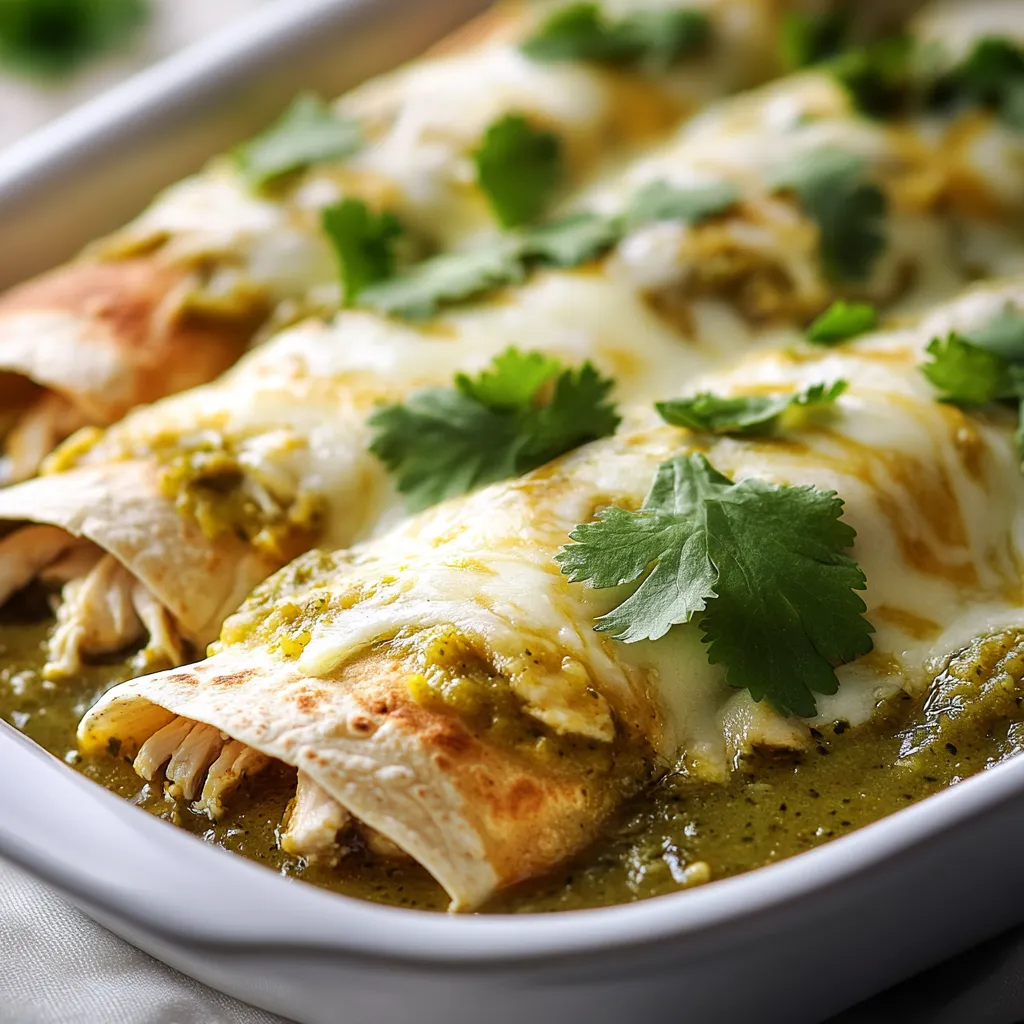
7. Garnish and Serve: After removing the dish from the oven, allow it to cool for a few minutes. If desired, sprinkle with chopped fresh cilantro for a burst of color and flavor. Serve warm and savor every bite!
Preparing the Chicken Filling
The filling is the star of the show in enchiladas, making it essential to craft a delicious blend of ingredients. Shredded chicken, whether pulled from a roast or pre-cooked, is the primary feature. If you choose rotisserie chicken, it not only simplifies the process but also infuses flavors from the spices used during cooking.
Shredding the Chicken
To create shredded chicken, the easiest approach is to use pre-cooked rotisserie chicken, allowing you to save time and ensure flavor. For those starting from scratch, poaching or boiling chicken breasts until fully cooked and tender works well. Using two forks to pull apart the chicken yields perfectly shredded pieces—just be sure to avoid overcooking, which can dry it out.
Mixing the Ingredients
In a large mixing bowl, combine your chicken with the enchilada sauce, diced green chiles, sour cream, garlic powder, onion powder, and seasonings. It is essential to combine these ingredients thoroughly to ensure every tortilla enjoys a flavorful filling. Give it a solid stir until the mixture is uniform and creamy, allowing the flavors to meld together seamlessly.
Balancing Flavors
Don’t underestimate the importance of seasoning in this part of the preparation. While the green chiles and enchilada sauce provide some heat and depth, the garlic powder and onion powder enhance the flavor profile remarkably. Adjusting salt and pepper to your palate can amplify the taste even further, making your enchilada experience all the more enjoyable.
Warming the Tortillas
Warming the corn tortillas is a vital step in preparing your enchiladas, aiding the rolling process and preventing cracking during assembly. Flexible tortillas form the perfect vessel for your delicious filling.
Skillet Method
To warm tortillas on the skillet, begin by preheating it to medium heat. Add a few tortillas at a time, allowing one minute on each side. You want them just warm enough to bend without breaking, so avoid overcooking. This method adds a light toasted flavor that enhances the overall dish.
Microwaving Technique
If you’re in a hurry, microwaving is an efficient alternative. Stack a handful of tortillas, wrap them in a damp paper towel, and microwave for about 30 seconds. This method will steam the tortillas, making them soft and pliable, ready for filling and rolling without any fuss.
Assembling the Enchiladas
Assembling enchiladas is not just about filling and rolling; it’s also about building layers of flavor that will meld together beautifully during baking.
Spreading the Sauce
Begin the assembly process by spreading a thin layer of enchilada sauce on the bottom of your baking dish. This not only prevents sticking but also adds moisture and flavor to the base of your dish. Following this, spoon approximately 1/4 cup of the prepared filling onto each warm tortilla, roll it tightly, and nestle it seam-side down into the prepared dish.
The careful arrangement of enchiladas will ensure an even distribution of sauce and cheese later, creating a beautiful layer of melted goodness atop each one. Repeat the process for all tortillas until the dish is full. The anticipation of that first bite will only continue to grow as you complete these final steps.
Filling the Tortillas
When it comes to filling and rolling the tortillas for your enchiladas, technique is key to ensuring even distribution and preventing any messy leaks while baking. Start by using a tablespoon or measuring cup to scoop approximately 1/4 cup of the delicious chicken filling onto each tortilla. Place the filling slightly off-center, closer to one edge of the tortilla. This allows you to have enough room to roll it tightly without spilling.
Next, gently fold the sides of the tortilla over the filling, creating a pocket, before rolling it away from you toward the opposite edge. Press lightly as you roll to ensure a snug fit but avoid crushing the tortilla. Place the finished enchilada seam-side down in the prepared baking dish. This method not only ensures a clean roll but also helps keep everything intact during baking.
Arranging in the Dish
When arranging the rolled enchiladas in your baking dish, it’s important to consider the spacing to avoid them unraveling during the cooking process. Ensure that you place each enchilada closely, but not overcrowded. This allows them to maintain their shape while also ensuring that the edges get hit with the steam, which keeps them moist. If you have leftover filling, consider placing a spoonful on top of the arranged enchiladas before adding the sauce, which will enhance the flavor even more.
Adding Sauce and Cheese
Finishing the enchiladas with sauce and cheese not only elevates their flavors but also contributes significantly to their enticing appearance.
Pouring the Remaining Sauce
To evenly distribute the remaining green chile enchilada sauce over your assembled enchiladas, start by pouring it in a zigzag pattern across the dish. This technique allows the sauce to flow into the gaps between each enchilada, ensuring every bite is infused with flavor. For additional moisture, you can tilt the dish slightly and gently shake it back and forth, helping the sauce seep into the gaps.
Cheese Layering Techniques
Sprinkling the cheese in an even layer is essential for achieving a delightful gooey finish. Use your fingers or a small cup to sprinkle the shredded cheese evenly over the top of the enchiladas. When doing so, consider mixing the cheddar and Monterey Jack for a blend of flavors and textures. For added gourmet flair, you might sprinkle some cheese in the middle of the enchiladas before adding the topping, which allows for a cheesy surprise in every bite.
Baking the Enchiladas
Baking transforms your assembly of ingredients into a complete meal with rich, layered flavors.
Initial Baking
Cover the baking dish with aluminum foil to help trap steam and moisture. This step is critical during the first phase of baking as it encourages the cheese to melt evenly and prevents the enchiladas from drying out. Bake in the preheated oven for about 20 minutes. This initial baking allows the flavors to meld together without overcooking the tortillas.
Uncovering for Melting Cheese
After the first 20 minutes, it’s time to remove the foil. This step is crucial for creating that sought-after bubbly, golden cheese topping. Continue baking for an additional 10-15 minutes. Keep an eye on the enchiladas in the final minutes; a perfect finish will have melted cheese that is just beginning to brown, resulting in a mouth-watering contrast to the tender tortillas.
Serving Suggestions
Presentation plays a key role in the dining experience, especially with vibrant dishes like green chile chicken enchiladas.
Garnishing Ideas
Once out of the oven, consider garnishing your enchiladas with fresh cilantro and lime wedges. The cilantro adds a pop of color and fresh flavor, enhancing the dish’s appearance and taste. A squeeze of lime right before taking a bite can brighten the flavors, making each mouthful even more enjoyable.
Pairing Options
For a complete meal, serve the enchiladas alongside a simple salad or fluffy Mexican rice. A side of refried beans or black beans can also complement the creamy chicken filling beautifully, adding more protein and fiber to your meal. For a refreshing accompaniment, consider a light corn salad or a zesty salsa.
Tips for Success
Maximize your enchiladas’ success with a few helpful tips based on common practices.
Choosing the Right Cheese
The choices of cheese make a significant difference in both flavor and texture in enchiladas. Opting for a finely shredded cheese will melt more evenly than larger chunks. Cheddar brings a slightly sharp taste, while Monterey Jack offers a creamy, milder flavor, providing a perfect balance.
Storing Leftovers
To store any leftover enchiladas, allow them to cool completely before transferring them to an airtight container. Refrigerate them for up to three days. For optimal storage, you can also layer parchment paper between layers if they stack. This will help maintain their integrity when reheating.
Variations to Explore
Feel free to personalize your enchiladas by exploring different variations while keeping the core flavors intact.
Vegetarian Options
For a meatless alternative, consider replacing the chicken with black beans, refried beans, or sautéed vegetables like zucchini or spinach. These ingredients can take on the flavors of the enchilada sauce beautifully while ensuring you don’t sacrifice texture or satisfaction.
Spice Level Adjustments
The heat can be adjusted to fit your preference by selecting different types of chiles. Consider mixing in some jalapeños or adding cayenne pepper to the filling for a spicier kick. Conversely, for milder enchiladas, opt for more sour cream or cheese to balance the heat.
Nutritional Information
Understanding the nutritional aspects of your meal is helpful for planning purposes.
Caloric Breakdown
Estimating the calories per serving, based on the ingredients commonly used, these enchiladas typically contain around 400-500 calories per serving, depending on the type of cheese and additional toppings you choose to add.
Dietary Considerations
For those with dietary needs, it’s important to note that corn tortillas are gluten-free, making them suitable for individuals with gluten sensitivity. To adapt for dairy-free options, there are non-dairy cheeses and sour creams available that can easily substitute traditional ingredients.
Conclusion
The ultimate green chile chicken enchiladas offer a delightful blend of flavors, with a creamy filling and perfectly melted cheese, baked to golden perfection. The dish takes approximately 45 minutes from start to finish, making it a convenient option for busy weeknights or special gatherings. Packed with comfort and savory goodness, this recipe promises a satisfying meal that will leave everyone craving more.

Ultimate Green Chile Chicken Enchiladas Recipe
Ingredients
- 2 cups cooked shredded chicken
- 1 can green chile enchilada sauce
- 1 can diced green chiles
- 1 cup sour cream
- 2 cups shredded cheese
- 8-10 pieces corn tortillas
- ½ cup chopped fresh cilantro
- 1 teaspoon garlic powder
- 1 teaspoon onion powder
- to taste salt and pepper
Instructions
- Preheat your oven to 350°F (175°C).
- In a large mixing bowl, combine the shredded chicken, half of the enchilada sauce, diced green chiles, sour cream, half of the shredded cheese, garlic powder, onion powder, and a pinch of salt and pepper.
- Warm the corn tortillas in a skillet or microwave to make them pliable.
- Spread a thin layer of the remaining enchilada sauce on the bottom of a baking dish.
- Take one tortilla, add ¼ cup of the chicken filling, roll it up tightly, and place it seam-side down in the dish.
- Repeat with the remaining tortillas and filling.
- Pour the remaining enchilada sauce over the top and sprinkle with the remaining cheese.
- Cover with aluminum foil and bake for 20 minutes, then remove the foil and bake for an additional 10-15 minutes.
- Allow to cool for a few minutes, then garnish with cilantro before serving.