Sticky Honey-Glazed Chicken Tenders Recipe
Introduction
Sticky Honey-Glazed Chicken Tenders are an exquisite fusion of sweet and savory flavors that create an irresistible dish for any occasion. Imagine tender, juicy chicken coated in a golden, crispy exterior, enhanced by a luscious honey glaze that sticks to every morsel. This dish is perfect for family dinners, game day gatherings, or a delightful snack that’s sure to impress everyone at the table. The subtle hints of garlic, onion, and smoked paprika elevate the taste, while the optional sriracha adds a delicious kick for those who crave a bit of heat.
This recipe brings warmth and comfort with every bite, making it a beloved favorite among both children and adults. It beautifully combines the satisfying crunch of fried chicken with the sticky sweetness of honey, creating a textural delight that excites the palate. Whether served alone or accompanied by your favorite dipping sauce, these chicken tenders are bound to become a staple in your kitchen.
Recipe Overview
– Total Time: 1 hour 15 minutes
– Yield/Servings: 4 servings
– Difficulty: Not specified in the recipe.
Enjoy the crispy texture and the delightful sticky sauce that makes these tenders a satisfying meal. The frying method ensures a crunchy exterior while locking in moisture. This dish is perfect for serving with a side of veggies, rice, or your favorite dipping sauce. Each bite offers a harmony of flavors, ideal for a busy weeknight meal or a special occasion with friends and family.
Ingredients
– 1 lb chicken tenders
– 1 cup buttermilk
– 1 cup all-purpose flour
– 1 tsp garlic powder
– 1 tsp onion powder
– 1 tsp smoked paprika
– 1/2 tsp salt
– 1/2 tsp freshly ground black pepper
– 1/2 cup honey
– 1/4 cup low-sodium soy sauce
– 2 tbsp apple cider vinegar
– 2 tbsp sriracha (optional, for a spicy kick)
– Vegetable oil (for frying)
– Toasted sesame seeds (for garnish)
– Fresh cilantro leaves (for garnish)
Instructions
1. Marinate the Chicken: In a large mixing bowl, combine chicken tenders with buttermilk. Ensure all pieces are submerged. Cover the bowl with plastic wrap and refrigerate for at least 1 hour, or overnight for maximum flavor and tenderness.
2. Prepare the Coating: In another mixing bowl, whisk together the flour, garlic powder, onion powder, smoked paprika, salt, and black pepper until well blended.
3. Heat the Oil: In a spacious skillet or frying pan, pour in vegetable oil to a depth of about 1/2 inch. Heat the oil over medium-high heat until it shimmers and a drop of water sizzles upon contact.
4. Coat the Chicken: Take the marinated chicken tenders out of the buttermilk, letting any excess drip off. Dredge each tender in the flour mixture, ensuring a thorough coating by pressing gently on the flour.
5. Fry the Chicken: Carefully place the coated chicken tenders into the hot oil, frying them in batches to avoid overcrowding. Cook for approximately 5-7 minutes on each side, or until they are golden brown and fully cooked. Transfer the cooked tenders to a paper towel-lined plate to absorb excess oil.
6. Make the Sticky Sauce: In a small saucepan, combine honey, soy sauce, apple cider vinegar, and sriracha (if using). Heat over medium heat, stirring occasionally, until the mixture begins to simmer and thickens slightly, about 5 minutes.
7. Coat the Chicken: Once the chicken tenders are fried and crispy, place them in a large bowl and drizzle the sticky sauce over them. Toss gently to ensure each tender is well coated in the sweet and savory glaze.
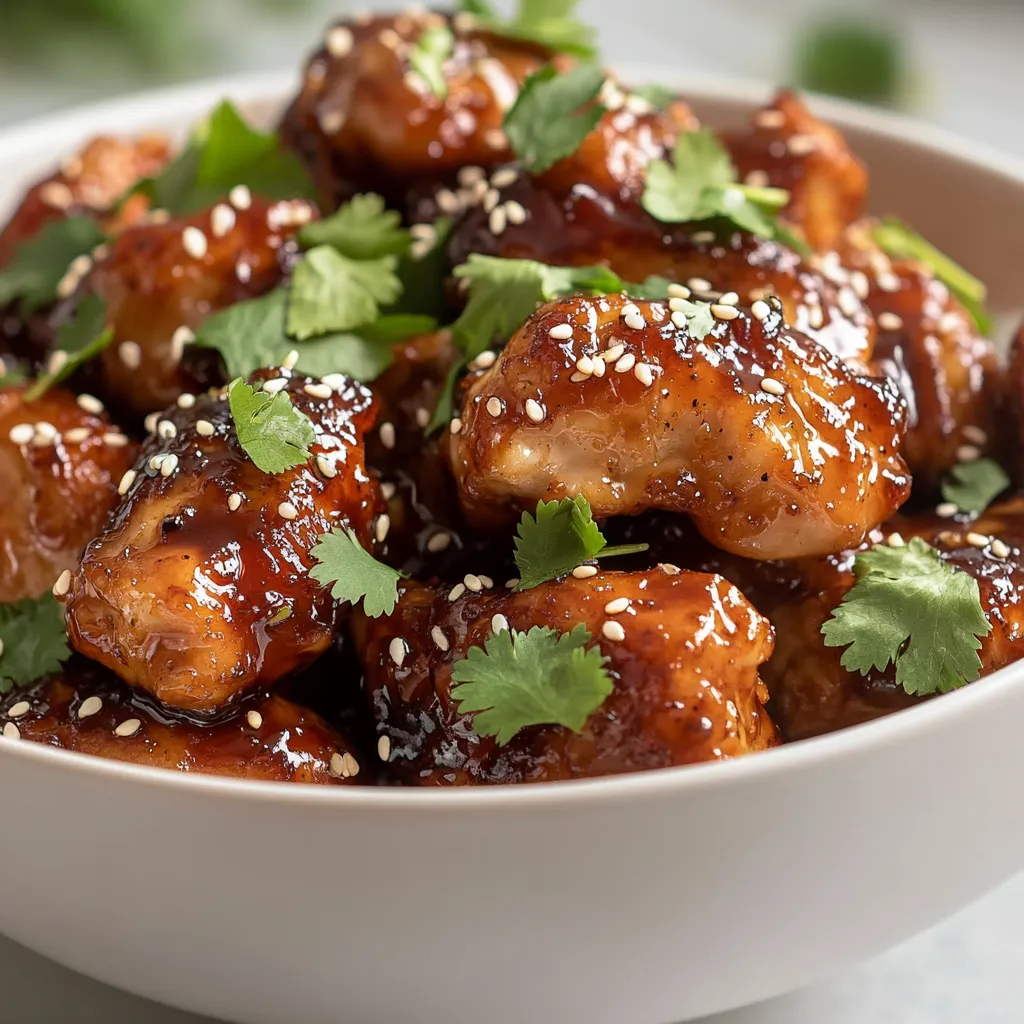
8. Serve: Arrange the sticky chicken tenders on a serving platter. Garnish generously with toasted sesame seeds and fresh cilantro leaves. Serve immediately alongside your favorite dipping sauce or sides for a delightful meal.
Marinating the Chicken
Marinating the chicken is a crucial step when preparing Sticky Honey-Glazed Chicken Tenders. Marinating initiates the flavor infusion process, allowing the buttermilk to work its magic. The chicken pieces must be immersed fully, which facilitates even texture and enhances tenderness. Recommending a minimum marinating time of at least one hour ensures the chicken absorbs the buttermilk flavors. However, letting it rest overnight is ideal, as it amplifies the dish’s flavor potential.
Choosing the Right Buttermilk
Buttermilk serves as an excellent marinade component due to its acidity, which helps tenderize the meat while keeping it juicy. If you don’t have buttermilk on hand, alternatives can be made using milk with a tablespoon of vinegar or lemon juice, allowing it to curdle for about five minutes. This substitution will impart a similar effect, making your chicken tender and flavorful.
How to Properly Submerge Chicken
For the best results, ensure every chicken tender is completely submerged in the buttermilk. Utilizing a large bowl gives ample space to avoid overlapping, ensuring an even marination process. Consider using a resealable bag if space is limited; this allows thorough mixing and ensures that each piece of chicken is enveloped in the buttermilk.
Preparing the Coating
The coating for your chicken tenders makes a significant difference in the final texture. A well-seasoned flour mixture acts as a crunchy layer, offering a delightful contrast to the juicy chicken. The key to achieving optimal flavor lies in the mixing of seasonings with the flour.
Mixing Ingredients
Combining flour with spices such as garlic powder, onion powder, smoked paprika, salt, and black pepper provides a flavor profile that enhances each bite. Whisking these ingredients not only ensures even distribution but also creates a uniform texture that maximizes the crunch of the fried chicken.
Selecting the Right Flour
Using all-purpose flour is essential for a perfectly crispy coating. This type of flour allows for the perfect balance of crunch and tenderness. When pan-frying, the starches in the flour help create a crust that adheres well and locks in the juiciness of the chicken, contributing to an excellent eating experience.
Incorporating Additional Spices
While the base of the coating is simple, feel free to experiment by incorporating other spices that align with your tastes. Paprika adds a smokiness that enriches the dish, while herbs like oregano or rosemary can contribute fragrant notes if desired. This customization approach elevates the flavor, making the dish your own.
Heating the Oil
Frying the chicken tenders requires proper technique to achieve that golden, crispy texture without compromising the internal tenderness. The choice of pan and the temperature of the oil play a vital role in this process.
Choosing the Pan
A spacious skillet or frying pan is ideal for frying chicken tenders, allowing enough space for the tenders to cook evenly. Ensure the pan has tall enough sides to accommodate the oil depth, helping to prevent splatters while you fry. A cast-iron skillet offers great heat retention and even cooking, making it a popular choice for frying.
Importance of Oil Temperature
The temperature of the oil is paramount for achieving crispy chicken. It should be hot enough to create a sizzling sound when the chicken is added, ideally aiming for a temperature between 350°F to 375°F. This level will cook the chicken properly without absorbing excess oil, yielding tenders that are crispy on the outside and juicy on the inside.
Checking Oil Temperature
To check if the oil is adequately heated, a simple method is to drop a small piece of bread into the oil. If it browns within 60 seconds, the oil is ready for frying. Alternatively, an instant-read thermometer can ensure precise readings for the perfect frying conditions.
Safety Tips for Frying
Frying can pose safety risks, especially with hot oil. It’s essential to keep a lid nearby to cover the pan in case of splatters or fires, and avoid overcrowding the frying pan, which can lower the oil temperature and lead to soggy chicken. Use a long-handled slotted spoon to gently place the chicken into the oil and keep children and pets at a safe distance from the frying area.

Detailing the coating process
Draining buttermilk
Once the chicken tenders have marinated sufficiently in the buttermilk, it is essential to drain them properly before coating. This step helps to prevent the flour from becoming too soggy, ensuring a crispier texture. To drain, simply remove the chicken tenders from the buttermilk using tongs, and allow the excess liquid to drip off back into the bowl. If you prefer, you can place the chicken on a wire rack for a few moments to ensure thorough drainage. This allows for optimal adhesion of the flour coating.
Dredging in the flour mixture
Next, prepare to dredge each chicken tender in the flour mixture. It is vital to work with one tender at a time for precise coating. Gently place the drained chicken in the flour mixture, rolling and pressing lightly to ensure every surface is covered. This interaction between the moist chicken and dry flour mixture creates the starting point for a crispy coating. Ensure that no bare spots remain, as these will not fry to a golden brown texture. After dredging, shake off any excess flour to avoid clumping when frying.
Tips for a Perfect Coat
Achieving a well-coated chicken tender hinges on a few tried-and-true techniques:
– Use a Shallow Bowl: When mixing the flour and spices, a shallow bowl allows for easier dredging and more effective coating.
– Double Dredge for Extra Crispiness: For an ultra-crispy texture, consider double dredging. After your first coat has been applied, you can dip the chicken back into the buttermilk briefly and follow up with another layer of the flour mixture.
– Keep the Work Area Organized: Set up your dredging station with the buttermilk on one side, the flour mixture in the middle, and a plate for the coated tenders on the other. This will streamline your cooking process and minimize mess.
Common Mistakes to Avoid
While coating chicken tenders may seem straightforward, several common pitfalls can lead to subpar results:
– Overcrowding: When dredging, resist the temptation to coat too many tenders at once. This can lead to uneven coating and difficulty in frying. Stick to one or two at a time if necessary.
– Skipping the Resting Period: After coating, let the chicken tenders rest for 5-10 minutes before frying. This resting period allows the coating to set and adhere better during the cooking process, enhancing crispiness.
Frying the Chicken
Cooking in Batches
When frying, patience is key. Crowding the pan with too many chicken tenders at once can reduce the oil temperature and lead to soggy, unappetizing results. Plan to fry in small batches that allow each tender enough space to float freely in the hot oil. To check readiness, carefully lower a few tenders into the oil—keeping a watchful eye on oil temperature to ensure it remains hot.
Checking Doneness
Monitoring doneness is essential in achieving perfectly cooked chicken tenders. To ensure they are cooked through, you can use a food thermometer; the internal temperature should reach 165°F (74°C) for poultry. If you do not have a thermometer, look for a golden-brown color on the exterior and clear juices when pierced with a fork.
Achieving Golden Brown Perfection
Observing the chicken tenders while frying is crucial for optimal results. As a reference, approximately 5-7 minutes on each side should yield a lovely golden-brown finish. Use a slotted spoon or tongs to gently flip the tenders halfway through cooking. If needed, adjust heat to prevent burning, aiming for an even, consistent fry.
Draining Excess Oil
Once the chicken is perfectly fried, remove them from the oil and let them drain. Place the tenders on a plate lined with paper towels or a wire rack to absorb excess oil. The use of paper towels helps maintain some crispiness, while a wire rack allows air circulation around the tenders, preventing sogginess.
Making the Sticky Sauce
Combining Ingredients
For the sticky sauce, begin by gathering the honey, low-sodium soy sauce, apple cider vinegar, and sriracha (if using). In a small saucepan over medium heat, combine these ingredients. Stir consistently to ensure that the honey fully dissolves and merges with the other components, developing an even consistency.
Cooking the Sauce
As the mixture heats, it will start to bubble and thicken. Continue to stir occasionally and allow the sauce to simmer for about 5 minutes. Monitoring closely will prevent burning. The goal is to achieve a smooth, slightly sticky consistency without becoming too thick, as this could make coating the chicken difficult.
Temperature Control
The heat you apply during sauce preparation is critical. Too high of a temperature can scorched the honey and compromise flavor. Conversely, if the heat is too low, the sauce will take too long to reduce properly. A medium heat setting is usually optimal for maintaining control over the sauce’s consistency and flavor balance.
Adjusting Flavor Profiles
If you wish to tweak the flavor of the sauce, consider these adjustments:
– Sweetness: For a sweeter profile, add more honey. In contrast, if you prefer a tangier note, increasing the apple cider vinegar will enhance acidity.
– Heat: To amp up the spice level, you can include additional sriracha or incorporate a pinch of red pepper flakes.
Coating the Chicken with Sauce
Proper Tossing Techniques
Once the chicken has finished frying, transfer the hot tenders to a mixing bowl. Drizzle the warm sticky sauce over the chicken, and employ a spoon or spatula to toss gently but thoroughly. This technique ensures each tender gets an even coating without falling apart.
Ensuring Even Distribution
Aim for a gentle tossing motion, allowing the stickiness of the sauce to adhere properly to every surface. If you find the coating uneven, don’t hesitate to add more sauce to the bowl. A thorough coating is paramount for the best flavor in every bite.
Serving Ideas
With the sticky chicken now beautifully glazed, consider how to present them. A simple platter or wooden board enhances the dish aesthetically.
Accompaniments: Choose complementary sides and sauces. A cool, creamy ranch dip or tangy barbecue sauce can balance the sweetness of the chicken.
Plating Tips
Create an inviting presentation by arranging the chicken tenders casually but appealingly. The garnishing of toasted sesame seeds and cilantro not only adds visual appeal but also additional flavor layers.
Garnishing for Appeal
Tooften the presentation, sprinkle generous amounts of toasted sesame seeds over the tenders just before serving. These crunchy elements, combined with the vibrant colors of the cilantro, elevate the dish’s overall appeal.
Pairing with Sides
Consider pairing your chicken tenders with a side of lightly seasoned roasted vegetables, a fresh green salad, or crispy coleslaw. These combinations provide a balance of textures and flavors, making for a well-rounded meal.
Optional Presentation Tips
Creative ideas for serving the dish elegantly
Wooden Board with Parchment
Using a wooden board lined with parchment paper not only adds a rustic charm but facilitates easy cleanup as well.
Adorning with Lime Wedges
Adding lime wedges can provide a brilliant pop of color, alongside potential tangy flavor enhancement, making it visually striking.
Creating a Relaxed Dining Atmosphere
Presentation can play an integral role in enhancing one’s dining experience. A beautifully arranged dish can stimulate the appetite and set a relaxed, inviting tone for mealtime.
Optional Dipping Sauce Ideas
Serving with extra sauces such as apple cider vinaigrette, honey mustard, or a spicy aioli can enhance the flavor experience.
Conclusion
The Sticky Honey-Glazed Chicken Tenders marry sweet and savory flavors, boasting a delightful crunch on the outside while remaining juicy within. With a preparation time that is both efficient and rewarding, this dish is suitable for any gathering or mealtime. Each bite offers a balance of textures and tastes, sure to satisfy any palate.
Sticky Honey-Glazed Chicken Tenders Recipe
Ingredients
- 1 lb chicken tenders
- 1 cup buttermilk
- 1 cup all-purpose flour
- 1 tsp garlic powder
- 1 tsp onion powder
- 1 tsp smoked paprika
- ½ tsp salt
- ½ tsp freshly ground black pepper
- ½ cup honey
- ¼ cup low-sodium soy sauce
- 2 tbsp apple cider vinegar
- 2 tbsp sriracha
- Vegetable oil
- Toasted sesame seeds
- Fresh cilantro leaves
Instructions
- Marinate the chicken in buttermilk for at least 1 hour.
- Whisk together flour, garlic powder, onion powder, smoked paprika, salt, and black pepper.
- Heat vegetable oil in a skillet to ½ inch depth over medium-high heat.
- Dredge marinated chicken in the flour mixture.
- Fry chicken tenders for 5-7 minutes on each side until golden brown.
- Combine honey, soy sauce, apple cider vinegar, and sriracha in a saucepan and heat until simmering.
- Drizzle the sticky sauce over the fried chicken tenders and toss to coat.
- Garnish with toasted sesame seeds and fresh cilantro before serving.